How To Install a Kohler Bathtub Drain
Installing a Kohler bathtub drain requires careful planning and execution. This article provides a comprehensive guide to assist individuals with the process, emphasizing the necessary steps and considerations for a successful installation. Proper installation is crucial for preventing leaks and ensuring the long-term functionality of the bathtub.
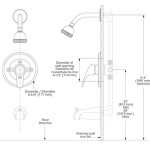
Before commencing the installation, gathering the necessary tools and materials is essential. A Kohler bathtub drain kit, pipe wrench, channel-lock pliers, plumber's putty, Teflon tape, a screwdriver (both flathead and Phillips head), a hacksaw or pipe cutter, and safety glasses are typically required. Checking the specific requirements outlined in the Kohler drain kit instructions is always recommended.
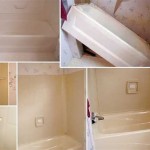
It is also advisable to prepare the workspace. This involves removing any existing drain components and thoroughly cleaning the drain opening. Any debris or old putty can interfere with the new drain’s seal and should be removed. Adequate lighting and ventilation are important for a safe and efficient working environment.
Key Point 1: Removing the Old Bathtub Drain
The initial step involves removing the existing bathtub drain. The method for removal will vary depending on the type of drain installed. Common types include pop-up drains, lift-and-turn drains, and toe-tap drains. The first step is to drain the remaining water from the tub. Use a bucket to collect this water efficiently.
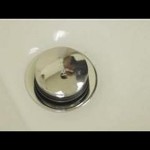
For a pop-up drain, typically, the stopper can be unscrewed or lifted out. Locate the linkage connecting the stopper to the drain assembly beneath the tub. This linkage usually consists of a rocker arm or pivot rod. Disconnect the linkage by loosening any screws or clips securing it. Once disconnected, the drain flange (the visible portion of the drain inside the tub) can be unscrewed. A drain wrench, also known as a dumbell wrench, is generally required for this. Insert the wrench into the drain opening and turn counterclockwise to loosen and remove the flange. In some instances, the flange may be stuck due to corrosion or old putty. Using penetrating oil can help loosen it.
Lift-and-turn drains also require the removal of the stopper. This usually involves unscrewing the stopper, which then reveals a screw underneath. Remove this screw to detach the stopper mechanism. Then, proceed to remove the drain flange with a drain wrench, similar to the pop-up drain removal process.
Toe-tap drains involve pressing the stopper to either open or close the drain. Removing this type of drain typically involves unscrewing the stopper, which may require a special tool or pliers. Once the stopper is removed, the drain flange can be unscrewed using a drain wrench. Again, penetrating oil can be beneficial if encountering resistance.
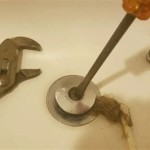
After removing the drain flange, the drain shoe (the part of the drain assembly located beneath the tub) must be disconnected from the drain pipe. This typically involves loosening the slip nuts connecting the drain shoe to the overflow pipe and the drain pipe. Use a pipe wrench or channel-lock pliers to loosen these nuts. Be prepared for water to spill out, so keep a bucket handy.
With the slip nuts loosened, carefully separate the drain shoe from the overflow pipe and the drain pipe. Once disconnected, the old drain assembly can be completely removed. Thoroughly clean the drain opening in the tub and the surrounding area to remove any remaining putty or debris. This step is crucial for ensuring a proper seal with the new drain assembly.
Key Point 2: Assembling and Installing the New Kohler Drain
The next phase involves assembling and installing the new Kohler bathtub drain. Begin by applying a generous amount of plumber's putty to the underside of the new drain flange. Roll the putty into a rope-like shape and then firmly press it onto the flange's lip. Ensure even coverage to create a watertight seal.
Insert the drain flange into the drain opening from inside the tub. Press down firmly to ensure the plumber's putty makes solid contact with the tub surface. Excess putty will squeeze out, which can be removed later with a putty knife or your finger.
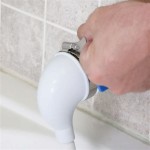
From beneath the tub, slide the rubber or plastic washer and then the cardboard or metal washer onto the drain tailpiece (the threaded part of the drain flange that extends below the tub). Thread the drain shoe onto the tailpiece, tightening it by hand initially. Then, using a pipe wrench, further tighten the drain shoe until it is snug and secure. Avoid over-tightening, which could damage the threads or the tub.
Attach the overflow pipe to the overflow elbow located on the tub's side. Apply Teflon tape to the threads of the overflow pipe before connecting it to the overflow elbow. This will help prevent leaks. Tighten the connection using a pipe wrench or channel-lock pliers. Ensure the overflow pipe is properly aligned with the drain shoe.
Connect the drain shoe to the drain pipe. Use a slip nut and washer to secure the connection. Again, apply Teflon tape to the threads of the drain pipe before connecting it to the drain shoe. Tighten the slip nut by hand initially, and then use a pipe wrench to further tighten it until snug. Avoid over-tightening.
If installing a pop-up drain, connect the linkage according to the manufacturer's instructions. This typically involves attaching the rocker arm or pivot rod to the drain assembly and adjusting the stopper height. Ensure the stopper operates smoothly and seals properly when closed.
Key Point 3: Testing and Final Adjustments
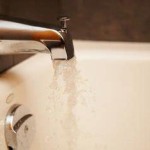
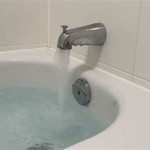
After completing the installation, testing for leaks is crucial. Plug the drain and fill the tub with a few inches of water. Inspect all connections beneath the tub, including the drain shoe, overflow pipe, and drain pipe, for any signs of leaks.
If leaks are detected, tighten the connections further. If the leak persists, disassemble the connection, reapply Teflon tape or plumber's putty, and reassemble. In some cases, replacing a washer or slip nut may be necessary. Continuous leakage could also indicate a poorly threaded pipe or a damaged drain component, requiring replacement of the faulty part.
Once the leak test is successful, remove the plug and allow the water to drain. Check for leaks again during the draining process. This ensures the drain functions properly when water is flowing through it.
Clean up any excess plumber's putty around the drain flange. Use a putty knife or your finger to remove the excess and smooth the seam between the flange and the tub surface. This will improve the appearance and prevent the buildup of dirt and grime.
Proper alignment of the overflow plate is important. Ensure the overflow plate is securely attached to the overflow elbow and that it is flush against the tub surface. This prevents water from leaking into the wall cavity through the overflow opening.
Finally, double-check all connections to ensure they are tight and secure. A loose connection can lead to leaks over time. Regular inspection of the drain assembly is recommended to identify and address any potential issues early on.
Adhering to these steps and paying close attention to detail will increase the likelihood of a successful Kohler bathtub drain installation, reducing the possibility of future plumbing problems.

Kohler Bathtub Installation Part 1 Drain Kit Install Mariposa Purist Acrylic Fiberglass Tub Unboxing

Installation And Overview Pureflo Cable Bath Drain

How To Disassemble And Replace Your Kohler Bathtub Drain When It Stops Working Part 1068204

How To Install A Kohler Pop Up Er Drain Get Rid Of The Old Step By

How To Install A Bathtub Acrylic Kohler Archer Step By

Kohler Standard Er Drain With Overflow In Vibrant Brushed Nickel K Rh1274364 Bn The Home Depot

How To Replace A Bathtub Drain

Cable Type Drain Close And Overflow For Bath Tub

7 Bathtub Plumbing Installation Drain Diagrams

How To Replace Bathtub Drain Stopper With A Lift And Turn Diy