How To Caulk Around A Bathtub Faucet
Caulking around a bathtub faucet is a crucial maintenance task for any homeowner. It prevents water damage, mold growth, and ensures the longevity of the surrounding surfaces. Proper caulking creates a watertight seal, directing water into the drain instead of seeping behind the faucet escutcheon and into the wall cavity. This article provides a detailed guide on how to caulk around a bathtub faucet effectively.
The importance of a sound caulk joint cannot be overstated. Water intrusion can lead to structural damage, requiring costly repairs. Mold growth, often unseen, presents health hazards. A clean, well-maintained caulk line also enhances the aesthetic appearance of the bathtub area, contributing to a more pleasant and hygienic bathing environment.
The process of caulking around a bathtub faucet involves several steps, from preparation to application and finishing. Each stage requires meticulous attention to detail to ensure a durable and visually appealing result. The success of the project depends on choosing the right materials, tools, and employing the correct techniques. This article will delve into each of these aspects to provide a comprehensive understanding of the process.
Key Point 1: Preparation is Paramount
Proper preparation is the foundation of a successful caulking job. Neglecting this step can lead to premature failure of the caulk, requiring repeat applications and potentially causing further damage. The preparation process includes removing the old caulk, cleaning the surfaces, and ensuring they are dry.
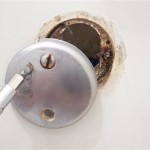
The first step is to remove the existing caulk. Over time, caulk can become brittle, cracked, and discolored. It might also harbor mold and mildew. A caulk removal tool, such as a specialized scraper or a utility knife with a stiff blade, is essential. Carefully run the tool along the edges of the old caulk to break the bond with the surrounding surfaces. Be cautious not to scratch the bathtub, tile, or faucet escutcheon. For stubborn areas, a caulk softening solution can be applied to make the removal process easier.
Once the old caulk is removed, thorough cleaning is essential. Use a scrub brush and a cleaning solution designed to remove soap scum, mildew, and other residue. Any remaining debris can prevent the new caulk from adhering properly. An anti-mildew solution should be used to kill any residual mold spores that may be present. Rinse the area thoroughly with clean water to remove any traces of the cleaning solution. Allow the area to dry completely before proceeding to the next step.
Drying the surfaces is critical. Moisture trapped beneath the caulk can lead to mold growth and adhesion problems. Use a clean, dry cloth to wipe away any excess water. A hair dryer can be used on a low setting to expedite the drying process. Ensure that the surfaces are completely dry to the touch before applying the new caulk. A small amount of rubbing alcohol can be used to further ensure complete drying and to remove any lingering residue.
Key Point 2: Selecting the Right Caulk and Tools
Choosing the appropriate caulk and tools is essential for achieving a professional-looking and long-lasting result. Different types of caulk are available, each with its own properties and intended uses. Selecting the right one for the specific application is critical.
For bathtub applications, silicone or latex-based caulk is typically recommended. Silicone caulk is known for its excellent water resistance and flexibility. It forms a durable, watertight seal that can withstand temperature fluctuations and movement. Latex-based caulk is easier to apply and clean up, but it may not be as water-resistant as silicone. Mold-resistant caulk should be selected to prevent mold and mildew growth, especially in damp environments like bathrooms. Read the product label carefully to understand the caulk's properties and suitability for the task.
A high-quality caulking gun is essential for applying the caulk evenly and precisely. A smooth-rod caulking gun provides more control over the caulk flow than a ratchet-style gun. Choose a gun with a comfortable grip and a responsive trigger. A nozzle cutter or utility knife will be needed to cut the caulk tube nozzle at the correct angle. The angle of the cut determines the width of the caulk bead.
Other useful tools include a caulk smoothing tool, such as a profile tool or a wet finger. A roll of painter's tape is helpful for creating clean, straight lines. A bucket of water and a sponge are needed for cleaning up excess caulk and smoothing the bead. Wear disposable gloves to protect your hands from the caulk.
When selecting a caulk smoothing tool, consider the desired profile of the caulk bead. Some tools create a concave bead, while others create a convex or flat bead. Experiment with different tools to find the one that provides the most aesthetically pleasing and functional result. A wet finger, while less precise, can be effective for creating a smooth, slightly concave bead. Ensure the finger is clean and dipped in water before smoothing the caulk.
Key Point 3: Applying and Finishing the Caulk
Proper application and finishing techniques are essential for creating a professional-looking and durable caulk joint. The application process involves loading the caulk gun, cutting the nozzle, applying the caulk bead, and smoothing the surface. The finishing process focuses on cleaning up excess caulk and ensuring a clean, even appearance.
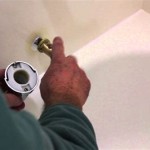
To load the caulk gun, pull back the plunger and insert the caulk tube into the gun. Cut the nozzle of the caulk tube at a 45-degree angle, using a utility knife or nozzle cutter. The size of the opening should be slightly smaller than the desired width of the caulk bead. Puncture the seal inside the caulk tube with a long nail or wire to allow the caulk to flow freely.
Apply painter's tape along the edges of the surfaces to be caulked, creating a clean boundary for the caulk bead. This will help to prevent the caulk from smearing onto the surrounding surfaces. Apply the caulk in a smooth, continuous bead along the joint, maintaining a consistent pressure on the caulk gun trigger. Avoid gaps or overlaps in the caulk bead. If necessary, apply a second bead to fill in any gaps or imperfections.
Immediately after applying the caulk, smooth the bead with a caulk smoothing tool or a wet finger. Apply gentle pressure and move the tool along the bead in a smooth, continuous motion. Remove any excess caulk with a damp sponge. If using a wet finger, dip your finger in water before smoothing the caulk to prevent it from sticking to your skin. The goal is to create a smooth, even, and slightly concave caulk bead.
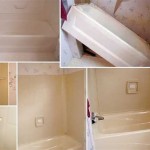
Once the caulk has been smoothed, remove the painter's tape carefully, pulling it away from the caulk at a 45-degree angle. This will create a clean, sharp edge along the caulk joint. If any caulk remains on the surrounding surfaces, wipe it away with a damp sponge. Allow the caulk to cure completely according to the manufacturer's instructions before using the bathtub. Curing times vary depending on the type of caulk used.
After the caulk has cured, inspect the joint for any imperfections. If necessary, apply a small amount of additional caulk to fill in any gaps or cracks. Clean the area thoroughly with a mild detergent and water. Regular cleaning will help to prevent mold and mildew growth and maintain the appearance of the caulk joint.
In conclusion, proper preparation, material selection, and application techniques are essential for successful caulking. Taking the time to complete each step carefully will result in a durable, watertight seal that protects the bathtub area from water damage and mold growth. While this guide provides a thorough overview, always consult the manufacturer's instructions for specific caulk products, and seek professional assistance if unsure about any aspect of the process.

How To Seal Tub Spout And Valve Trim With Silicone Caulking The Fixer Clips

How To Apply Caulk Around A Tub Spout Bathroomaccessories Plumbingissues Howto Diy
:max_bytes(150000):strip_icc()/wipe_dap-56a73ba03df78cf77293815a.jpg?strip=all "How To Caulk Shower And Bathtub Trim")
How To Caulk Shower And Bathtub Trim

How To Caulk A Bathtub 13 Steps With Pictures Wikihow

Resealing Shower Fixtures With Quality Caulk

Great Way To Caulk Tub Valve Handle And Cover

How To Caulk A Bathtub 13 Steps With Pictures Wikihow

How To Install A Tub Spout The Home Depot

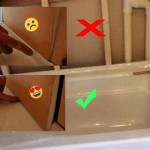
Don T Caulk Here

Stop Water Damage Re Caulk Your Tub Today 1 Tom Plumber