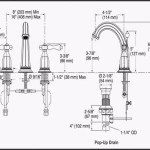
How To Remove a Pop-Up Bathtub Drain Plug Stopper
Bathtub drain stoppers, particularly the pop-up variety, are designed to create a watertight seal, preventing water from escaping while bathing. Over time, these stoppers can become clogged with hair, soap scum, and other debris. This buildup can impede their proper function, causing slow drainage or complete obstruction. In other cases, the stopper mechanism itself may malfunction, requiring removal for repair or replacement. Removing a pop-up bathtub drain stopper can seem daunting, but with the right tools and techniques, it is a manageable task for most homeowners. This article provides a comprehensive guide to safely and effectively removing various types of pop-up bathtub drain stoppers.
Before initiating any repair or removal process, it is crucial to identify the specific type of pop-up drain stopper present in the bathtub. Different designs necessitate different approaches, and attempting to force a removal process based on incorrect assumptions can cause damage to the drain assembly or the bathtub itself. The most common types of pop-up drain stoppers include those operated by a trip lever, those with a push-button mechanism, and those with a lift-and-turn design. Each of these designs features a unique method of attachment and release.
Safety is paramount when working with plumbing fixtures. Before commencing any work on the bathtub drain, it is essential to turn off the water supply to the bathroom. This will prevent any accidental flooding or water damage. Additionally, it is recommended to wear appropriate personal protective equipment, such as gloves, to protect the hands from bacteria and sharp edges. Adequate lighting is also crucial for ensuring clear visibility and preventing accidents.
Identifying the Type of Pop-Up Drain Stopper
The first step in removing a pop-up drain stopper is accurately identifying its type. This identification will dictate the appropriate removal method. Three primary types are commonly encountered: trip-lever drains, push-button drains, and lift-and-turn drains.
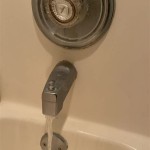
Trip-Lever Drains: These drains are controlled by a lever usually located on the overflow plate beneath the bathtub faucet. When the lever is moved, it actuates a linkage system that raises or lowers the drain stopper. The stopper itself is typically connected to a vertical rod that extends down through the drainpipe. Recognizing this type is important as the removal process involves manipulating this linkage.
Push-Button Drains: As the name suggests, push-button drains operate via a button located directly on the drain stopper. Pressing the button once seals the drain, and pressing it again releases it. These stoppers often have a more streamlined design and are often held in place by a spring-loaded mechanism or a simple threaded connection.
Lift-and-Turn Drains: Lift-and-turn drains feature a stopper that can be lifted and turned to either seal or unseal the drain. These stoppers are usually secured by a screw located on top of the stopper itself. Loosening this screw allows the stopper to be removed.
Once the type of drain stopper has been identified, the appropriate removal procedure can be selected. Attempting to remove a stopper using the wrong technique can result in damage to the stopper, the drain, or even the bathtub itself. Therefore, careful observation and accurate identification are crucial.
Removing a Trip-Lever Pop-Up Drain Stopper
Removing a trip-lever drain stopper typically involves accessing the linkage mechanism located behind the overflow plate. This plate is usually held in place by one or two screws. Once the plate is removed, the linkage and the attached stopper rod can be accessed.
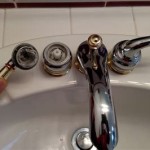
Step 1: Removing the Overflow Plate: Begin by unscrewing the overflow plate located beneath the bathtub faucet. These screws are typically visible and easily accessible. It's advisable to keep these screws in a safe place, as they will be needed to reattach the plate later.
Step 2: Accessing the Linkage: Once the overflow plate is removed, carefully pull out the linkage assembly. This assembly consists of a vertical rod connected to the trip lever and the drain stopper. Be prepared for some water to drain out as the linkage is removed.
Step 3: Disconnecting the Stopper: The stopper is usually connected to the rod via a series of holes or a pivoting arm. Carefully disconnect the stopper from the rod. In some cases, the stopper may be heavily coated with debris, making it difficult to disconnect. Gentle manipulation and cleaning may be necessary.
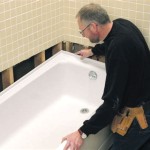
Step 4: Removing the Stopper: Once disconnected, the stopper can be carefully pulled out of the drain. If the stopper is stuck, avoid forcing it, as this could damage the drainpipe. Instead, try gently twisting and pulling the stopper while applying a small amount of penetrating oil to loosen any buildup.
Addressing Stubborn Stoppers: In situations where the stopper is particularly stubborn, a specialized tool called a drain auger or a plumber's snake can be used to break up the debris and free the stopper. Insert the auger into the drain opening and rotate it to dislodge any obstructions. Once the obstruction is cleared, the stopper should be easier to remove.
Removing a Push-Button or Lift-and-Turn Pop-Up Drain Stopper
Removing push-button and lift-and-turn drain stoppers is often a simpler process than removing trip-lever stoppers. These stoppers typically feature a more direct removal method, often involving unscrewing or simply lifting the stopper out of the drain.
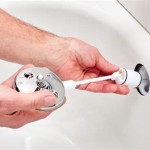
Push-Button Stopper Removal: Push-button stoppers often have a mechanism that allows them to be unscrewed from the drain assembly. Inspect the stopper for a small screw or indentation. Some stoppers may require a small flathead screwdriver or a hex key to loosen the retaining mechanism.
Step 1: Identify the Retaining Mechanism: Carefully examine the stopper for any visible screws or access points. Some stoppers have a small set screw located on the side of the button. Others may require the entire button assembly to be rotated to unlock the stopper.
Step 2: Loosening the Stopper: Use the appropriate tool to loosen the retaining mechanism. If a set screw is present, carefully loosen it. If the stopper requires rotation, gently turn the button assembly until it unlocks.
Step 3: Removing the Stopper: Once the retaining mechanism is released, the stopper should be able to be lifted out of the drain. If the stopper is stuck, gently twist and pull it while applying a small amount of penetrating oil.
Lift-and-Turn Stopper Removal: Lift-and-turn stoppers are usually secured by a screw located on top of the stopper. This screw is typically visible and easily accessible. Loosening this screw allows the stopper to be removed.
Step 1: Locate the Retaining Screw: The screw is typically located directly on top of the stopper, often concealed beneath a decorative cap. Remove the cap, if present, to expose the screw.
Step 2: Loosening the Screw: Use a screwdriver to loosen the screw. It's important not to remove the screw completely, as it can be difficult to retrieve if it falls into the drain.
Step 3: Removing the Stopper: Once the screw is loosened, the stopper should be able to be lifted out of the drain. As with push-button stoppers, gently twist and pull the stopper if it is stuck.
General Tips for Stubborn Stoppers: Regardless of the type of stopper, if removal proves difficult, the following tips can be helpful:
* Apply Penetrating Oil: A small amount of penetrating oil can help to loosen the debris and corrosion that may be holding the stopper in place. Allow the oil to soak for several minutes before attempting to remove the stopper. * Use a Drain Auger: A drain auger can be used to break up any obstructions that are preventing the stopper from being removed. * Gently Wiggle and Rotate: Gently wiggling and rotating the stopper while pulling can help to break the seal and dislodge it from the drainpipe. * Avoid Excessive Force: Avoid using excessive force, as this could damage the drain assembly or the bathtub itself.After successfully removing the pop-up bathtub drain plug stopper, it is essential to thoroughly clean the drain opening and the stopper itself. This will help to prevent future clogs and ensure proper drainage. Use a brush or cloth to remove any remaining debris from the drain opening. If necessary, flush the drain with hot water to remove any remaining soap scum or hair. Similarly, clean the stopper thoroughly, removing any accumulated debris. Check the stopper for signs of wear or damage, and replace it if necessary.

Remove Pop Up Bath Tub Drain Stopper 3 Ways

How To Remove Pop Up Tub Stopper Easy Method

Bathroom Repair How To A Pop Up Tub Drain Stopper

So Easy How To Remove A Watco Pop Up Drain Plug

How To Remove Bathtub Drain Stopper

How To Remove A Bathtub Drain The Home Depot

How To Remove Bathtub Drain Stopper That Spins Freely

How To Remove Bathtub Drain Stopper

How To Remove A Bathtub Drain Stopper

How To Remove A Bathtub Drain Stopper
Related Posts