Fixing a Leaking Delta Bathtub Faucet: A Comprehensive Guide
A dripping bathtub faucet is more than just an annoyance; it is a source of wasted water, which translates directly into higher water bills. Over time, even a slow drip can add up to significant water loss. Furthermore, a persistent leak can lead to staining in the tub or shower and may even contribute to mold and mildew growth. Addressing a leaking Delta bathtub faucet promptly is essential for both economic and sanitary reasons. This article provides a detailed, step-by-step guide on how to diagnose and fix a leaking Delta bathtub faucet, covering common causes and offering practical solutions.
The process of repairing a leaking faucet usually involves identifying the type of faucet, determining the cause of the leak, gathering the necessary tools and replacement parts, and then executing the repair. Delta faucets are known for their durability and relatively straightforward design, making them a popular choice in many homes. While some repairs might seem daunting, most can be accomplished by a homeowner with basic plumbing knowledge and the right tools.
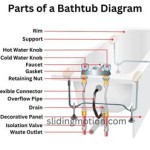
Identifying the Type of Delta Faucet
Before attempting any repairs, understanding the type of Delta faucet is crucial. Delta offers several different faucet designs, each with its own internal components and repair procedures. The most common types include:
Ball-Type Faucets: These faucets typically have a single handle controlling both temperature and water flow. A ball-type faucet uses a slotted metal or plastic ball with openings that control the mixing of hot and cold water. Leaks in ball-type faucets are often caused by worn-out O-rings, springs, or the ball itself.
Cartridge-Type Faucets: Cartridge faucets also feature a single handle for both temperature and flow. However, instead of a ball, they use a cartridge. The cartridge slides up and down and rotates to control water temperature and flow. Leaks in cartridge faucets are usually the result of a worn or damaged cartridge.
Two-Handle Faucets: These faucets have separate handles for hot and cold water. They can be either compression faucets or ceramic disc faucets. Compression faucets use rubber washers and a stem that is compressed to stop the water flow. Ceramic disc faucets use two ceramic discs that slide against each other to control the water flow. Leaks in compression faucets are often caused by worn washers, while leaks in ceramic disc faucets could be due to damaged discs or O-rings.
Identifying the faucet type will help determine the correct replacement parts and the specific steps required for the repair. Look closely at the handles and the way they control water flow and temperature to determine the type of faucet you have.
Gathering Tools and Replacement Parts
Once the type of faucet is identified, assembling the necessary tools and replacement parts is the next step. Having everything on hand before starting the repair will save time and prevent frustration. The following is a list of commonly needed tools and parts:
Tools:
- Adjustable wrench
- Screwdrivers (Phillips and flathead)
- Allen wrench set
- Pliers
- Basin wrench (for removing the faucet spout if necessary)
- Penetrating oil (to loosen stubborn parts)
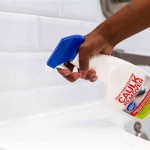
- Plumber’s grease (silicone-based)
- Clean cloths or rags
- Small container to hold small parts
Replacement Parts:
- Delta faucet repair kit specific to your faucet type (O-rings, washers, springs, cartridges, balls, etc.)
- Valve seats (if applicable)
- Spout O-ring (if the leak is from the base of the spout)
- Stem extensions (if applicable)
The most efficient way to obtain the correct replacement parts is to take the old parts to a local hardware store or plumbing supply store. The staff can usually identify the part and provide the exact replacement. Another option is to contact Delta directly or visit their website. They often have detailed diagrams and parts lists for their faucets. Be sure to note the model number of the faucet when ordering parts.
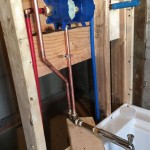
Before starting the repair, shut off the water supply to the bathtub. Typically, there are shut-off valves located under the sink or behind an access panel near the bathtub. If individual shut-off valves are not available, the main water supply to the house will need to be turned off. After shutting off the water, turn on the faucet to relieve any remaining pressure in the lines.
Step-by-Step Repair Procedures for Common Delta Faucets
The following sections outline the repair steps for the most common types of Delta bathtub faucets. Always refer to the manufacturer's documentation for specific instructions related to your particular model.
Repairing a Delta Ball-Type Faucet:
1. Shut Off the Water: Turn off the hot and cold water supply to the faucet.
2. Remove the Handle: Loosen the set screw on the handle with an Allen wrench and remove the handle.
3. Loosen the Cap: The cap, which holds the internal components, needs to be loosened. Use an adjustable wrench to carefully loosen the cap, turning it counterclockwise.
4. Remove the Ball and Cam Assembly: After removing the cap, you will see the ball and cam assembly. Carefully lift out the ball and inspect it for any damage or wear. Then, remove the cam assembly.
5. Replace the O-rings and Springs: Use a small screwdriver or pick to remove the old O-rings and springs located in the faucet body. Clean the area thoroughly. Install the new O-rings and springs from the repair kit, applying a small amount of plumber’s grease to the O-rings. Ensure the springs are properly seated in their slots.
6. Reassemble the Faucet: Place the cam assembly back into the faucet body. Next, position the new ball into the faucet. Reinstall the cap and tighten it with the adjustable wrench, being careful not to overtighten. Replace the handle and tighten the set screw.
7. Turn On the Water: Turn on the water supply slowly and check for leaks. If leaks persist, double-check that all O-rings and springs are properly installed and seated.
Repairing a Delta Cartridge-Type Faucet:
1. Shut Off the Water: Turn off the hot and cold water supply to the faucet.
2. Remove the Handle: Depending on the model, the handle may be held in place by a set screw or a decorative cap. Remove the set screw or pop off the cap to access the screw that secures the handle. Remove the handle.
3. Remove the Retaining Clip: Once the handle is removed, you will see a retaining clip that holds the cartridge in place. Use pliers or a screwdriver to carefully remove the retaining clip.
4. Remove the Cartridge: The cartridge may be difficult to remove if it is old or corroded. Use pliers to gently wiggle and pull the cartridge out of the faucet body. If necessary, use a cartridge puller tool. Note the position of the cartridge before removing it, as the new cartridge will need to be installed in the same orientation.
5. Install the New Cartridge: Lubricate the new cartridge with plumber’s grease. Align the cartridge with the faucet body in the correct orientation (matching the old cartridge’s position). Push the cartridge firmly into place until it is fully seated.
6. Reinstall the Retaining Clip: Reinstall the retaining clip to secure the cartridge in place.
7. Reassemble the Faucet: Replace the handle and tighten the screw or replace the decorative cap. Ensure the handle operates smoothly.
8. Turn On the Water: Turn on the water supply slowly and check for leaks. If leaks persist, ensure the cartridge is fully seated and the retaining clip is properly installed.
Repairing a Delta Two-Handle Faucet (Compression Type):
1. Shut Off the Water: Turn off the hot and cold water supply to the faucet.
2. Remove the Handles: Remove the decorative caps on the handles to access the screws. Loosen the screws and remove the handles.
3. Remove the Stem: Use a wrench to loosen and remove the stem assembly from the faucet body. Turn the stem counterclockwise.
4. Replace the Washer: At the end of the stem, you will find a rubber washer. Remove the old washer and replace it with a new washer from the repair kit. Secure the new washer with the screw.
5. Replace the Valve Seat (Optional): If the valve seat is worn or damaged, it can also contribute to leaks. Use a valve seat wrench to remove the old valve seat and install a new one. Apply plumber’s grease to the threads of the new valve seat.
6. Reassemble the Faucet: Reinstall the stem assembly into the faucet body and tighten it with the wrench. Replace the handles and tighten the screws. Replace the decorative caps.
7. Turn On the Water: Turn on the water supply slowly and check for leaks. If leaks persist, ensure the washer is properly installed and the stem is tightened sufficiently.
Repairing a Delta Two-Handle Faucet (Ceramic Disc Type):
1. Shut Off the Water: Turn off the hot and cold water supply to the faucet.
2. Remove the Handles: Remove the decorative caps on the handles to access the screws. Loosen the screws and remove the handles.
3. Remove the Cartridge Assembly: Depending on the model, there may be a retaining nut or clip holding the cartridge assembly in place. Remove the nut or clip and carefully lift out the cartridge assembly.
4. Inspect and Clean the Ceramic Discs: Examine the ceramic discs for any damage or debris. Clean the discs with a soft cloth. If the discs are damaged, they will need to be replaced.
5. Replace O-rings: The cartridge assembly will likely have O-rings that may be the source of the leak. Replace these O-rings with new ones from the repair kit. Apply plumber’s grease to the new O-rings.
6. Reassemble the Faucet: Reinstall the cartridge assembly into the faucet body, ensuring it is properly seated. Replace the retaining nut or clip. Replace the handles and tighten the screws. Replace the decorative caps.
7. Turn On the Water: Turn on the water supply slowly and check for leaks. If leaks persist, ensure the cartridge assembly is properly seated and the retaining nut or clip is securely fastened.
Following these steps should resolve most common Delta bathtub faucet leaks. Remember to always consult the manufacturer's instructions for your specific model and exercise caution when working with plumbing fixtures. If unsure about any step, consult a qualified plumber.

How To Replace A Delta Cartridge And Fix Leaky Bathtub Faucet It Tutorials

I Fixed A Leak In The Delta Tub Shower Single Handle Faucet

How To Fix A Leaking Dripping Delta Bathtub Faucet 2

How To Repair A Delta Tub Shower Valve

Fix A Leaky Delta Single Handle Shower Faucet For Under 2

How To Fix A Leaky Bathtub Faucet Delta Shower Cartridge L Replace

Leaks Service Parts Faq Delta Faucet

How To Repair Leaking Dripping Delta Faucet Diyplumbing Serviceplumbing Tappplumbing

Simple Ways To Fix A Leaky Delta Bathroom Sink Faucet

How To Fix A Leaking Bathtub Faucet The Home Depot