Replacing an American Standard Bathtub Faucet: A Step-by-Step Guide
Replacing a bathtub faucet can be a daunting task for homeowners, especially if they are unfamiliar with plumbing. However, with the right tools and a bit of patience, even novice DIYers can successfully replace an American Standard bathtub faucet. This guide provides a comprehensive overview of the process, covering everything from identifying the necessary tools and materials to the step-by-step replacement procedure.
Identifying the Necessary Tools and Materials
Before embarking on the replacement, it's crucial to gather all the required tools and materials. This will ensure a smooth and efficient process. The following list outlines the essential items:
- New American Standard bathtub faucet
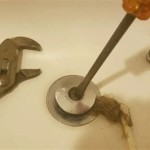
- Adjustable wrench
- Channel-lock pliers
- Screwdriver (Phillips and flathead)
- Plumber's tape
- Basin wrench
- Pipe wrench
- Teflon tape
- Bucket
- Rag or sponge
- Safety glasses
- Gloves
The specific tools required might vary depending on the model and design of the bathtub faucet. It's advisable to consult the installation instructions provided with the new faucet for a comprehensive list of tools.
Step-by-Step Replacement Procedure
Once you have all the necessary tools and materials, you can proceed with the replacement process.
- Turn off the water supply: Locate the water shut-off valves for the hot and cold water lines supplying the bathtub faucet. These valves are typically found beneath the sink or on the wall behind the bathtub. Turn both valves fully clockwise to stop the water flow.
- Drain the bathtub: To avoid a mess, drain the bathtub completely before proceeding with the replacement.
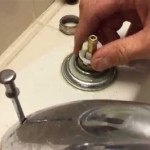
- Remove the old faucet: Carefully remove the old faucet using the appropriate tools. This might involve removing the handles, the spout, and the mounting plate. Be sure to note the order of removal and any special features, such as escutcheon plates or decorative trim.
- Disconnect the water supply lines: Using a wrench, disconnect the water supply lines from the old faucet. Be careful not to overtighten the fittings, as this can damage the pipes.
- Remove the old faucet body: Once the water supply lines are disconnected, remove the old faucet body from the tub wall. This might involve removing the mounting nuts and bolts.
- Prepare the new faucet: Before installing the new faucet, carefully inspect the new faucet parts and make sure they are clean and free of debris. Apply Teflon tape to the threads of the water supply lines and the new faucet inlets to prevent leaks.
- Install the new faucet: Attach the new faucet body to the tub wall using the provided mounting hardware. Make sure the faucet is level and secure before proceeding.
- Connect the water supply lines: Connect the water supply lines to the new faucet inlets, tightening them securely with a wrench. Take care not to overtighten.
- Install the handles and spout: After connecting the water supply lines, attach the handles and spout to the new faucet body. Make sure all parts are securely connected.
- Test for leaks: Once the new faucet is installed, turn the water supply back on slowly and check for any leaks. Tighten any loose fittings if necessary.
Important Considerations for Replacement
It's important to keep in mind several considerations when replacing an American Standard bathtub faucet:
- Compatibility: Ensure that the new faucet is compatible with your existing plumbing system. The connections should match, and the faucet should have the same mounting type as the old one.
- Style and Features: Consider the style and features you want in your new faucet. Some options include single-handle, double-handle, and thermostatic faucets.
- Safety: Always wear safety glasses and gloves when working with plumbing, and be cautious when handling sharp tools.
- Professional Assistance: If you are not comfortable performing the replacement yourself, it is best to consult a licensed plumber. They can ensure that the faucet is properly installed and eliminate the risk of any damage or leaks.
By following these steps and keeping in mind the important considerations, you can successfully replace an American Standard bathtub faucet. This will enhance the functionality and aesthetics of your bathroom while ensuring a safe and reliable water supply.

Lincoln S Tub And Shower Rebuild Kit For American Standard Renu 3 Handle Faucets 111830 The Home Depot

Factory Direct Plumbing Supply Replacement American Standard Colony Soft 3 Valve Tub Shower P021 01205

American Standard Slip On Diverter Tub Spout In Polished Chrome For Faucets 8888 026 002 The Home Depot

Kissler And Co 3 Handle Shower Valve Rebuild Kit For American Standard Tub Faucets Replaces 9806 02 9803 Rbk0033 The Home Depot

Factory Direct Plumbing Supply Replacement American Standard Cadet Acrylic Handle 3 Valve Reb P021 0056

Lincoln S Tub And Shower Rebuild Kit For American Standard Colony 3 Handle Faucets 111833 The Home Depot

American Standard 2 Handle Plastic Faucet Tub Shower Cartridge For Fits Most 994053 0070a H At Com

Lincoln S Tub And Shower Rebuild Kit For American Standard Cadet 2 Handle Faucets 111817

American Standard Repair Kit For Old Single Handle Shower Faucets Noel S Plumbing Supply

American Standard Diverter Tub Spout Repair Kit Satin Nickel 012653 2950a
Related Posts