Replacing a Bathtub Drain Cover: A Step-by-Step Guide
A bathtub drain cover, often made of metal or plastic, plays a crucial role in maintaining a smooth and efficient water flow within your bathroom. However, over time, these covers can become damaged, rusted, or simply worn out, requiring replacement. Replacing a bathtub drain cover is a relatively straightforward DIY task that can significantly enhance the functionality and aesthetics of your bathroom. This article provides a comprehensive guide on how to replace a bathtub drain cover, outlining the necessary steps, tools, and considerations.
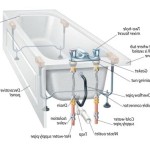
1. Understanding the Types of Bathtub Drain Covers
Before embarking on the replacement process, it's essential to understand the different types of bathtub drain covers available. The most common types include:
- Push-and-Pull Covers: These covers feature a simple push-and-pull mechanism for opening and closing the drain. They are commonly found in older bathrooms and are generally less expensive.
- Twist-and-Lock Covers: These covers have a twist-and-lock mechanism, offering a more secure seal. They are often found in modern bathrooms and come in various styles and materials.
- Pop-Up Stopper Covers: These covers have a pop-up stopper mechanism that allows for easy and controlled water flow. They are commonly found in modern bathrooms and are known for their sleek design.
- Overflow Covers: These covers are specifically designed to cover the overflow hole in the bathtub, preventing water from spilling over the sides.
Identifying the type of drain cover you have will determine the specific steps involved in the replacement process.
2. Gathering Necessary Tools and Materials
Before commencing the replacement, ensure you have gathered the following tools and materials:
- New Bathtub Drain Cover: Select a replacement cover that matches the size and style of your existing drain.
- Adjustable Wrench: This tool will be used to loosen and tighten the drain assembly.
- Screwdriver: A screwdriver may be required to remove or install screws that secure the drain cover.
- Channel-Lock Pliers: These pliers can be helpful for gripping and turning stubborn components.
- Plumber's Tape: This tape helps create a watertight seal on the drain threads.
- Bucket or Bowl: A bucket or bowl is necessary to collect any water that might drain from the tub during the replacement process.
- Protective Gloves: Wearing gloves is recommended to protect your hands from any sharp edges or debris.
Having all the necessary tools and materials readily available will streamline the replacement process and ensure a smooth operation.
3. Step-by-Step Replacement Process
Once you have gathered the required tools and materials, follow these steps to replace your bathtub drain cover:
- Turn Off the Water Supply: Locate the water shut-off valve for the bathtub and turn it off. This will prevent water from flowing into the tub during the replacement process.
- Drain the Tub: If there is any water remaining in the tub, drain it using a bucket or a siphon pump.
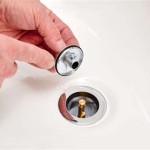
- Remove the Old Drain Cover: Depending on the type of drain cover, use the appropriate tool to remove it. For push-and-pull covers, simply lift the cover up. For twist-and-lock covers, turn the cover counterclockwise to loosen it. For pop-up stopper covers, remove the lever or knob that controls the stopper, then lift the cover out.
- Inspect the Drain Assembly: Once the old drain cover is removed, inspect the drain assembly for any signs of damage or corrosion. If necessary, replace any damaged parts.
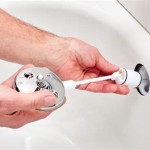
- Install the New Drain Cover: Carefully align the new drain cover with the drain assembly and install it securely. For push-and-pull covers, simply push the cover down. For twist-and-lock covers, turn the cover clockwise to tighten it. For pop-up stopper covers, insert the cover and secure it with the lever or knob.
- Turn on the Water Supply: After installing the new drain cover, slowly turn the water supply back on and check for any leaks.
- Clean Up: Once you are satisfied with the installation, clean up any debris or water spills.
Following these steps carefully will ensure a successful and hassle-free replacement of your bathtub drain cover.

How To Remove A Bathtub Drain The Home Depot

How To Remove A Bathtub Drain The Home Depot

Easy Replacement Of A Bathtub Drain

How To Remove A Bathtub Drain Stopper

How To Remove A Bathtub Drain The Home Depot

How To Remove Replace A Bath Tub Drain That Has Broken Out Cross Piece No Special Tools

How To Remove A Bathtub Drain

How To Replace A Bathtub Drain

How To Replace Bathtub Drain Grate Bunnings Work Community

How To Install A New Bathtub Overflow Plate Assembly
Related Posts