Refinishing Your Bathtub: A DIY Guide
A worn-out bathtub can make even the most stylish bathroom feel dated and unappealing. While replacing a bathtub can be a significant expense, refinishing offers a cost-effective solution to restore its luster and functionality. This DIY guide will provide you with the essential steps and information to refinish your bathtub, giving it a fresh, new look.
Preparing Your Bathtub for Refinishing
Proper preparation is crucial for a successful refinishing project. Begin by thoroughly cleaning the bathtub to remove any dirt, grime, or soap residue. You can use a mild detergent and a non-abrasive scrub brush or sponge. Pay close attention to the corners and edges, where dirt tends to accumulate.
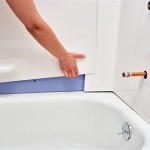
Once the bathtub is clean, it’s essential to remove any existing caulk and sealant around the tub. A utility knife or a caulk remover tool can help with this step. It's important to remove the caulk thoroughly to ensure the new coating adheres properly.
Next, sand the bathtub surface using fine-grit sandpaper. This step helps create a rough texture that will allow the new coating to adhere better. Start with a coarse-grit sandpaper (around 80 grit) to remove any stubborn stains or imperfections. Then switch to a finer-grit sandpaper (around 180 grit) to smooth the surface. Ensure you wear a mask and eye protection during sanding.
Choosing the Right Refinishing Kit
There are various refinishing kits available on the market, each designed for specific bathtub materials and finishes. Choose a kit that is specifically meant for your bathtub's material. For example, porcelain or fiberglass tubs require different kits than acrylic tubs. Consider the desired finish, such as a glossy or matte look, and select a kit that offers that option. Be sure to read the instructions carefully and choose a kit that is appropriate for your level of DIY experience.
It's essential to select a high-quality kit from a reputable brand. Look for kits that include all the necessary materials, such as cleaning agents, primer, paint, and topcoat. Some kits may also include tools like brushes, rollers, and protective gear.
Applying the Refinishing Kit
Once you have your refinishing kit and have thoroughly prepared your bathtub, you can begin the application process. The specific steps may vary depending on the kit you choose. Follow the instructions provided with your kit closely to achieve the best results.
Typically, refinishing kits involve applying primer, paint, and topcoat in several layers. Allow each layer to dry completely before applying the next. Ensure the room is well-ventilated during the application process, and wear protective gear such as gloves, a mask, and eye protection. Avoid touching the wet surface, as it can leave fingerprints that may be visible once the coating is dry.
Once the entire bathtub has been refinished, follow the kit's instructions for curing time. This is the time required for the new coating to harden properly. During this time, avoid using the bathtub and allow the coating to dry completely.
Tips for a Successful Refinishing Project
Here are a few additional tips to ensure your refinishing project is successful:
Planning and Preparation
*
Research:
Before starting the project, thoroughly research the process and ensure you understand the necessary steps and precautions. Watch videos and read online tutorials to gather information and tips from experienced refinishers.*
Safety First:
Use personal protective equipment, such as gloves, a mask, and eye protection, throughout the process. Work in a well-ventilated area and ensure the area is free of children and pets.*
Proper Tools:
Gather all the necessary tools, including brushes, rollers, sandpaper, cleaning supplies, and protective gear. Make sure you have all the required tools to ensure the process goes smoothly.Refinishing Process
*
Clean Thoroughly:
Clean the bathtub thoroughly before starting the process. Use a mild cleaner and a scrubbing brush to remove any dirt, soap residue, or stains. Pay particular attention to the corners and edges.*
Prime the Surface:
Applying a primer helps the paint adhere better to the bathtub surface. Follow the kit’s instructions regarding the primer's application and drying time.*
Apply Consistent Coats:
Apply thin coats of paint or refinishing product consistently. Avoid applying thick coats, as this can lead to cracking and peeling. Allow each coat to dry completely before applying the next coat.*
Proper Curing Time:
Ensure the bathtub is allowed to cure completely before using it. The curing time will vary depending on the refinishing kit.Maintenance
*
Regular Cleaning:
Clean the bathtub with a mild cleaner and a soft sponge or cloth regularly. Avoid abrasive cleaners, as they can damage the refinished surface.*
Avoid Harsh Chemicals:
Do not use harsh chemicals, such as bleach or acidic cleaners, on the refinished surface. These can damage the coating and shorten its lifespan.*
Repair Minor Damage:
If you notice any minor scratches or chips on the refinished surface, consider using a touch-up kit or a similar product from the original refinishing kit to repair them.Refinishing your bathtub can be a rewarding DIY project that can transform the look of your bathroom. By following these tips and taking the necessary precautions, you can restore its luster and enjoy a refreshed and rejuvenated bathroom space. Remember to choose the right refinishing kit, prepare the surface properly, apply the coating evenly, and allow adequate curing time for a successful project.

How To Refinish A Bathtub On Budget

How To Refinish An Old Clawfoot Bath Tub

Bathtub Refinishing Kit Guide Diy Bathroom Update

Super Simple How To Paint A Bathtub

Diy Painted Bathtub Follow Up Your Questions Answered Addicted 2 Decorating

Do Diy Bathtub Resurfacing Kits Really Work Todd S Bathtubs

Diy Bathtub Reglazing For Beginners And Professionals With Dwil Tub Tile Refinishing Kit

Bathtub Painting Diy Vs Pro Which Is Best Refinishing Company Little Rock Ar

Bathworks 20 Oz Diy Bathtub And Tile Refinishing Kit Almond Bwk 04 The Home Depot

Refinishing Our Off White Bathtub Homehq
Related Posts