Delta Single Handle Bathtub Faucet Cartridge Replacement: A Comprehensive Guide
The single handle bathtub faucet, a common fixture in many homes, simplifies water temperature and flow control. However, over time, these faucets can develop leaks or drips, often stemming from a worn or damaged cartridge. Replacing the cartridge is a cost-effective solution compared to replacing the entire faucet. This article details the process of replacing a Delta single handle bathtub faucet cartridge, providing a step-by-step guide to ensure a successful repair.
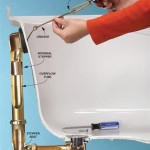
Before embarking on the replacement process, understanding the faucet's anatomy and the cartridge's function is crucial. The cartridge is the central component responsible for regulating water flow and temperature. It houses internal seals and mechanisms that can degrade over time due to mineral buildup, water pressure fluctuations, and general wear and tear. Recognizing the signs of a failing cartridge, such as a persistent drip, difficulty adjusting water temperature, or a reduction in water pressure, allows for timely intervention and prevents further damage.
The procedure outlined below presumes that the problem is indeed a cartridge issue. Other faucet problems can mimic a bad cartridge, such as damaged O-rings or valve seats. If replacing the cartridge does not solve the problem, it may be necessary to consult a plumbing professional.
Required Tools and Materials
Prior to commencing the repair, gathering the necessary tools and materials is essential. This preparation minimizes interruptions and ensures a smooth workflow. The following items are typically required:
- New Delta Faucet Cartridge: Obtaining the correct replacement cartridge is paramount. Identifying the specific faucet model is crucial, as different models use different cartridges. Delta's website or customer service can provide assistance in identifying the correct part number. Bringing the old cartridge to a plumbing supply store is also a reliable method for ensuring a correct match.
- Screwdrivers: A set of screwdrivers, including both Phillips head and flathead types, will be needed. The size and type of screwdriver will depend on the specific faucet design.
- Allen Wrench Set: Many Delta single handle faucets use an Allen screw to secure the handle. An Allen wrench set is necessary to remove this screw. Again, the size will vary based on the faucet model.
- Adjustable Wrench: An adjustable wrench is useful for loosening and tightening larger nuts or couplings.
- Pliers: Pliers, particularly slip-joint pliers or needle-nose pliers, can assist in gripping and manipulating small parts.
- Cartridge Puller (Optional but Recommended): While not strictly necessary, a cartridge puller is a specialized tool designed to remove stubborn cartridges without causing damage to the faucet body. This tool can save considerable time and effort.
- Penetrating Oil: Applying penetrating oil to corroded or stuck components can help loosen them for easier removal.
- Clean Cloths or Rags: These are essential for cleaning up spills and wiping down parts.
- Flashlight: A flashlight will improve visibility in the work area, particularly in dimly lit bathrooms.
- Safety Glasses: Protecting your eyes from debris or splashes is always a good practice.
- Basin Wrench (Optional): In some cases, the faucet connections are difficult to reach, and a basin wrench can be helpful for loosening the water supply lines.
Having all these tools prepared before starting ensures a more efficient and less frustrating repair process.
Step-by-Step Cartridge Replacement Procedure
The cartridge replacement process requires careful execution to avoid damaging the faucet or causing leaks. The following steps outline the procedure in detail:
- Turn Off the Water Supply: The first and most crucial step is to shut off the water supply to the faucet. Typically, shut-off valves are located under the sink or near the bathtub. If individual shut-off valves are not present, the main water supply to the house must be turned off. After turning off the water, open the faucet to relieve any residual pressure in the lines.
- Protect the Bathtub Surface: Place a towel or other protective covering over the bathtub surface to prevent scratches or damage from dropped tools.
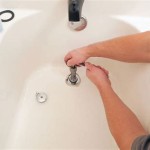
- Remove the Faucet Handle: Locate the set screw on the faucet handle. This screw is usually hidden beneath a decorative cap or button, which can be pried off with a small flathead screwdriver or a fingernail. Once the cap is removed, use the appropriate Allen wrench to loosen the set screw. Once the set screw is loosened, the handle should slide off the faucet stem. If the handle is stuck, gently rock it back and forth while pulling outward. Avoid excessive force, as this can damage the handle or the faucet body.
- Remove the Handle Adapter or Sleeve: After removing the handle, there may be a handle adapter or sleeve that covers the cartridge. This adapter is typically held in place by a threaded connection or a retaining clip. Unscrew the adapter or carefully pry off the retaining clip, taking care not to damage the surrounding components.
- Remove the Retaining Nut or Clip: The cartridge is usually secured by a retaining nut or clip. If it is a nut, use an adjustable wrench to loosen and remove it. If it is a clip, use pliers or a screwdriver to carefully remove it. Be mindful of the orientation of the clip, as it will need to be reinstalled in the same position.
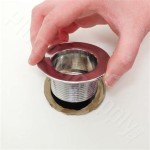
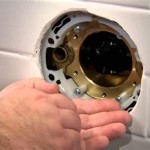
- Remove the Old Cartridge: With the retaining nut or clip removed, the cartridge should now be free to be pulled out. If the cartridge is stuck, try gently twisting it back and forth while pulling outward. If the cartridge still resists removal, apply penetrating oil around the cartridge and let it sit for a few minutes. Then, use a cartridge puller tool to carefully extract the cartridge. A cartridge puller attaches to the cartridge stem and provides a leverage point for pulling it out. If a cartridge puller is unavailable, carefully use pliers to grip the cartridge stem and pull it straight out. Avoid using excessive force, as this can break the cartridge and make it even more difficult to remove.
- Clean the Faucet Body: Once the old cartridge is removed, thoroughly clean the inside of the faucet body. Remove any mineral deposits or debris that may have accumulated. A small brush or a cloth can be used for this purpose. Inspect the faucet body for any signs of damage, such as cracks or corrosion. If damage is present, the entire faucet may need to be replaced.
- Install the New Cartridge: Before installing the new cartridge, lubricate the O-rings with silicone grease. This will help ensure a smooth insertion and prevent leaks. Align the new cartridge with the faucet body, ensuring that it is oriented correctly. The cartridge typically has markings or notches that align with corresponding features in the faucet body. Push the cartridge firmly into place until it is fully seated.
- Reinstall the Retaining Nut or Clip: Once the cartridge is in place, reinstall the retaining nut or clip. Tighten the nut securely with an adjustable wrench, but avoid over-tightening, as this can damage the cartridge or the faucet body. If it is a clip, ensure it is properly snapped into place.
- Reinstall the Handle Adapter or Sleeve: Reinstall the handle adapter or sleeve, ensuring that it is properly secured.
- Reinstall the Faucet Handle: Slide the faucet handle back onto the stem and tighten the set screw with the Allen wrench. Reinstall the decorative cap or button.
- Turn on the Water Supply: Slowly turn on the water supply and check for leaks around the faucet handle and spout. If leaks are present, double-check the cartridge installation and tighten any connections as needed.
- Test the Faucet: Test the faucet by turning it on and off and adjusting the water temperature. Ensure that the water flow is smooth and consistent and that there are no leaks.
By following these steps carefully, most individuals can successfully replace a Delta single handle bathtub faucet cartridge without professional assistance.
Troubleshooting Common Issues
Even with careful execution, certain issues may arise during the cartridge replacement process. Addressing these issues effectively prevents further problems and ensures a successful repair. Here are some common troubleshooting scenarios:
- Difficulty Removing the Old Cartridge: As previously mentioned, a stuck cartridge is a common problem. Applying penetrating oil and using a cartridge puller are the best solutions. If those methods fail, gently heating the faucet body around the cartridge with a heat gun (on a low setting) can help loosen the cartridge. However, exercise extreme caution when using heat, as excessive heat can damage the faucet or surrounding materials.
- Leaks After Cartridge Replacement: If leaks are present after installing the new cartridge, several factors could be responsible. First, ensure that the cartridge is fully seated and that the retaining nut or clip is properly secured. Second, inspect the O-rings on the cartridge for damage or misplacement. If the O-rings are damaged, replace the cartridge with a new one. Third, check the faucet body for cracks or corrosion. If the faucet body is damaged, the entire faucet may need to be replaced. Finally, ensure that the water supply connections are tight and leak-free.
- Incorrect Cartridge Installation: Installing the cartridge incorrectly can result in improper water temperature control or reduced water flow. Carefully review the cartridge installation instructions and ensure that the cartridge is oriented correctly. The cartridge typically has markings or notches that align with corresponding features in the faucet body.
- Stripped Screws or Rounded Nuts: Stripped screws or rounded nuts can make it difficult to remove faucet components. Use a screw extractor or a nut splitter to remove these components. Alternatively, try using a rubber band or steel wool to improve the grip of the screwdriver or wrench.
By understanding these potential issues and their solutions, individuals can effectively troubleshoot problems encountered during the cartridge replacement process.
In conclusion, replacing a Delta single handle bathtub faucet cartridge is a manageable task for most homeowners with basic plumbing skills and the right tools. By carefully following the steps outlined in this article and addressing any potential issues effectively, individuals can restore their faucet to proper working order and avoid the expense of replacing the entire unit. Remember to always prioritize safety by turning off the water supply and protecting the surrounding surfaces before beginning the repair.

How To Repair A Delta Tub Shower Valve

How To Replace A Delta Cartridge And Fix Leaky Bathtub Faucet It Tutorials

Delta Replacement Pressure Balance Cartridge For Tub And Shower Valves Ib 133670 The Home Depot

Delta Shower Faucet Cartridge Replacement 1700 Monitor Leak Repair

Lvuzo Rp46074 Delta Shower Valve Cartridge Compatible With 13 14 Series Bath Tub Faucet For Single Handle Hssa04 2fs058

Shower Faucet Repair Advocate Master Plumbing

Delta 17 Series Tub Shower Cartridges 5 D White Rp32104 The Home Depot

How To Replace A Delta Tub Or Shower Cartridge

Delta Shower Cartridge Replacement For 1300 1400 Series Single Handle Bath Tub Faucet Replace Me Bestsuppliers Com

Danco Plastic Tub Shower Valve Cartridge For Delta 10664 At Com
Related Posts