Single Handle Bathtub Faucet Cartridge Replacement: A Comprehensive Guide
A leaky single-handle bathtub faucet can be a persistent annoyance, leading to wasted water, increased water bills, and potential damage to surrounding fixtures. Often, the culprit behind this leak is a worn-out or damaged cartridge within the faucet. Replacing the cartridge is a common plumbing repair that can often be accomplished by homeowners with basic tools and a little know-how, saving the expense of hiring a professional plumber. This article provides a detailed, step-by-step guide to replacing a single-handle bathtub faucet cartridge, covering identification, preparation, the replacement process, and troubleshooting common issues.
Before embarking on this project, it is crucial to understand the basic mechanics of a single-handle bathtub faucet. These faucets typically use a cartridge, a single unit containing the valve mechanism that controls the flow and temperature of water. Over time, mineral deposits, wear and tear, or damage to the cartridge seals can lead to leaks. Replacing the cartridge effectively restores the faucet's functionality and prevents further water wastage.
Key Point 1: Identifying the Correct Cartridge
One of the most critical steps in replacing a faucet cartridge is identifying the correct replacement. Faucets come in various designs, and each manufacturer often uses specific cartridge models. Using the wrong cartridge will render the repair ineffective and may even damage the faucet. Here's how to ensure you get the right replacement:
Determining the Faucet Manufacturer and Model: The first step is to identify the faucet's manufacturer and, ideally, the specific model number. This information is often located on the faucet itself, either on the handle, the base, or underneath the spout. Look for a brand name or logo. Many manufacturers also provide model numbers in these locations. If the information is not readily visible, check any original documentation that came with the faucet during installation.
Consulting the Manufacturer's Website or Customer Support: Once the manufacturer and model information have been obtained, the next step is to consult the manufacturer's website or contact their customer support. Most manufacturers have online databases or customer service representatives who can help identify the correct cartridge based on the faucet model. Provide them with as much information as possible, including the model number, any serial numbers, and even photographs of the faucet.
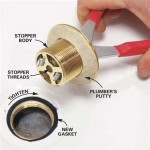
Removing the Old Cartridge for Identification: If the manufacturer information is unavailable, carefully remove the old cartridge from the faucet. This will allow you to visually compare it to replacement cartridges available at hardware stores or plumbing supply outlets. Take the old cartridge with you to the store and compare it directly to the options. Pay close attention to the length, diameter, and shape of the cartridge, as well as the number and placement of the O-rings and other seals. Note any distinguishing features, such as specific markings or notches on the cartridge body.
Using Online Resources and Cross-Reference Tools: Several online resources and cross-reference tools can assist in identifying the correct cartridge. These tools often allow you to input the faucet manufacturer and model number, and they will provide a list of compatible cartridges. These resources can be particularly helpful when dealing with older or less common faucets. Inputting detailed measurements of the old cartridge can also narrow down the options if the manufacturer information is unknown.
Avoiding Universal Cartridges: While some "universal" cartridges are available, it is generally advisable to avoid them. These cartridges are designed to fit a wide range of faucets, but they may not provide the perfect fit or optimal performance. Using a cartridge specifically designed for your faucet model will ensure a proper seal and a longer lifespan.
Failing to identify the correct cartridge can lead to a frustrating and time-consuming repair process. Therefore, allocating sufficient time and effort to this step is essential. Accurate identification not only ensures a successful repair but also prevents potential damage to the faucet body.
Key Point 2: Step-by-Step Cartridge Replacement Process
Once you have acquired the correct replacement cartridge, the next step is to replace the old one. This process requires careful attention to detail and the use of appropriate tools. Following these steps will ensure a smooth and effective repair:
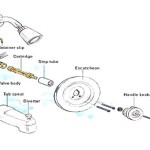
Gathering the Necessary Tools and Materials: Before starting, assemble all the necessary tools and materials. This typically includes: a new cartridge, a flathead screwdriver, a Phillips head screwdriver, an adjustable wrench, pliers (needle-nose pliers are helpful), a cartridge puller (optional but recommended for stubborn cartridges), penetrating oil (if needed), a clean cloth or towel, and plumber's grease (silicone-based).
Shutting Off the Water Supply: This is a critical safety precaution. Locate the shut-off valves for the hot and cold water lines leading to the bathtub faucet. These valves are usually located in an accessible area near the bathtub or in the basement or utility room. Turn both valves clockwise until they are completely closed. After shutting off the water, turn on the bathtub faucet to relieve any remaining pressure in the lines. If there are no individual shut-off valves, you may need to shut off the main water supply to the entire house.
Removing the Faucet Handle: The process for removing the faucet handle varies depending on the design. Typically, there will be a small screw located on the handle, either on the side or underneath a decorative cap. Use a flathead or Phillips head screwdriver to remove the screw. Once the screw is removed, carefully pull the handle straight off the faucet body. If the handle is stuck, gently wiggle it back and forth while pulling.
Removing the Retaining Clip or Nut: After removing the handle, you will typically find a retaining clip or nut that secures the cartridge in place. The clip is usually made of metal and can be removed using needle-nose pliers or a small screwdriver. The nut, often made of brass, may require an adjustable wrench to loosen and remove. Be careful not to damage the clip or nut during removal, as they may need to be reused.
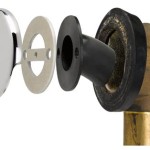
Removing the Old Cartridge: Once the retaining clip or nut is removed, the old cartridge can be pulled out. This can sometimes be challenging if the cartridge is corroded or stuck due to mineral deposits. If the cartridge is difficult to remove, try using a cartridge puller. This tool attaches to the end of the cartridge and provides leverage for pulling it out. Alternatively, you can try applying penetrating oil around the cartridge to help loosen it. Allow the oil to soak for a few minutes before attempting to remove the cartridge. Gently wiggle the cartridge back and forth while pulling it straight out of the faucet body. Avoid using excessive force, as this could damage the faucet body.
Cleaning the Faucet Body: Before installing the new cartridge, thoroughly clean the inside of the faucet body. Remove any mineral deposits, debris, or corrosion using a clean cloth or a small brush. Inspect the inside of the faucet body for any damage or wear. If there is significant damage, the entire faucet may need to be replaced.
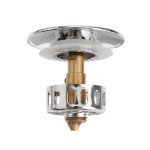
Installing the New Cartridge: Apply a thin layer of plumber's grease (silicone-based) to the O-rings and seals of the new cartridge. This will help to ensure a proper seal and prevent future leaks. Carefully insert the new cartridge into the faucet body, aligning it correctly. The cartridge should slide in smoothly. Ensure that the cartridge is fully seated and flush with the faucet body.
Securing the Retaining Clip or Nut: Reinstall the retaining clip or nut that secures the cartridge in place. Tighten the nut with an adjustable wrench, but avoid over-tightening, as this could damage the cartridge. Ensure that the clip is properly seated and secured.
Reinstalling the Faucet Handle: Reattach the faucet handle to the faucet body, aligning it correctly. Tighten the screw that secures the handle in place. Ensure that the handle is properly aligned and moves smoothly.
Turning on the Water Supply and Testing for Leaks: Slowly turn on the water supply valves, both hot and cold. Check for any leaks around the faucet handle, the spout, and the connections to the water lines. If you detect any leaks, turn off the water supply and re-examine the connections. Ensure that all parts are properly tightened and sealed. Once you are confident that there are no leaks, test the faucet by turning it on and off and adjusting the temperature. Verify that the water flow is smooth and consistent.
This detailed process will equip you with the knowledge to perform a successful cartridge replacement. However, remember to always prioritize safety by turning off the water supply and using appropriate tools.
Key Point 3: Troubleshooting Common Issues
Even with careful execution, some issues may arise during or after the cartridge replacement process. Recognizing and addressing these issues promptly is crucial for a successful repair. Here are some common problems and their solutions:
Difficulty Removing the Old Cartridge: As previously mentioned, removing the old cartridge can be challenging if it is corroded or stuck. Using a cartridge puller is often the most effective solution. If a cartridge puller is not available, try applying penetrating oil around the cartridge and allowing it to soak for several minutes. Gently wiggling the cartridge back and forth while pulling can also help to loosen it. Avoid using excessive force, as this could damage the faucet body.
Leaks After Cartridge Replacement: If leaks persist after installing the new cartridge, several factors may be responsible. First, double-check that the cartridge is the correct model for the faucet. Using the wrong cartridge will prevent a proper seal. Second, ensure that the cartridge is fully seated and flush with the faucet body. If the cartridge is not fully seated, it will not form a watertight seal. Third, inspect the O-rings and seals on the cartridge for any damage or defects. Damaged O-rings can cause leaks. Finally, check the faucet body for any cracks or corrosion that could be preventing a proper seal. If the faucet body is damaged, it may need to be replaced.
Water Flow Problems: If the water flow is weak or restricted after replacing the cartridge, the issue may be related to debris or sediment in the water lines. Turn off the water supply and remove the cartridge. Flush the water lines by briefly turning on the water supply to allow any debris to be flushed out. Reinstall the cartridge and test the water flow again. If the problem persists, check the aerator (if present) on the faucet spout for any clogs. Clean or replace the aerator as needed.
Handle Not Moving Smoothly: If the faucet handle is difficult to move or feels stiff after replacing the cartridge, ensure that the handle is properly aligned and secured. Apply a small amount of plumber's grease (silicone-based) to the cartridge stem to improve lubrication. If the handle continues to feel stiff, the cartridge may be defective and need to be replaced.
Incorrect Hot and Cold Water Orientation: Sometimes, after replacing the cartridge, the hot and cold water may be reversed. This can be corrected by removing the handle and rotating the cartridge 180 degrees. Ensure that the cartridge is reinstalled correctly and test the water temperature again.
Stripped Screws or Damaged Nuts: During the removal or installation process, it is possible to strip screws or damage nuts. If this occurs, try using a screw extractor or a nut splitter to remove the damaged hardware. Replacement screws and nuts can be purchased at most hardware stores.
By understanding these common issues and their solutions, homeowners can effectively troubleshoot and resolve most problems encountered during a single-handle bathtub faucet cartridge replacement.

How To Replace A Single Handle Shower Cartridge 1 Tom Plumber

Glacier Bay Ceramic Faucet Oem Replacement Cartridge 866870 The Home Depot

How To Replace A Moen Cartridge And Fix Leaky Bathtub Faucet It Tutorials

Danco Cartridge For Aquasource Glacier Bay Single Handle Tub Shower Faucets 10670 The Home Depot

How To Replace A Single Handle Shower Cartridge 1 Tom Plumber

How To Replace A Delta Cartridge And Fix Leaky Bathtub Faucet It Tutorials

Moen 1 Handle Brass And Plastic Faucet Tub Shower Cartridge 1225 At Com

Danco Plastic Tub Shower Valve Cartridge For Delta 10347 At Com

Gerber How To Install A Cartridge Tub Shower 1 Handle Pressure Balanced Ceramic Disc

Shower Faucet Repair Advocate Master Plumbing
Related Posts