How To Change The Color Of A Plastic Bathtub
Changing the color of a plastic bathtub can revitalize a bathroom without the expense and hassle of replacing the entire fixture. While not as straightforward as painting a wall, successfully altering the color of a plastic bathtub requires careful preparation, informed product selection, and meticulous application. The following provides a detailed guide to the process, outlining essential steps and considerations to achieve a durable and aesthetically pleasing result.
Before initiating any project involving chemical treatments, it is paramount to prioritize safety. Adequate ventilation is crucial; open windows and use fans to circulate air. Wear appropriate personal protective equipment (PPE), including gloves, safety glasses, and a respirator, especially when working with primers, paints, and cleaning solutions. Protect surrounding surfaces with drop cloths and painter's tape to prevent accidental spills or overspray. Consult the manufacturer's safety data sheets (SDS) for all products used to understand potential hazards and necessary precautions.
Surface Preparation: The Foundation of a Lasting Finish
The longevity and appearance of the newly colored bathtub depend significantly on the quality of surface preparation. A clean, properly prepared surface allows the primer and paint to adhere effectively, preventing peeling, chipping, and bubbling. This process involves multiple steps, each contributing to the overall success of the project.
Begin by thoroughly cleaning the bathtub with a non-abrasive cleaner designed to remove soap scum, mildew, and hard water stains. Avoid using harsh scouring powders or abrasive pads, as these can scratch the plastic surface, creating imperfections that will be visible after painting. A dedicated bathroom cleaner containing mildewcide is recommended, particularly in areas prone to moisture buildup. Rinse the bathtub thoroughly with clean water to remove all traces of the cleaning solution.
After cleaning, inspect the bathtub for any cracks, chips, or imperfections. These must be repaired before proceeding. For small cracks, use a plastic repair kit specifically designed for bathtubs. Follow the manufacturer's instructions carefully, ensuring the repair material is compatible with the bathtub's plastic composition. Larger cracks or significant damage may necessitate professional repair or, in some cases, bathtub replacement.
Once repairs are complete, the next critical step is sanding the bathtub's surface. This process creates a slightly roughened texture, providing a better grip for the primer. Use fine-grit sandpaper (around 320-400 grit) and gently sand the entire surface of the bathtub. Avoid applying excessive pressure, as this can create deep scratches. The goal is to create a uniform, slightly abraded surface, not to remove the existing finish entirely. Pay particular attention to areas where the original finish is glossy, as these areas will require more thorough sanding to ensure proper adhesion.
After sanding, meticulously remove all sanding dust. Use a tack cloth to wipe down the entire surface, ensuring no residual dust particles remain. Alternatively, a vacuum cleaner with a brush attachment can be used, followed by wiping with a damp cloth and allowing the surface to dry completely. Any remaining dust will compromise the adhesion of the primer and paint, leading to premature failure of the finish.
Finally, degrease the surface with a solvent-based degreaser. This step removes any remaining oils, waxes, or contaminants that may have been missed during cleaning and sanding. Apply the degreaser according to the manufacturer's instructions, ensuring adequate ventilation. Wipe the surface thoroughly with a clean, lint-free cloth and allow it to dry completely before proceeding to the priming stage.
Product Selection: Choosing the Right Materials for Longevity
Selecting the appropriate primer and paint is crucial for achieving a durable and aesthetically pleasing finish on a plastic bathtub. Not all paints are created equal, and using the wrong type can lead to peeling, chipping, cracking, or discoloration. Consider the specific composition of the plastic bathtub and select products that are compatible with that material.
A two-part epoxy primer is generally recommended for plastic bathtubs. Epoxy primers offer excellent adhesion, durability, and resistance to chemicals and moisture, making them ideal for the demanding environment of a bathroom. These primers typically consist of a resin and a hardener, which must be mixed according to the manufacturer's instructions. Ensure accurate mixing ratios for optimal performance. Apply the epoxy primer in thin, even coats, allowing each coat to dry completely before applying the next. Follow the manufacturer's recommended drying times, as these can vary depending on the specific product and environmental conditions.
For the topcoat, consider using a two-part epoxy acrylic paint or a specialized bathtub refinishing kit. Epoxy acrylic paints offer a balance of durability, color retention, and ease of application. Bathtub refinishing kits typically include a primer, a topcoat, and a clear sealant, all specifically formulated for use on bathtubs. These can be a convenient option for DIYers, as they provide a complete system designed to work together. Regardless of the choice, ensure the paint is formulated for use on plastic and is resistant to water, chemicals, and abrasion.
When selecting the color, consider the overall bathroom design and desired aesthetic. Choose a color that complements the existing fixtures and décor. Light colors can make a small bathroom appear larger and brighter, while darker colors can add a touch of drama and sophistication. Obtain color samples and test them in a small, inconspicuous area of the bathtub to ensure the desired effect before applying the paint to the entire surface.
In addition to the primer and paint, gather necessary application tools, including high-quality brushes, rollers, and paint trays. For a smooth, even finish, use a fine-nap roller designed for use with epoxy paints. Consider using a paint sprayer for larger surfaces or intricate areas, but practice beforehand to avoid drips and uneven coverage. Ensure all tools are clean and free of contaminants before use.
Application Techniques: Achieving a Professional-Looking Finish
The application of the primer and paint requires careful attention to detail to achieve a smooth, even, and durable finish. Proper technique is crucial to avoid common problems such as drips, runs, orange peel texture, and uneven color coverage. Patience and meticulousness are key to a professional-looking result.
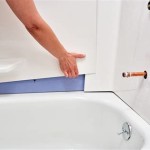
Before applying the primer, thoroughly mask off all areas that are not to be painted, including faucets, drains, and surrounding walls. Use high-quality painter's tape to create clean, sharp lines. Overlap the tape slightly to ensure complete coverage and prevent paint from seeping underneath. Protect surrounding surfaces with drop cloths to catch any accidental drips or overspray.
Apply the epoxy primer in thin, even coats, using a brush or roller. Avoid applying too much primer at once, as this can lead to drips and runs. Work in small sections, overlapping each stroke slightly to ensure complete coverage. Allow the primer to dry completely between coats, following the manufacturer's recommended drying times. Typically, two coats of primer are sufficient to provide a solid base for the topcoat.
Once the primer is fully dry, lightly sand the surface with fine-grit sandpaper (around 400-600 grit) to remove any imperfections or roughness. This step helps to create a smoother surface for the topcoat. Remove all sanding dust with a tack cloth before proceeding.
Apply the epoxy acrylic paint or bathtub refinishing topcoat in thin, even coats, using a brush, roller, or paint sprayer. Follow the same techniques as with the primer, working in small sections and overlapping each stroke slightly. Avoid applying too much paint at once, as this can lead to drips and runs. Allow the paint to dry completely between coats, following the manufacturer's recommended drying times. Typically, two to three coats of topcoat are required to achieve full color coverage and a durable finish.
If using a paint sprayer, maintain a consistent distance from the surface and move the sprayer in a smooth, even motion. Avoid holding the sprayer in one spot for too long, as this can lead to uneven coverage and drips. Practice on a scrap piece of material to get a feel for the sprayer before applying paint to the bathtub.
After the final coat of paint has dried completely, carefully remove the painter's tape. Pull the tape away from the painted surface at a 45-degree angle to avoid chipping or peeling the paint. Inspect the finished surface for any imperfections or areas that require touch-up. Use a small brush to apply touch-up paint to these areas, feathering the edges to blend them seamlessly with the surrounding finish.
Allow the painted bathtub to cure completely for the manufacturer's recommended time before using it. This allows the paint to fully harden and develop its maximum durability. Avoid exposing the painted surface to water, chemicals, or abrasive cleaners during the curing process. After the curing period, clean the bathtub with a mild, non-abrasive cleaner and protect it from scratches and impacts.

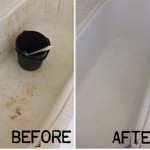
Before After How To Paint A Bathtub And Clean It Does Last Thrift Diving

Super Simple How To Paint A Bathtub

How To Refinish Your Bathtub For 50

Super Simple How To Paint A Bathtub

How To Re And Change The Color Of A Plastic Bathtub Miss Mv

How To Refinish A Bathtub On Budget

Can Plastic Acrylic Or Fiberglass Bathtubs Shower Stalls Be Reglazed Refinished America Refinishing Pros

Yes You Can Paint Your Bathtub And Tile Here S How Toolbox Divas

How To Paint An Acrylic Bath Victorian Plumbing

How To Paint Your Bathtub Yes Seriously Love Renovations