How To Refinish a Bathtub
Bathtub refinishing, also known as reglazing or resurfacing, offers a cost-effective alternative to replacing a worn or outdated bathtub. This process involves repairing and recoating the existing bathtub surface, restoring its appearance and extending its lifespan. While professional refinishing is recommended for optimal results, homeowners with DIY experience can undertake this project with careful preparation and execution.
Before beginning, it's crucial to assess the bathtub's condition. Refinishing is suitable for bathtubs with minor chips, scratches, and surface stains. However, severely damaged tubs with extensive cracks or structural issues may require replacement. Inspect the tub thoroughly for any underlying problems that may not be readily visible.
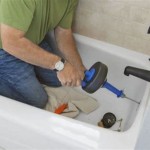
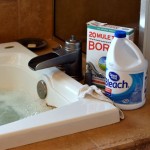
The first step in refinishing a bathtub involves meticulous cleaning. This removes dirt, grime, soap scum, and any mineral deposits that could interfere with the adhesion of the new coating. Use a heavy-duty bathroom cleaner and abrasive cleanser to scrub the entire surface. Pay particular attention to corners, edges, and areas around the drain. Rinse the tub thoroughly and allow it to dry completely.
After cleaning, the next step is to repair any chips or imperfections. Use a two-part epoxy filler specifically designed for bathtub repair. Follow the manufacturer's instructions for mixing and application. Apply the filler to the damaged areas using a putty knife, ensuring a smooth and even finish. Allow the filler to dry and cure completely according to the manufacturer's recommendations. Once cured, sand the repaired areas with progressively finer grits of sandpaper until they are flush with the surrounding surface.
Masking and protecting the surrounding areas is essential before applying the refinishing coating. Cover the floor, walls, fixtures, and any adjacent surfaces with drop cloths, painter's tape, and plastic sheeting. Ensure adequate ventilation by opening windows and using a fan to exhaust fumes from the refinishing products. Wear a respirator mask, gloves, and eye protection throughout the application process.
The next stage involves etching the bathtub surface to promote proper adhesion of the refinishing coating. Use an etching cleaner specifically designed for porcelain or fiberglass bathtubs, following the manufacturer's instructions carefully. Apply the etching cleaner evenly over the entire surface of the tub, allowing it to sit for the recommended time. Rinse the tub thoroughly with clean water and allow it to dry completely.
Once the tub is dry, apply the refinishing coating. Several types of refinishing products are available, including epoxy, acrylic polymer, and polyurethane coatings. Each product has specific application instructions, so it's crucial to follow the manufacturer's guidelines carefully. Most refinishing coatings are applied in multiple thin coats, allowing each coat to dry and cure completely before applying the next. Use a high-quality brush, roller, or spray gun for a smooth and even finish.
After applying the final coat, allow the refinishing coating to cure completely according to the manufacturer's instructions. This typically takes several days. Avoid using the bathtub during the curing period to prevent damage to the new finish. Once cured, carefully remove the masking tape and protective coverings.
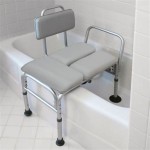
Proper maintenance will help extend the life of the refinished bathtub. Avoid using abrasive cleaners or harsh chemicals on the refinished surface. Clean the tub regularly with a mild, non-abrasive cleaner and a soft sponge or cloth. Avoid dropping heavy objects in the tub, and use a bath mat to prevent scratches from sharp objects.
Choosing the right refinishing product is essential for a successful outcome. Epoxy coatings are known for their durability and long lifespan, but they can be more challenging to apply. Acrylic polymer coatings are easier to apply and offer good durability, making them a popular choice for DIY refinishing projects. Polyurethane coatings are less common but offer excellent resistance to chemicals and abrasion. Research the different product options and choose the one that best suits the project requirements and the homeowner's skill level.
Surface preparation is critical for achieving a professional-looking finish. Thorough cleaning, repair of any imperfections, and proper etching ensure optimal adhesion of the refinishing coating. Skipping or neglecting these steps can lead to premature peeling, cracking, and other issues with the new finish.
Safety precautions are paramount when working with refinishing products. These products often contain strong chemicals and volatile organic compounds (VOCs). Always wear appropriate safety gear, including a respirator mask, gloves, and eye protection. Ensure adequate ventilation to prevent the buildup of fumes. Follow the manufacturer's safety instructions carefully.
While refinishing a bathtub can be a DIY project, professional refinishing offers several advantages. Professionals have the experience and expertise to handle complex repairs and achieve a flawless finish. They also use specialized equipment and high-quality products that may not be readily available to homeowners. Professional refinishing often comes with a warranty, providing peace of mind in case of any issues with the new finish.

How To Refinish A Bathtub On Budget

How To Refinish A Bathtub On Budget

How To Reglaze Or Refinish A Bathtub Napco Step By Guide

How To Refinish An Old Clawfoot Bath Tub

How To Reglaze A Bathtub And Tile Surround Daly Digs

Tub Refinishing Tips For Beginners

Bathtub Resurfacing Custom Tub And Tile

How To Refinish A Bathtub On Budget Erin Spain

How To Reglaze A Bathtub 3 Preparing Be Reglazed Painted

Refinishing Our Off White Bathtub Homehq