How to Replace a Bathtub and Wall Surround System Together
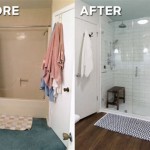
Updating your bathtub and wall surround system can dramatically transform the look and feel of your bathroom. Whether you're tackling a quick cosmetic refresh or embarking on a comprehensive bathroom remodel, replacing these elements simultaneously ensures a cohesive and polished result.
This article provides a comprehensive guide to replacing both your bathtub and wall surround system together. We'll cover everything from selecting the right materials to step-by-step instructions, ensuring you have a successful and rewarding renovation experience.
Choosing the Right Bathtub and Wall Surround System
The first step in any bathtub and wall surround system replacement project is choosing the right materials. Consider the following factors:
- Material: Bathtubs and wall surrounds are commonly made from acrylic, fiberglass, or cast iron.
- Color and Style: Select options that complement your bathroom's overall design scheme and personal preferences.
- Size and Shape: Ensure the bathtub and wall surround fit your bathroom's dimensions and layout.
- Features: Some bathtubs and wall surrounds offer additional features like built-in shelves, grab bars, or whirlpools.
- Cost: Establish a budget and choose materials that fit within your financial constraints.
Step-by-Step Instructions
1. Preparation
- Remove all fixtures, such as the faucet, showerhead, and towel bars.
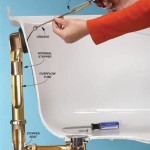
- Disconnect the water supply and drain lines.
- Remove the old bathtub and wall surround by carefully prying them loose with a pry bar or crowbar.
2. Installing the New Bathtub
- Place the new bathtub in position and level it using shims.
- Connect the drain line and water supply lines.
- Secure the bathtub to the floor and surrounding walls using screws or bolts.
3. Installing the Wall Surround System
- Apply a bead of silicone caulk around the bathtub perimeter and the wall where the surround will be installed.
- Starting in a corner, install the wall surround panels by sliding them into the trim channels and securing them with screws or nails.
- Finish the installation by caulking all seams and installing trim pieces around the edges.
4. Final Touches
- Reinstall the fixtures, such as the faucet, showerhead, and towel bars.
- Reconnect the water supply and drain lines.
- Apply a bead of caulk around the bathtub and wall surround seams.
Tips for Success
- Wear protective gear, including gloves and safety glasses.
- Work in a well-ventilated area.
- Be patient and meticulous, especially when installing the wall surround system.
- Don't hesitate to seek professional assistance if needed.
- Enjoy your newly updated bathroom!

How To Install An Acrylic Bathtub And Surround

How To Install A Bath And Shower Surround Delta Classic 400

How To Install A Bathtub And Shower Wall Set

How To Close The Gap Between Bathtub And Wall Doityourself Com Community Forums

Bathtub Tub Replacement Replace Bath Planet

Tub Shower Combo Replacement Kits With Base Walls Doors Innovate Building Solutions

How To Install A Glue Up Shower Enclosure The Home Depot

How To Install A Bath Tub Surround

3 Ways To Install A Tub Surround Wikihow Life

How To Install Acrylic Bathtub And Surround Walls Part 6
Related Posts

