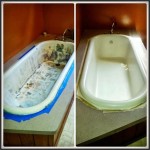
Converting Bathtub to Shower: A Step-by-Step Guide
Are you looking to modernize your bathroom and replace your old bathtub with a sleek and functional shower? Whether you're a seasoned DIY enthusiast or a novice seeking a step-by-step guide, this comprehensive article will take you through the process of converting your bathtub to a shower. With careful planning, attention to detail, and the right tools and materials, you can create a stylish and functional shower space that meets your needs and enhances your bathroom's overall aesthetic. ### 1. Planning and Preparation:a. Assessing Feasibility:
- Determine if your bathroom layout and plumbing system can accommodate a shower conversion. - Consider the size and location of the bathtub and any potential obstacles (e.g., windows, walls, fixtures).b. Obtaining Permits:
- Check with your local building department to determine if permits are required for the conversion. - If necessary, obtain the necessary permits and have them ready before starting the project.c. Safety Precautions:
- Wear appropriate safety gear, including gloves, safety goggles, and a dust mask. - Disconnect the water supply and electrical power to the bathtub area. - Ensure proper ventilation to prevent the buildup of toxic fumes.d. Tools and Materials:
- Gather essential tools and materials: - Hammer - Crowbar - Pry bar - Screwdriver - Pliers - Tape measure - Level - Utility knife - Caulk gun - Safety goggles - Gloves - Shower pan or liner - Shower base kit - Shower door or curtain - Tile or shower surround material - Waterproof grout and adhesive - Plumber's putty - Shut-off valves - Shower faucet and fixtures ### 2. Dismantling the Bathtub:a. Removing Fixtures:
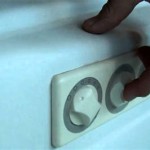
- Disconnect and remove any fixtures attached to the bathtub, such as faucets, showerheads, and drains. - Cap the pipes temporarily to prevent water leakage.b. Detaching the Bathtub:
- Carefully use a pry bar or crowbar to detach the bathtub from the surrounding structure. - Remove any screws or fasteners securing the bathtub in place. - Lift and remove the bathtub, taking care not to damage the surrounding area. ### 3. Preparing the Shower Space:a. Removing Old Fixtures:
- Remove the old showerhead, faucet, and other fixtures from the wall. - Cap the exposed pipes to prevent water leakage.b. Installing Shut-Off Valves:
- Install shut-off valves on the exposed pipes to control water flow to the shower. - This will allow you to turn off the water supply to the shower without affecting the rest of the bathroom.c. Leveling the Shower Base:
- If you're installing a shower pan or base, ensure it is level using a level tool. - Adjust the support structure underneath the base as needed to achieve a level surface. ### 4. Installing the Shower Pan or Liner:a. Preparing the Subfloor:
- Ensure the subfloor is smooth, level, and free of debris. - Apply a layer of thin-set mortar to the subfloor and allow it to dry according to the manufacturer's instructions.b. Installing the Shower Pan or Liner:
- Position the shower pan or liner in place, making sure it fits snugly against the walls and corners. - Apply a layer of sealant or adhesive to the edges of the pan or liner to secure it to the subfloor. - Allow the sealant or adhesive to dry completely. ### 5. Installing the Shower Base:a. Assembling the Base:
- If you're using a shower base kit, assemble the base according to the manufacturer's instructions. - Ensure all components fit together securely.b. Installing the Base:
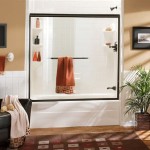
- Place the shower base on top of the shower pan or liner. - Level the base using a level tool and adjust the support structure underneath as needed. - Secure the base to the subfloor using screws or fasteners provided in the kit. ### 6. Installing the Shower Walls and Door:a. Choosing Shower Walls:
- Select shower wall panels or tiles that are waterproof and easy to clean.b. Installing Shower Walls:
- Apply a thin layer of adhesive to the back of each shower wall panel or tile. - Press the panels or tiles firmly against the wall, starting from the bottom and working your way up. - Use a level tool to ensure each panel or tile is installed straight.c. Installing the Shower Door or Curtain:
- Install a shower curtain rod or frame according to the manufacturer's instructions. - Hang the shower curtain or install the shower door. - Ensure the door or curtain opens and closes smoothly. ### 7. Connecting Plumbing and Fixtures:a. Connecting Water Supply Lines:
- Connect the shower faucet and fixtures to the exposed pipes using flexible water supply lines. - Ensure all connections are secure and free of leaks.b. Installing Shower Head and Fixtures:
- Install the showerhead, faucet, and any other desired fixtures. - Tighten all connections securely. ### 8. Finishing Touches:a. Applying Grout:
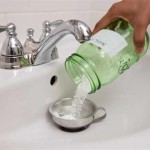
- If you're using tiles for the shower walls, apply grout between the tiles to create a waterproof seal. - Allow the grout to dry according to the manufacturer's instructions.b. Caulking and Sealing:
- Apply caulk around the edges of the shower pan or liner, shower base, and shower walls to prevent leaks. - Ensure all seams and joints are properly sealed.c. Cleaning and Testing:
- Clean the newly installed shower thoroughly to remove any debris or residue. - Turn on the water supply and test the shower to ensure it functions properly. - Check for any leaks or issues and address them immediately. By following these steps and taking the necessary precautions, you can successfully convert your bathtub to a shower. Always consult with a qualified plumber or contractor if you encounter any challenges or have concerns about the safety or complexity of the conversion process. A well-executed conversion will not only enhance the functionality of your bathroom but also contribute to its overall style and aesthetic appeal.
Bathtub To Shower Conversion Safe Bathroom For Seniors

The Pros And Cons Of Converting A Standard Tub Into Walk In Shower Naperville

Bathtub To Shower Conversion Safe Bathroom For Seniors

Top 4 Benefits Of Tub To Shower Conversion Silverado Showers Llc

Tub To Shower Conversion Bath Remodel Ez Pro Baths

Convert Shower To Bath Tub Conversion Planet

Tub Conversions To Shower Conversion Bath Planet

Tub To Shower Conversion Living Baths 413 279 1202

Bathtub To Shower Conversion Safe Bathroom For Seniors

Tub To Shower Conversion Naples Repair Remodeling