Revitalize Your Bathtub with Rust-Oleum's Bathtub Refinishing Kit
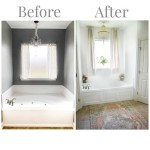
Bathtubs, as essential bathroom fixtures, can succumb to the wear and tear of daily use, resulting in unsightly stains, chips, and discoloration. Rust-Oleum's Bathtub Refinishing Kit presents a cost-effective solution to restore your bathtub's pristine appearance, saving you the expense of a full replacement.
This easy-to-use kit provides you with all the necessary materials for a professional-looking bathtub refinishing project. With careful preparation, application, and maintenance, you can achieve a renewed and rejuvenated bathtub that will enhance your bathroom's aesthetics and functionality.
Essential Steps for Using the Rust-Oleum Bathtub Refinishing Kit
1. Surface Preparation:
Before applying the refinishing kit, thoroughly clean the bathtub surface. Use a non-abrasive cleaner and a soft cloth to remove any dirt, soap scum, or mildew. Inspect the surface for any cracks or chips and repair them using the included repair patch kit.
2. Masking and Taping:
Protect the surrounding areas from overspray by masking off the fixtures, wall, and floor with painter's tape. Ensure that the tape adheres firmly to the surfaces to prevent paint from seeping underneath.
3. Application:
The kit contains a primer and a topcoat. Apply the primer evenly over the bathtub surface using a brush or roller, ensuring complete coverage. Allow the primer to dry completely as per the recommended drying time.
Once the primer has dried, apply the topcoat in a similar manner. Apply multiple thin coats, allowing each coat to dry before applying the next. This will provide a durable and professional-looking finish.
4. Drying and Curing:
After applying the final coat, allow the bathtub to dry and cure for the specified time. This is crucial for the finish to attain its maximum hardness and durability.
5. Maintenance:
To prolong the refinished bathtub's lifespan, practice regular cleaning and maintenance. Use non-abrasive cleaners and avoid harsh chemicals that could damage the finish. Regularly inspect the surface for any signs of wear or damage and address them promptly.
Additional Tips for Success
- Ensure proper ventilation during the application and drying process.
- Use high-quality brushes and rollers for smooth and even application.
- Read and follow the manufacturer's instructions carefully.
- Allow ample drying time to achieve optimum results.
- Consider using a spray gun for a more professional-looking finish.
By following these steps, you can successfully use the Rust-Oleum Bathtub Refinishing Kit to revitalize your bathtub and restore its pristine appearance. Enjoy the convenience and cost-effectiveness of this DIY project, transforming your bathroom into a rejuvenated and inviting space.

Rust Oleum Tub And Tile Refinishing Kit Review Ask Anna

How To Paint A Tub With Rustoleum What Not Do

Tub Tile Refinishing Kit Bathtub Coating Rust Oleum

Diy Painted Bathtub Follow Up Your Questions Answered Addicted 2 Decorating

Rustoleum Tub And Tile Refinishing Kit How To Paint Your Diy

To Spray Or Not A Bathtub That Is The Caldwell Project

Ultimate Tile Refinishing Guide Must Do Steps Before Using Rust Oleum Kit

How To Paint A Bathtub Rustoleum Tub And Tile House Becoming Home

Rustoleum Tub And Tile Refinishing Kit Diy Bathtub Resurfacing Re How To Paint Your

How To Paint A Tub With Rustoleum What Not Do
Related Posts