How To Get The Drain Plug Out Of A Bathtub
Removing a bathtub drain plug might seem like a simple task, but it can quickly become frustrating if the plug is stuck, corroded, or if the specific drain mechanism is unfamiliar. Understanding the different types of bathtub drain plugs and the appropriate methods for removal is crucial to avoid damaging the drain or the bathtub itself. This article provides a comprehensive guide to identifying common drain types and outlines the necessary steps for their safe and effective removal.
Bathtub drain plugs serve the vital function of sealing the drain opening, preventing water from escaping while the tub is in use. Over time, however, hair, soap scum, mineral deposits, and other debris can accumulate around the plug and within the drain mechanism, causing it to become stuck or difficult to operate. Furthermore, the metal components of the plug and drain can corrode, further hindering their movement. Therefore, regular maintenance and a careful approach to removal are essential.
Before attempting to remove any drain plug, it is generally advisable to wear rubber gloves to protect hands from potential contaminants and sharp edges. Adequate lighting is also important to clearly see the drain mechanism. Consider using a flashlight or headlamp to illuminate the area effectively. It is also wise to have a small container handy to collect any debris or small parts that may come loose during the removal process.
Identifying the Type of Bathtub Drain Plug
The first step in removing a bathtub drain plug is to accurately identify its type. Several common designs exist, each requiring a different approach for removal. Recognizing the specific type of plug is paramount to avoiding damage and ensuring a successful outcome. The most prevalent types include pop-up drains, lift-and-turn drains, toe-touch drains, and trip lever drains. Less common types may also exist depending on the age and manufacturer of the bathtub.
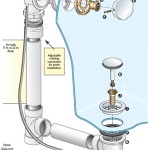
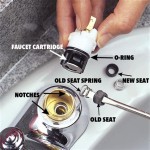
Pop-up drains are characterized by a stopper that is raised and lowered by a lever mechanism usually located near the overflow drain. This mechanism typically involves a linkage connecting the lever to the stopper. Lift-and-turn drains feature a stopper that is lifted and turned to open or close the drain. They usually have a small knob or handle on top of the stopper for easy manipulation. Toe-touch drains operate with a simple push of the foot on the stopper. A second push typically releases the stopper, allowing the water to drain. Trip lever drains use a lever located on the overflow plate to raise and lower the drain stopper. This type is often found in older bathtubs.
A careful visual inspection of the drain and its operating mechanism will usually suffice to identify its type. If uncertainty persists, consulting the manufacturer’s documentation or searching online for images of different drain types can be helpful. It is important to note that even within each category, variations may exist in the specific design and method of removal.
Removing a Pop-Up Drain Plug
Removing a pop-up drain plug generally involves detaching the linkage that connects the stopper to the operating lever. This linkage is typically accessible through the overflow drain opening. The following steps outline the procedure:
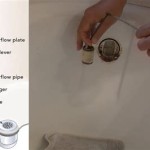
- Remove the overflow plate: Using a screwdriver, remove the screws that secure the overflow plate to the bathtub. Carefully set the plate and screws aside.
- Locate the linkage: Looking into the overflow drain opening, locate the linkage connecting the operating lever to the drain stopper. This linkage may consist of a rod, a spring, and a pivot mechanism.
- Disconnect the linkage: Depending on the design, the linkage may be connected with a clip, a screw, or a ball joint. Use pliers or a screwdriver to carefully disconnect the linkage from the stopper. In some cases, it may be necessary to manipulate the operating lever to create slack in the linkage.
- Remove the stopper: Once the linkage is disconnected, the stopper should be free to be removed. Gently pull the stopper upwards and out of the drain opening. If the stopper is stuck, try wiggling it gently or using a pair of pliers to grip it securely while pulling upwards. Avoid using excessive force, which could damage the stopper or the drain.
- Clean the stopper and drain: After removing the stopper, thoroughly clean it and the drain opening to remove any accumulated debris. This will help prevent future blockages and ensure smooth operation.
- Reassemble the drain: To reassemble the drain, reverse the above steps. Reconnect the linkage to the stopper, reinstall the overflow plate, and tighten the screws. Test the operation of the drain to ensure that it is functioning properly.
If the stopper is particularly corroded or stuck, it may be necessary to use a penetrating oil lubricant. Apply the lubricant to the stopper and the drain opening, and allow it to soak for several minutes before attempting to remove the stopper. This can help loosen the corrosion and make the stopper easier to remove.
Removing a Lift-and-Turn Drain Plug
Lift-and-turn drain plugs are typically secured with a screw located beneath the stopper cap. Removing this type of drain plug usually involves these steps:
- Remove the stopper cap: The stopper cap is usually secured to the stopper body with a small screw. Locate the screw on the top of the stopper cap and use a screwdriver to remove it. In some cases, the screw may be hidden beneath a decorative cover that can be pried off with a small flathead screwdriver.
- Remove the stopper: Once the screw is removed, the stopper cap should be free to be removed. Gently lift the stopper cap off of the stopper body.
- Loosen the stopper body: After removing the stopper cap, the stopper body may be threaded into the drain housing. Rotate the stopper body counterclockwise to loosen it. If the stopper body is stuck, try using a wrench or pliers to grip it securely while turning it. Be careful not to damage the stopper body.
- Remove the stopper body: Once the stopper body is loosened, it should be possible to lift it out of the drain housing. Gently pull the stopper body upwards and out of the drain opening.
- Clean the stopper and drain: After removing the stopper body, thoroughly clean it and the drain opening to remove any accumulated debris.
- Reassemble the drain: To reassemble the drain, reverse the above steps. Thread the stopper body back into the drain housing, reinstall the stopper cap, and tighten the screw. Test the operation of the drain to ensure that it is functioning properly.
If the stopper body is severely corroded, it may be necessary to use a penetrating oil lubricant. Apply the lubricant to the stopper body and the drain opening, and allow it to soak for several minutes before attempting to remove the stopper body. This can help loosen the corrosion and make the stopper body easier to remove.
Removing a Toe-Touch Drain Plug
Toe-touch drain plugs are often more complex than other types, as they typically contain an internal spring-loaded mechanism. Removing this type of drain plug requires a delicate approach to avoid damaging the internal components. The following steps offer guidance:
- Depress the stopper: Press down on the stopper to engage the release mechanism. This will allow access to the components inside.
- Unscrew the stopper: Most toe-touch stoppers are threaded and can be unscrewed. Grip the sides of the stopper firmly and rotate it counterclockwise. It might be stiff, so apply steady pressure.
- Remove the internal components: Once the stopper is unscrewed, carefully remove the internal components. This may include a spring, a plunger, and various washers. Pay close attention to the order in which these components are removed, as this will be important for reassembly.
- Clean the stopper and drain: Thoroughly clean all of the components, removing any hair, soap scum, or other debris. Clean the drain opening as well.
- Reassemble the drain: Reassemble the drain in the reverse order of disassembly. Make sure that all of the components are properly aligned.
- Test the operation of the drain: After reassembly, test the operation of the drain to ensure that it is functioning properly.
If the stopper is stuck or difficult to unscrew, try using a rubber jar opener to improve grip. Avoid using metal tools, as these could damage the stopper.
Removing a Trip Lever Drain Plug
Trip lever drain plugs are connected to a plunger or stopper inside the drainpipe by a linkage. Removing this type of plug requires accessing the linkage through the overflow drain.
- Remove the overflow plate: Unscrew and remove the overflow plate.
- Pull out the linkage: Carefully pull out the linkage connected to the trip lever. This linkage usually includes a rod and a plunger or stopper at the end.
- Remove the stopper: Once the linkage is removed, the stopper should come out with it, or it may be left behind in the drainpipe. If it's stuck, try using a bent wire or pliers to pull it out.
- Clean the stopper and drain: Clean all parts, including the drainpipe, of any debris.
- Reassemble the drain: Insert the stopper (if it wasn't attached to the linkage) back into the drainpipe. Then, insert the linkage back through the overflow drain and reattach the overflow plate.
Sometimes, the linkage may be corroded or broken. In such cases, it may be necessary to replace the entire linkage assembly.
In summary, removing a bathtub drain plug requires careful identification of the drain type and the use of appropriate techniques. By following the steps outlined in this article, individuals can safely and effectively remove most common types of bathtub drain plugs. Remember to always prioritize caution and avoid excessive force, as this can prevent damage to the drain or the bathtub itself.

How To Easily Remove Bathtub Drain Plug Stopper Unclog In 1 Minute Jonny Diy
How To Remove 6 Diffe Kinds Of Drain Stoppers

How To Remove A Bathtub Drain The Home Depot

Remove A Bathtub Drain Stopper To Unclog The Quick Easy
How To Remove 6 Diffe Kinds Of Drain Stoppers

4 Easy Ways To Remove A Tub Drain Stopper Wikihow

How To Remove A Bathtub Drain Stopper

How To Remove Bathtub Drain Stopper That Spins Freely

How To Remove A Bathtub Drain Stopper Mr Rooter

How To Remove A Bathtub Drain Stopper
Related Posts