Repairing Bathtub Drain Pipes: A Comprehensive Guide
Bathtub drain pipes, hidden beneath the floor or behind walls, are critical components of a household plumbing system. When these pipes fail, homeowners can face significant issues, ranging from slow draining and unpleasant odors to water damage and costly repairs. Understanding the common causes of drain pipe problems and knowing how to approach repairs is essential for maintaining a functional and efficient bathroom. This article provides a comprehensive guide to repairing bathtub drain pipes, covering diagnostics, necessary tools, and step-by-step repair procedures.
Before beginning any repair work, safety precautions must be addressed. Turn off the water supply to the bathroom to prevent accidental flooding. Wear safety glasses and gloves to protect against debris and potential contaminants. Ensure the work area is well-ventilated, especially if using chemical drain cleaners or solvents. Furthermore, disconnecting electrical appliances near the work area is advised to mitigate any electrical hazards.
Identifying Common Drain Pipe Problems
Several factors can contribute to problems with bathtub drain pipes. Regularly identifying these issues early can prevent more extensive and costly repairs down the line.
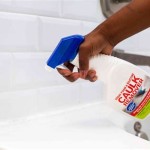
Clogs: This is perhaps the most common drain pipe problem. Hair, soap scum, and other debris accumulate over time, restricting water flow and eventually causing a complete blockage. Symptoms include slow draining or standing water in the bathtub after use. Regular cleaning and the use of drain screens can help prevent clogs.
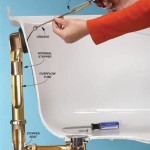
Leaks: Leaks can occur at pipe joints, fittings, or due to corrosion. They can manifest as water stains on the ceiling below, dampness around the bathtub, or a musty odor. Identifying the source of the leak is crucial for effective repair. Small leaks may be easily fixed, while larger leaks may require more extensive pipe replacement.
Corrosion: Over time, metal drain pipes can corrode, particularly in areas with hard water or acidic soil. Corrosion weakens the pipe, leading to cracks, leaks, and eventual failure. The presence of rust or flaking metal on the pipe's exterior is a telltale sign of corrosion. Depending on the extent of the corrosion, pipe replacement may be necessary.
Damaged or Cracked Pipes: Physical damage, such as from impact or shifts in the foundation, can cause cracks or breaks in the drain pipes. These cracks can lead to significant leaks and water damage. Inspecting exposed sections of the drain pipe for any visible damage is crucial. Significant damage often necessitates pipe replacement.
Loose Connections: Over time, the connections between drain pipes and fittings can loosen, leading to leaks. This is particularly common with older plumbing systems. Checking all accessible connections for tightness and tightening any loose fittings can often resolve this issue. In some cases, replacing the fittings may be necessary.
Essential Tools and Materials for Repair
Having the right tools and materials on hand is essential for efficient and effective drain pipe repair. The specific tools and materials needed will depend on the type of repair being undertaken, but a basic toolkit should include the following:
Pipe Wrench: A pipe wrench is essential for gripping and turning drain pipes. Different sizes may be required depending on the pipe diameter.
Adjustable Wrench: An adjustable wrench is useful for tightening and loosening fittings, such as nuts and bolts.
Plumber's Putty: Plumber's putty is used to create a watertight seal around fittings and fixtures.
Teflon Tape: Teflon tape, also known as plumber's tape, is used to seal threaded pipe connections.
Pliers: Pliers are useful for gripping and manipulating small parts.
Screwdrivers: A set of screwdrivers, both Phillips and flathead, is essential for removing and installing screws.
Hacksaw or Pipe Cutter: A hacksaw or pipe cutter is needed for cutting drain pipes to size.
Basin Wrench: A basin wrench is specifically designed for loosening and tightening nuts in hard-to-reach places, such as under the sink or behind the bathtub.
Plunger: A plunger is a basic tool for clearing minor clogs in drain pipes.
Drain Snake or Auger: A drain snake or auger is used to remove more stubborn clogs from drain pipes.
Replacement Pipes and Fittings: Having replacement pipes and fittings on hand is essential for repairing or replacing damaged sections of the drain pipe.
Safety Glasses and Gloves: Safety glasses and gloves are essential for protecting your eyes and hands from debris and potential contaminants.
Bucket and Rags: A bucket and rags are needed for catching water and cleaning up spills.
Flashlight or Work Light: A flashlight or work light is essential for illuminating the work area, especially in dark or confined spaces.
Step-by-Step Repair Procedures
The following outlines common repair procedures for bathtub drain pipes. These steps are intended as a general guide, and the specific steps may vary depending on the nature of the problem and the type of plumbing system.
Clearing a Clogged Drain:
Step 1: Start by using a plunger to attempt to dislodge the clog. Ensure there is enough water in the bathtub to cover the flange of the plunger. Apply firm, consistent pressure with the plunger, and repeat several times.
Step 2: If the plunger is unsuccessful, use a drain snake or auger to break up or remove the clog. Insert the drain snake into the drain opening and rotate it as you push it further into the pipe. When you encounter resistance, continue rotating the snake to break up the clog or hook onto it.
Step 3: Once you have removed the clog, flush the drain with hot water to ensure it is clear.
Step 4: As a preventative measure, consider using a drain screen to catch hair and other debris before they enter the drain pipe.
Repairing a Leaky Pipe Joint:
Step 1: Identify the source of the leak. Dry the area around the joint with a clean rag to help pinpoint the exact location of the leak.
Step 2: If the joint is simply loose, try tightening the fitting with a wrench. Be careful not to overtighten, as this can damage the fitting.
Step 3: If tightening the fitting does not stop the leak, disassemble the joint and inspect the threads for damage. Clean the threads thoroughly and apply fresh Teflon tape or plumber's putty before reassembling the joint.
Step 4: If the fitting is corroded or damaged, replace it with a new fitting of the same type and size.
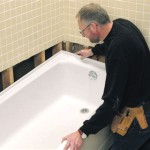
Replacing a Section of Damaged Pipe:
Step 1: Turn off the water supply to the bathroom.
Step 2: Cut the damaged section of pipe using a hacksaw or pipe cutter. Be sure to cut the pipe straight to ensure a proper fit with the replacement pipe.
Step 3: Measure the length of the section of pipe that you removed and cut a new piece of pipe to the same length.
Step 4: Deburr the cut ends of the pipe with a file or deburring tool to remove any sharp edges that could damage the fittings.
Step 5: Apply Teflon tape or plumber's putty to the threads of the fittings and assemble the new section of pipe with the existing pipe. Ensure that all connections are tight and watertight.
Step 6: Turn the water supply back on and check for leaks.
Repairing a Drain Stopper Mechanism:
Step 1: Identify the type of drain stopper mechanism. Common types include lift-and-turn, pop-up, and toe-touch stoppers.
Step 2: For lift-and-turn stoppers, clean any debris from the stopper and the drain opening. Adjust the height of the stopper by loosening the screw on the side of the stopper and repositioning it.
Step 3: For pop-up stoppers, remove the stopper and clean any debris from the stopper and the drain opening. Inspect the linkage mechanism for damage and replace any worn or broken parts.
Step 4: For toe-touch stoppers, clean any debris from the stopper and the drain opening. The mechanism may need adjustment based on the manufacturer's specific instructions.
Sealing Around the Drain Flange:
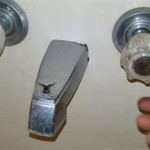
Step 1: If water is leaking around the drain flange (the metal ring around the drain opening), the seal between the flange and the bathtub may be compromised.
Step 2: Remove the drain stopper and unscrew the drain flange from the drain pipe below.
Step 3: Clean the area around the drain opening thoroughly, removing any old plumber's putty or caulk.
Step 4: Apply a generous bead of plumber's putty around the underside of the drain flange and reattach it to the drain pipe below. Tighten the flange securely, but be careful not to overtighten, as this could damage the bathtub.
Step 5: Clean up any excess plumber's putty around the drain flange. Once the putty has cured, apply a bead of caulk around the edge of the flange to create a watertight seal.
By addressing drain pipe issues promptly and effectively, homeowners can prevent costly repairs, maintain a functional plumbing system, and ensure a comfortable and hygienic bathroom environment. Remember to prioritize safety and seek professional assistance when dealing with complex plumbing problems or when unsure about any aspect of the repair process.

Tub Drain Pipe Leaks How To Replace

How To Replace Bathtub Drain Stopper With A Lift And Turn Diy

How To Replace A Bathtub Drain

How To Remove Broken Bathtub Drain Without Special Removal Tool Cross Members

Plumbing Struggles Replacing Bathtub Drain Home Improvement Stack Exchange

Leaking Tub Drain Replaced Plumbing Tips

Plumbing How Do I Replace A Broken Bathtub Drain Home Improvement Stack Exchange

Bathtub Has Been Extremely Slow Draining Clogged For What Seems Like Years And All Methods We Ve Tried To Fix Draino Snakes Etc Are Inconsistent Any Permanent Solutions Quora

How To Diagnose A Bathtub Leak Diy

What Is A Bathtub Overflow Drain
Related Posts