Replacing a Bathtub Faucet Spout Diverter Valve
The bathtub faucet spout diverter valve, a seemingly small component, performs a critical function in directing water flow from the faucet to the showerhead. Over time, these valves can degrade due to mineral buildup, wear and tear, or simple aging of the internal components. A malfunctioning diverter valve can lead to reduced water pressure in the shower, simultaneous water flow from both the faucet and showerhead, or a complete inability to divert water upwards. Replacing a faulty diverter valve restores proper shower function and prevents water wastage.
Addressing a malfunctioning diverter valve promptly is essential. Ignoring the issue can lead to increased water bills, potential water damage from leaks, and a frustrating showering experience. While some diverter valve issues can be temporarily addressed with cleaning or minor repairs, replacement is often the most reliable and long-lasting solution. This article provides a detailed guide on how to replace a bathtub faucet spout diverter valve, ensuring a smooth and efficient shower system operation.
Identifying the Diverter Valve Type
Before embarking on the replacement process, accurately identifying the type of diverter valve present in the existing bathtub faucet is crucial. Bathtub faucets commonly employ one of three primary diverter valve types: spout diverters, T-handle diverters, and three-valve diverters. Each type operates differently and requires specific replacement procedures.
Spout Diverters: These are the most common type, integrated directly into the bathtub faucet spout. They typically feature a pull-up or push-down lever or knob located on the spout itself. Activating this lever diverts the water flow to the showerhead. Spout diverters are generally easier to replace than other types because they are directly accessible and often require minimal tools.
T-Handle Diverters: Located either above or below the bathtub faucet, T-handle diverters have a separate handle resembling the letter "T". Rotating the handle allows the user to switch between the faucet and showerhead. Replacing a T-handle diverter often involves accessing the valve body behind the wall, making the process slightly more complex.
Three-Valve Diverters: These systems use three separate handles: one for hot water, one for cold water, and one specifically for diverting water to the showerhead. Three-valve diverters are an older style and require more extensive plumbing knowledge to repair or replace. Replacement often involves working with multiple valve stems and seats.
Determining the diverter valve type is a fundamental first step. A visual inspection of the faucet and its associated handles will typically reveal the type. Consulting the faucet's documentation or the manufacturer's website can also provide valuable information. Failure to correctly identify the diverter valve type can lead to purchasing the wrong replacement parts and potentially damaging the existing plumbing.
Tools and Materials Required
Successful replacement of a bathtub faucet spout diverter valve hinges on having the right tools and materials at hand. Gathering these items before beginning the project streamlines the process and minimizes potential disruptions.
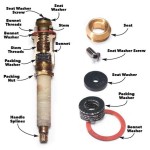
Essential Tools: A pipe wrench is indispensable for loosening and tightening plumbing connections. Adjustable wrenches can be used as alternatives, but a pipe wrench provides better grip and leverage. A screwdriver set, including both Phillips head and flathead screwdrivers, is necessary for removing screws and accessing internal components. Additionally, penetrating oil helps to loosen corroded or stuck connections. A clean rag or towel is useful for wiping up spills and keeping the work area clean. Finally, plumbers putty or Teflon tape is crucial for sealing joints and preventing leaks.
Replacement Parts: The most important material is the replacement diverter valve itself. After identifying the diverter valve type, purchase a replacement that is compatible with the existing faucet model. It is recommended to purchase a diverter valve from a reputable plumbing supply store to ensure quality and compatibility. Additionally, consider replacing the O-rings and washers associated with the diverter valve, as these components are also prone to wear and tear. These small parts are inexpensive and contribute significantly to a leak-free installation.
Safety Gear: Eye protection and gloves are essential for safety. Eye protection shields the eyes from potential splashes or debris, while gloves protect the hands from sharp edges and plumbing chemicals. Turning off the water supply is a prerequisite for any plumbing repair. Locate the shut-off valves for the bathtub faucet, typically found under the sink or in the basement. If individual shut-off valves are not available, the main water supply to the house must be turned off.
Careful preparation of the tools and materials significantly contributes to a smooth and successful diverter valve replacement. Taking the time to gather these items beforehand minimizes disruptions and ensures that the project can be completed efficiently.
Step-by-Step Replacement Procedure for a Spout Diverter
Replacing a spout diverter valve is a relatively straightforward process that can be accomplished with basic plumbing skills. The following step-by-step guide provides a clear outline of the procedure:
Step 1: Shut Off the Water Supply: Before commencing any plumbing work, ensuring the water supply is completely shut off is paramount. Locate the shut-off valves for the bathtub faucet and turn them off. If individual shut-off valves are unavailable, the main water supply to the house must be turned off. Open the bathtub faucet to relieve any residual water pressure in the pipes.
Step 2: Remove the Existing Spout: The method for removing the existing spout varies depending on the type of connection. Some spouts are threaded and can be unscrewed by rotating them counterclockwise. Others are held in place by a set screw located underneath the spout. Locate the set screw and loosen it using an Allen wrench or screwdriver. Once the set screw is loosened or removed, the spout can be pulled straight off the pipe.
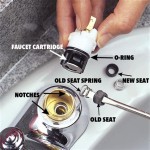
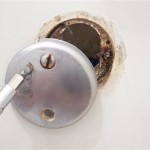
Step 3: Access the Diverter Valve: Once the spout is removed, the diverter valve will be visible inside the faucet body. Depending on the design, the diverter valve may be held in place by screws, clips, or a simple friction fit. Carefully examine the valve assembly to determine the method of attachment.
Step 4: Remove the Old Diverter Valve: Using the appropriate tools, remove the screws or clips holding the old diverter valve in place. Gently pull the diverter valve out of the spout. Take note of the orientation of the valve and any associated washers or O-rings. This will aid in installing the new diverter valve correctly.
Step 5: Install the New Diverter Valve: Before installing the new diverter valve, inspect the inside of the spout for any debris or corrosion. Clean the area thoroughly with a rag. Apply plumbers putty or Teflon tape to the threads of the new diverter valve, if applicable, to ensure a watertight seal. Insert the new diverter valve into the spout, ensuring it is oriented correctly. Secure the valve with screws or clips, as required.
Step 6: Reinstall the Spout: Apply Teflon tape to the threads of the pipe extending from the wall. Slide the spout back onto the pipe, aligning it correctly. If the spout is threaded, tighten it by rotating it clockwise. If the spout is held in place by a set screw, tighten the set screw securely. Ensure the spout is firmly attached to the pipe.
Step 7: Test for Leaks: Slowly turn the water supply back on. Check for any leaks around the spout and the diverter valve. If leaks are present, tighten the connections further or reapply plumbers putty or Teflon tape. Activate the diverter valve to ensure it is functioning correctly, directing water to the showerhead when engaged and to the faucet when disengaged.
Following these steps carefully ensures the successful replacement of a spout diverter valve. If any difficulties are encountered, consulting a qualified plumber is recommended.
Addressing Potential Problems
Even with careful planning, certain challenges may arise during the diverter valve replacement process. Understanding common problems and their solutions can help overcome these obstacles and ensure a successful outcome.
Stuck or Corroded Connections: Older faucets often suffer from corroded or stuck connections, making it difficult to remove the spout or access the diverter valve. Applying penetrating oil to the affected areas and allowing it to soak for several hours can help loosen the connections. Using a pipe wrench to gently rock the spout back and forth can also aid in breaking the corrosion. If the connections remain stubborn, applying heat with a heat gun (carefully) can sometimes help to expand the metal and loosen the bond.
Incorrect Replacement Part: Purchasing the wrong replacement diverter valve is a common mistake. Before attempting to install the new valve, carefully compare it to the old valve to ensure it is the correct size and configuration. Check the thread size, the diverter mechanism, and any associated O-rings or washers. If the replacement part is incorrect, return it to the store and obtain the correct one.
Leaks After Installation: Leaks after installation are often caused by inadequate sealing of the connections. Ensure that Teflon tape or plumbers putty is applied correctly to all threaded connections. Tighten the connections firmly, but avoid over-tightening, which can damage the pipes or fittings. If leaks persist, disassemble the connections, reapply the sealant, and reassemble. If the leak originates from the diverter valve itself, the valve may be defective and require replacement.
Difficulty Accessing the Diverter Valve: Some faucet designs make it difficult to access the diverter valve, requiring disassembly of other faucet components. Consult the faucet's documentation or the manufacturer's website for specific instructions on accessing the diverter valve. If the process is too complex or you are uncomfortable disassembling the faucet, consult a qualified plumber.
Damaged Pipes or Fittings: During the replacement process, pipes or fittings can be accidentally damaged, leading to leaks or other problems. If a pipe is cracked or damaged, it must be repaired or replaced. Small leaks from fittings can sometimes be sealed with epoxy putty. However, for significant damage, it is best to consult a qualified plumber.
By anticipating potential problems and having the necessary tools and knowledge to address them, the diverter valve replacement process can be completed successfully and efficiently. If at any point the task feels overwhelming or you are unsure of the next steps, seeking professional assistance is always a prudent choice.

Tub Spout Diverter How To Fix From Beginning The End Using Danco Repair Kit

Bathtub Spout With Diverter Replacement Fix Leaking Tub Jonny Diy

Bathtub Spout Diverter Replacement Easy

Replace Tub Spout Diverter Pull Kit Diy Fix

Replacing A Tub Faucet Bathtub Spout Replacement

Learn How To Remove And Install Various Tub Spouts

How To Fix A Shower Diverter Repair Or Replace

Repair Leaking Tub Spout Diverter Pull In Shower Mode

How To Repair A Shower Diverter Mr Rooter Blog

How To Replace A Tub Spout