Fixing a Leaky Single-Handle Bathtub Faucet
A dripping bathtub faucet is more than just an annoyance; it’s a persistent drain on water resources and a needless increase in water bills. A single-handle bathtub faucet, while streamlined in design, can still develop leaks over time due to wear and tear on internal components. Understanding the potential causes of these leaks and the steps required for repair is essential for any homeowner seeking to address this common plumbing issue. This article provides a comprehensive guide to diagnosing and fixing a leaky single-handle bathtub faucet effectively, focusing on safety, proper tools, and methodical troubleshooting.
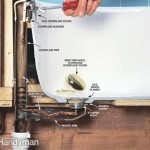
Before embarking on any plumbing repair, safety should be the paramount concern. Water and electricity are a dangerous combination, so it is crucial to eliminate any risk of electrical shock. This means ensuring any nearby electrical outlets are protected and dry. Moreover, the water supply to the faucet must be completely shut off before disassembly. This usually involves locating the shut-off valves for the hot and cold water lines that feed the faucet. These valves are typically found under the sink, in an access panel behind the tub, or in the basement near the main water meter. If individual shut-off valves are not present, the main water supply to the entire house will need to be turned off. Once the water supply is shut off, open the faucet to relieve any residual water pressure in the lines. Place a towel in the bathtub to protect the finish from scratches and to absorb any water that may spill during the repair process.
The tools required for this task are generally common household items. A set of screwdrivers (both flathead and Phillips head) is essential for removing handles, escutcheons, and internal components. A plumbing wrench or adjustable wrench is often needed for loosening and tightening larger nuts and fittings. A set of Allen wrenches (also known as hex keys) may be required for certain single-handle faucet designs. Additionally, having a pair of pliers, a utility knife, and some old rags or towels will prove useful. A container to hold small parts, such as screws and O-rings, is recommended to prevent them from being lost during the disassembly process. Finally, it is beneficial to have some plumber's grease on hand to lubricate new O-rings and seals during reassembly. Having all of these tools gathered and readily accessible before starting the repair ensures a smooth and efficient process.
Identifying the Cause of the Leak
The first step in fixing a leaky single-handle bathtub faucet is to pinpoint the source of the leak. While the dripping water is the symptom, the underlying cause can vary depending on the faucet's design and the extent of wear on its components. Common culprits include worn-out O-rings, corroded valve seats, and damaged cartridges. The location of the leak often provides clues about the likely cause. If the leak is coming from the base of the handle, the O-rings or seals around the handle stem are likely worn or damaged. If the leak is coming from the spout, the cartridge or valve seat is the more probable cause.
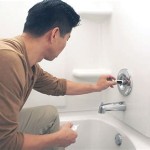
Further examination of the faucet involves a systematic disassembly to access the internal components. Most single-handle faucets have a decorative cap or cover on the handle that needs to be removed. This cap typically snaps off or is held in place by a small setscrew, often requiring an Allen wrench to loosen. Once the cap is removed, the handle itself can be detached. Depending on the faucet design, the handle may be attached with a screw or nut. With the handle removed, the escutcheon (the decorative plate that covers the faucet body) can usually be unscrewed or pried off gently. This exposes the faucet's internal mechanisms, including the cartridge or valve assembly.
Carefully inspect all exposed components for signs of wear and tear. Look for cracks, chips, or corrosion on the cartridge or valve body. Examine the O-rings and seals for signs of hardening, cracking, or deterioration. The valve seat, which is the surface against which the valve seals, should be inspected for pitting or corrosion. If any of these issues are present, the affected component will need to be replaced. Taking photographs of the faucet as it is disassembled can be extremely helpful during reassembly, ensuring that all parts are put back in the correct order and orientation.
Replacing Worn Components
Once the faulty component has been identified, the next step is to replace it with a new one. It is crucial to obtain the correct replacement part, which usually requires knowing the faucet's manufacturer and model number. This information is often found on the faucet itself, in the original packaging, or online. Taking the old part to a hardware store or plumbing supply store can also help ensure that the replacement is the correct match. When purchasing replacement parts, it is generally recommended to opt for high-quality components from reputable manufacturers to ensure durability and longevity.
Replacing an O-ring is a relatively straightforward process. After removing the old O-ring, clean the groove or channel where it sits to remove any debris or corrosion. Apply a small amount of plumber's grease to the new O-ring before installing it. This lubrication helps the O-ring seal properly and prevents it from being damaged during installation. Carefully stretch the O-ring over the stem or component and seat it properly in its groove. Avoid overstretching the O-ring, as this can weaken it and reduce its effectiveness. After installing the new O-ring, ensure that it is properly positioned and seated before reassembling the faucet.
Replacing a cartridge or valve assembly is a more involved process. Before removing the old cartridge, take note of its orientation so that the new cartridge can be installed in the same way. Some cartridges are held in place by a retaining clip or nut, which will need to be removed first. Once the retaining mechanism is removed, the old cartridge can be pulled straight out. If the cartridge is stuck, gently rock it back and forth to loosen it. Before installing the new cartridge, clean the valve body to remove any debris or corrosion. Apply a small amount of plumber's grease to the new cartridge to help it slide easily into the valve body. Align the new cartridge with the valve body, ensuring that it is properly oriented. Push the cartridge firmly into place and reinstall the retaining clip or nut. Make sure the retaining mechanism is securely fastened to prevent the cartridge from moving during operation.
Replacing a valve seat requires the use of a specialized tool called a valve seat wrench. This wrench is designed to grip and unscrew the valve seat from the faucet body. Before removing the old valve seat, apply a small amount of penetrating oil to help loosen it. Insert the valve seat wrench into the valve seat and turn it counterclockwise to unscrew it. Once the old valve seat is removed, clean the threads in the valve body to remove any debris or corrosion. Apply a small amount of Teflon tape to the threads of the new valve seat before installing it. This tape helps to seal the threads and prevent leaks. Insert the new valve seat into the valve body and turn it clockwise to tighten it using the valve seat wrench. Do not overtighten the valve seat, as this can damage the threads. After installing the new valve seat, ensure that it is properly seated and aligned with the valve body.
Reassembling the Faucet and Testing for Leaks
After replacing the worn components, the faucet needs to be carefully reassembled. Refer to the photographs taken during disassembly to ensure that all parts are put back in the correct order and orientation. Start by reinstalling the cartridge or valve assembly, making sure it is properly secured with the retaining clip or nut. Next, reinstall the escutcheon, tightening any screws or fasteners securely. Reattach the handle, making sure it is properly aligned and tightened. Finally, reinstall the decorative cap or cover on the handle.
Before turning the water supply back on, double-check that all components are properly installed and tightened. Once you are satisfied that the faucet is correctly reassembled, slowly turn the water supply back on. Start with the hot water valve, then the cold water valve. As the water pressure builds, carefully inspect the faucet for any leaks. Check around the handle, the spout, and the base of the faucet for any signs of dripping or seepage. If any leaks are present, immediately turn the water supply back off and re-examine the affected area.
If a leak is detected, the first step is to determine its source. If the leak is coming from around the handle, the O-rings or seals may not be properly seated or tightened. If the leak is coming from the spout, the cartridge or valve seat may not be properly installed. If the leak is coming from the base of the faucet, the connections to the water supply lines may not be tight enough. In any case, it is important to address the leak immediately to prevent water damage and wasted water. Tighten any loose connections, reseat any improperly installed components, and replace any damaged parts. Once the leak is resolved, turn the water supply back on and recheck for leaks.
After confirming that the faucet is no longer leaking, test its functionality. Turn the handle to adjust the water temperature and flow rate. Ensure that the water flows smoothly and consistently without any sputtering or hesitation. If the water flow is restricted, check for any debris or obstructions in the faucet's internal components. If the water temperature is not correct, the cartridge or valve assembly may need to be adjusted or replaced. Once you are satisfied that the faucet is functioning properly, clean up any spills or messes and dispose of the old parts properly. Regularly inspect the faucet for any signs of wear and tear and address any issues promptly to prevent future leaks.

How To Replace A Moen Cartridge And Fix Leaky Bathtub Faucet It Tutorials

How To Fix A Leaking Bathtub Faucet Diy Family Handyman

How To Fix A Leaking Single Handle Bathtub Faucet Quick And Easy

How To Fix A Leaky Bathtub Faucet 6 Ways Stop Drips

Repairing A Leaky Single Handle Tub Shower Ball Type Faucet

How To Fix A Leaking Bathtub Faucet The Home Depot

Fix A Leaky Delta Single Handle Shower Faucet For Under 2

How To Fix A Leaking Bathtub Faucet Diy Family Handyman

How To Fix A Leaking Bathtub Faucet The Home Depot

How To Fix A Leaking Bathtub Faucet The Home Depot
Related Posts