Replacing A Bathtub Faucet Spout
Replacing a bathtub faucet spout is a common home maintenance task that can often be accomplished by a homeowner with basic plumbing knowledge and a few essential tools. A worn, leaky, or damaged spout can detract from the aesthetic appeal of a bathroom and, more importantly, waste water, leading to increased utility bills. This article provides a comprehensive guide to understanding the different types of spouts, identifying the correct replacement, and executing the replacement process efficiently and effectively.
Before embarking on this project, it's crucial to understand the various spout types available, as the removal and installation procedures differ based on the connection mechanism and design. The two primary types are slip-fit and threaded spouts. Identifying the existing spout type is the first step in ensuring a smooth replacement process.
Identifying Your Bathtub Faucet Spout Type
Slip-Fit Spouts: These spouts are typically secured to a copper pipe extending from the wall using an O-ring or rubber gasket. The spout slides over the pipe, creating a watertight seal. A set screw, usually located on the underside of the spout, tightens against the pipe to hold the spout in place. Slip-fit spouts are generally easier to remove and install than threaded spouts due to their straightforward design.
Threaded Spouts: Threaded spouts screw directly onto a threaded pipe nipple extending from the wall. These spouts offer a more secure connection than slip-fit models, but their removal and installation can be more challenging, particularly if the threads are corroded or damaged. Determining the correct thread size and type is essential for a successful replacement.
The easiest way to determine the spout type is to visually inspect it. Look for a set screw on the underside. If a set screw is present, it is most likely a slip-fit spout. If no set screw is visible, and the spout appears to screw directly onto the wall, it is likely a threaded spout. Attempting to gently unscrew the spout (after turning off the water supply) can further confirm its type. If it turns freely, it's threaded; if it slides forward after loosening a set screw, it's a slip-fit.
Once the spout type is identified, the next step is to gather the necessary tools and materials. Having the right tools on hand will streamline the process and minimize the risk of damage to the plumbing or the new spout.
Gathering Necessary Tools and Materials
The tools required for replacing a bathtub faucet spout are relatively basic and commonly found in most household toolkits. A careful inventory of tools before starting will prevent interruptions during the process.
Basic Tools: A screwdriver (both flathead and Phillips head, depending on the set screw), adjustable wrench, pipe wrench (for threaded spouts), penetrating oil (if needed for stubborn threaded spouts), plumber's tape (Teflon tape), and a clean cloth or towel are essential.
Specialized Tools (Optional): A spout removal tool, specifically designed for removing stubborn spouts, can be beneficial for threaded spouts that are difficult to unscrew. A basin wrench may also be useful for reaching tight spaces behind the spout.
Materials: The most important material is the replacement spout itself. Ensure the replacement is compatible with the existing plumbing (slip-fit or threaded) and matches the desired finish and style. New O-rings or rubber gaskets (for slip-fit spouts) and plumber's putty (for threaded spouts) are also recommended to ensure a watertight seal. A small container to catch any residual water in the pipe after removing the old spout is also a good idea.
Before commencing the removal process, it is absolutely critical to shut off the water supply to the bathtub faucet. This prevents flooding and potential water damage during the replacement procedure.
Removing the Existing Bathtub Faucet Spout
The removal process depends on the type of spout previously identified. Proper technique is paramount to avoid damaging the water supply pipes or the surrounding wall.
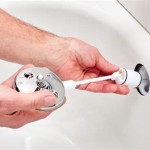
Removing a Slip-Fit Spout: Locate the set screw on the underside of the spout. Use the appropriate screwdriver to loosen the set screw completely, but do not remove it entirely. Gently pull the spout straight away from the wall. If the spout is stuck, try twisting it slightly while pulling. Avoid excessive force, as this could damage the underlying copper pipe. If the spout remains stubborn, apply a small amount of penetrating oil to the connection point and allow it to sit for a few minutes before attempting to remove the spout again.
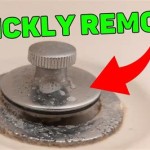
Removing a Threaded Spout: Wrap the old spout with a cloth to protect its finish. Use a pipe wrench or adjustable wrench to grip the spout firmly. Turn the spout counterclockwise to unscrew it from the pipe nipple. If the spout is difficult to turn, apply penetrating oil to the threaded connection and allow it to penetrate for several minutes. Use steady, even pressure when turning the wrench. Avoid jerking motions, which could damage the pipe nipple. If the pipe nipple starts to turn with the spout, use a second wrench to hold the pipe nipple in place while unscrewing the spout.
After removing the old spout, thoroughly clean the exposed pipe or pipe nipple. Remove any old plumber's putty, Teflon tape, or residue. Inspect the pipe or pipe nipple for damage or corrosion. If the pipe or pipe nipple is damaged, it may need to be repaired or replaced by a qualified plumber before installing the new spout.
With the old spout removed and the area cleaned, the new spout can be installed. The installation process mirrors the removal process but is done in reverse.
Installing the New Bathtub Faucet Spout
The installation process is equally crucial as the removal process. Proper installation ensures a leak-free and aesthetically pleasing result.
Installing a Slip-Fit Spout: Clean the inside of the new spout and the copper pipe extending from the wall. If the new spout did not come with replacement O-rings or rubber gaskets, purchase compatible replacements. Lubricate the O-rings or gaskets with a small amount of silicone grease to facilitate installation and ensure a watertight seal. Slide the new spout onto the copper pipe until it reaches the wall. Ensure the spout is aligned correctly and that the set screw is accessible. Tighten the set screw firmly to secure the spout in place. Avoid over-tightening the set screw, as this could damage the copper pipe or the spout itself.
Installing a Threaded Spout: Clean the threads on the pipe nipple and the inside of the new spout. Wrap the pipe nipple with several layers of Teflon tape, applying it in a clockwise direction. This creates a watertight seal and prevents leaks. Apply a small amount of plumber's putty to the threads of the pipe nipple. This further enhances the seal and prevents corrosion. Carefully screw the new spout onto the pipe nipple, turning it clockwise until it is snug against the wall. Avoid over-tightening the spout, as this could damage the pipe nipple or the spout itself. Use a wrench to tighten the spout an additional quarter turn, if necessary, to ensure a secure fit. Wipe away any excess plumber's putty with a damp cloth.
After installing the new spout, turn the water supply back on slowly. Carefully inspect the spout and the surrounding area for leaks. If any leaks are detected, turn off the water supply and tighten the connections further. If the leaks persist, disassemble the connection, reapply Teflon tape or plumber's putty, and reassemble. If the problem continues, consulting a qualified plumber is recommended.
Once the installation is complete and no leaks are detected, test the spout by running the water. Ensure the water flows smoothly and that there are no unusual noises or vibrations. Observe the spout for any signs of leaks over the next few days to ensure a long-lasting and problem-free installation. Following these steps will ensure a successful replacement of a bathtub faucet spout, improving both the functionality and aesthetics of the bathroom.

Replacing A Tub Faucet Bathtub Spout Replacement

How To Replace A Tub Spout

How To Replace A Bathtub Spout Family Handyman
:max_bytes(150000):strip_icc()/how-to-replace-a-bathtub-faucet-5210836-10-6825223c1e75442187d5ab09690510d4.jpg?strip=all "How To Replace A Bathtub Faucet")
How To Replace A Bathtub Faucet

Learn How To Remove And Install Various Tub Spouts

Replacing A Tub Spout An Easy Repair Job Theworldlink Com

Tub Spout Diverter How To Fix From Beginning The End Using Danco Repair Kit

Bathtub Spout Diverter Replacement Easy

How To Replace A Bathtub Spout Family Handyman

Bath Tub Spout Removal And Installation
Related Posts