How To Remove The Drain Cap From A Bathtub
Removing a bathtub drain cap is a common task necessary for cleaning, unclogging, or replacing the drain assembly. While seemingly simple, the process can vary significantly depending on the type of drain cap installed. Attempting to force the cap without proper knowledge can lead to damage, requiring more extensive and costly repairs. This article provides a comprehensive guide to safely and effectively removing different types of bathtub drain caps.
Before commencing any work, it is essential to identify the type of drain cap present in the bathtub. Common types include lift-and-turn, toe-touch, pop-up, and push-and-pull drains. Each type requires a specific approach for removal. Gather the necessary tools based on the identified drain type. Generally required tools include a flathead screwdriver, a Phillips head screwdriver, pliers, a drain wrench (also known as a dumbbell wrench or bathtub wrench), penetrating oil, and protective gloves.
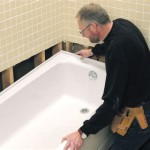
Prior to starting, protect the bathtub surface from scratches and damage. Place a towel or a thick cloth over the drain area to prevent tools from accidentally scraping the porcelain or acrylic finish. Also, ensure adequate lighting to facilitate clear visibility of the drain mechanism. Working in a well-lit environment increases safety and efficiency.
Removing a Lift-and-Turn Bathtub Drain Cap
Lift-and-turn drain stoppers are characterized by a knob on top that is lifted and turned to open or close the drain. Removal typically involves a straightforward process but can be complicated by corrosion or mineral buildup.
The initial step involves holding the drain cap firmly in one hand to prevent it from spinning. Using the other hand, locate the small set screw, typically located on the side of the drain cap near the base. This set screw secures the drain cap to the internal linkage.
Employ a small flathead screwdriver to loosen the set screw. Turn the screwdriver counterclockwise. Avoid completely removing the set screw, as it can be difficult to reinstall later. Loosening it sufficiently will release the drain cap from the linkage.
Once the set screw is loosened, gently pull the drain cap straight up. It may require some wiggling to dislodge it, especially if corrosion is present. If the cap is stuck, apply a penetrating oil, such as WD-40, around the base of the cap. Allow the oil to soak for approximately 15-30 minutes to help loosen any rust or mineral deposits. After soaking, try pulling the cap again.
If the drain cap remains stuck, carefully use pliers to grip the base of the cap. Rotate the cap gently back and forth while pulling upwards. Avoid applying excessive force, as this can damage the cap or the internal components. Once the cap is free, inspect the internal linkage for any signs of damage or corrosion. Clean any debris or mineral buildup from the linkage before reassembling or replacing the drain.
Removing a Toe-Touch Bathtub Drain Cap
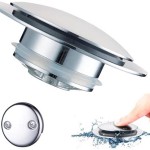
Toe-touch drain stoppers, also known as push-and-seal drains, operate by pressing down on the stopper to close and pressing again to open. These stoppers are generally more complex to remove than lift-and-turn drains.
The first step in removing a toe-touch drain cap is to twist the cap counterclockwise. This action unthreads the cap from the internal drain assembly. Some toe-touch drains may have a small set screw similar to lift-and-turn drains. Check for a set screw on the side of the cap and loosen it if present before attempting to twist the cap.
If the cap is difficult to twist, apply penetrating oil around the base of the cap and allow it to soak for 15-30 minutes. This will help loosen any corrosion or mineral deposits that may be preventing the cap from turning. After soaking, try twisting the cap again.
Once the cap is unthreaded, carefully pull it straight up. The cap is typically attached to a spring-loaded plunger mechanism. This plunger may come out along with the cap, or it may remain inside the drain. If the plunger remains inside the drain, it may need to be retrieved separately using pliers or a hooked tool.
After removing the cap and plunger, inspect the internal drain assembly for any debris or damage. Clean the assembly thoroughly before reassembling or replacing the drain. Pay particular attention to the spring mechanism, as this is a common point of failure in toe-touch drains.
Removing a Pop-Up Bathtub Drain Cap
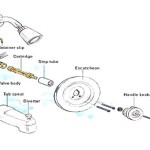
Pop-up drain stoppers are often found in newer bathtubs. They typically involve a lever located near the overflow drain that operates a linkage to raise or lower the stopper. Removal usually requires accessing the linkage behind the overflow plate.
Begin by removing the overflow plate. This plate is typically secured with one or two screws. Use a Phillips head screwdriver to remove these screws. Once the screws are removed, gently pull the overflow plate away from the tub wall. Be prepared for some water to drain out, as it may be trapped behind the plate.
With the overflow plate removed, the linkage connecting the lever to the drain stopper will be visible. The linkage typically consists of a rod or a series of connected arms. Locate the point where the linkage connects to the drain stopper. This connection may be a simple hook, a ball joint, or a threaded connection.
Disconnect the linkage from the drain stopper. The method for disconnecting will vary depending on the type of connection. A hook can usually be unhooked by gently bending it or prying it open. A ball joint may require a slight twist or pull to dislodge it. A threaded connection will need to be unscrewed.
Once the linkage is disconnected, the drain stopper should be free to be removed. In some cases, the stopper may simply lift out. In other cases, it may be necessary to use pliers to gently grasp the stopper and pull it upwards. Be careful not to damage the stopper or the drain assembly during this process.
After removing the stopper, inspect the linkage and the drain assembly for any signs of damage or corrosion. Clean all components thoroughly before reassembling or replacing the drain. Ensure that the linkage is properly connected to the new stopper during reassembly.
Removing a Push-and-Pull Bathtub Drain Cap
Push-and-pull drain stoppers feature a stopper that is pushed down to close and pulled up to open. These are generally simpler to remove than toe-touch or pop-up drains, but similar challenges with corrosion and mineral buildup can still occur.
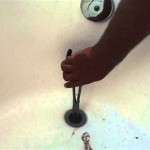
The primary method for removing a push-and-pull drain cap involves gripping the stopper firmly and pulling it straight up. The stopper is usually connected to a threaded rod that extends into the drain assembly. This rod may be partially visible when the stopper is in the open position.
If the stopper is difficult to pull out, try twisting it gently back and forth while pulling upwards. This twisting motion can help to break any corrosion or mineral deposits that may be binding the stopper. Apply penetrating oil around the base of the stopper and allow it to soak for 15-30 minutes if necessary.
In some cases, the stopper may be secured with a set screw. Look for a small set screw on the side of the stopper, near the base. Loosen the set screw with a small flathead screwdriver before attempting to pull out the stopper. Remember not to fully remove the set screw, just loosen it enough to release the stopper.
Once the stopper is removed, inspect the threaded rod and the drain assembly for any damage or debris. Clean all components thoroughly before reassembling or replacing the drain. Ensure that the stopper is properly threaded into the drain assembly during reassembly.
Dealing with Stubborn Drain Caps
Regardless of the drain type, encountering a stubborn drain cap is a common occurrence. Corrosion, mineral buildup, and years of accumulated grime can make removal difficult. Several techniques can be employed to address these situations.
The first line of defense is penetrating oil. Apply a generous amount of penetrating oil around the base of the drain cap and allow it to soak for an extended period, ideally several hours or even overnight. Reapply the oil periodically to keep the area saturated. The penetrating oil will help to break down rust and mineral deposits, making the cap easier to remove.
Heat can also be used to loosen stubborn drain caps. A heat gun or a hairdryer can be used to gently heat the drain cap. The heat will cause the metal to expand slightly, which can help to break the bond between the cap and the drain assembly. Be cautious when using heat, as excessive heat can damage the bathtub finish or the drain components. Avoid using an open flame.
If penetrating oil and heat are not sufficient, consider using a drain wrench (dumbbell wrench or bathtub wrench). This specialized tool is designed to grip the inside of the drain assembly and provide leverage for twisting. Insert the drain wrench into the drain and rotate it counterclockwise to loosen the drain assembly. Be careful not to damage the threads of the drain assembly during this process.
In extreme cases, it may be necessary to cut the drain cap off. This should be considered a last resort, as it can damage the drain assembly and require more extensive repairs. Use a hacksaw or a rotary tool with a cutting disc to carefully cut the drain cap. Be extremely cautious to avoid damaging the bathtub or the drain assembly. After cutting the cap, remove the remaining pieces with pliers.
After successfully removing the drain cap, it is crucial to thoroughly clean the drain assembly. Use a wire brush or a small tool to remove any remaining debris, corrosion, or mineral buildup. Inspect the drain assembly for any signs of damage, such as cracks or broken threads. If any damage is found, the drain assembly should be replaced.
Properly identifying the drain type, using the appropriate tools and techniques, and exercising caution throughout the process are essential for successfully removing a bathtub drain cap without causing damage. Taking the time to prepare and carefully execute each step will save time, money, and frustration in the long run.

How To Easily Remove Bathtub Drain Plug Stopper Unclog In 1 Minute Jonny Diy

How To Remove 6 Diffe Bath Drain Types
:max_bytes(150000):strip_icc()/remove-tub-stopper-clear-a-drain-2718786-hero-425b2598739f43718b6905767d2616d8.jpg?strip=all "How To Remove 6 Diffe Kinds Of Drain Stoppers")
How To Remove 6 Diffe Kinds Of Drain Stoppers

How To Remove A Bathtub Drain The Home Depot

Remove A Bathtub Drain Stopper To Unclog The Quick Easy

4 Easy Ways To Remove A Tub Drain Stopper Wikihow

How To Remove A Bathtub Drain Stopper

How To Remove A Bathtub Drain Stopper Mr Rooter

How To Remove Bathtub Drain Stopper That Spins Freely

So Easy How To Remove A Watco Pop Up Drain Plug
Related Posts