How To Remove a Bathtub Water Stopper
Bathtub water stoppers, while seemingly simple devices, play a crucial role in maintaining bathroom functionality. They prevent water from draining out during baths, allowing for an enjoyable and relaxing experience. However, these stoppers can sometimes become problematic, requiring removal for cleaning, repair, or replacement. This article provides a comprehensive guide on how to remove different types of bathtub water stoppers, covering the tools needed, step-by-step instructions, and troubleshooting tips for common issues.
Before undertaking any stopper removal process, safety should be a primary concern. It is advisable to wear gloves to protect the hands from potential grime and sharp edges. Having adequate light is also important for clear visibility. Furthermore, one should ensure that the drain is not actively blocked by debris beyond the stopper itself, as this might complicate the removal process. A clear workspace will also contribute to a smoother operation.
There are several types of bathtub stoppers commonly found in residential bathrooms. Each type has a unique mechanism for controlling water flow and, consequently, a different method for removal. Recognizing the specific type of stopper in the bathtub is the first essential step for a successful removal.
The most common types include:
- Lift-and-Turn Stoppers: These stoppers are typically operated by twisting the top portion, which either raises or lowers a rubber or silicone component to seal the drain.
- Push-and-Pull Stoppers: Similar to lift-and-turn, these stoppers operate by pushing down to close the drain and pulling up to open it.
- Toe-Touch Stoppers: Activated by pressing down with a toe, often featuring a spring-loaded mechanism.
- Pop-Up Stoppers: These stoppers are controlled by a lever located near the faucet. The lever actuates a linkage that raises or lowers the stopper.
- Chain and Stopper: A traditional design using a rubber or metal stopper attached to a chain that is manually placed into the drain.
Each of these types necessitates different approaches for removal, which will be discussed in detail in the following sections.
Identifying and Gathering the Necessary Tools
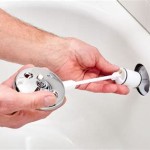
The first step toward removing a bathtub stopper is to accurately identify the type of stopper present. Visual inspection is usually sufficient, comparing the stopper to the types listed above. Once the stopper type is confirmed, the appropriate tools can be gathered. While some stoppers can be removed without any tools, others will require basic plumbing tools such as screwdrivers (Phillips head and flathead), pliers, and possibly a small wrench. In some cases, a specialized stopper wrench might be needed, particularly for certain pop-up stopper mechanisms.
Having a flashlight will be helpful for illuminating the drain and accessing any hidden screws or components. A small container or rag should be prepared to hold any removed screws or small parts, preventing them from being lost down the drain or elsewhere. Wearing rubber gloves will protect hands from germs and contact with potentially sharp edges or corrosive substances that may have accumulated around the stopper.
Finally, having a drain snake or a bent wire can be beneficial for removing any hair or debris that may be obstructing the stopper or drain mechanism. Addressing this debris proactively makes the entire removal and cleaning process easier and more effective.
Step-by-Step Guide for Removing Different Stopper Types
Each type of bathtub stopper requires a specific procedure for removal. The following sections provide detailed steps for each common stopper type:
Lift-and-Turn Stoppers:
These stoppers typically have a screw located on the side of the stopper's top portion. Use a small flathead screwdriver to loosen this screw. Once the screw is sufficiently loosened, the stopper should lift straight out. Sometimes, the stopper may be slightly stuck due to mineral buildup; gently wiggling it while pulling upwards can help dislodge it.
Push-and-Pull Stoppers:
Similar to lift-and-turn stoppers, push-and-pull stoppers often have a screw on the side or at the top. Loosen this screw and then pull the stopper straight up. If there's no visible screw, try gripping the top of the stopper firmly and twisting it counterclockwise while gently pulling upwards. Some models use a friction-fit mechanism, so this twisting motion may be necessary to release the stopper.
Toe-Touch Stoppers:
Toe-touch stoppers usually require a slightly different approach. First, unscrew the stopper's top cap by turning it counterclockwise. Once the cap is removed, the internal components, including the spring and plunger, will be exposed. Carefully remove these components. Beneath these, a central screw attaching the base of the stopper to the drain flange may be present. Unscrew this central screw to remove the entire stopper assembly.
Pop-Up Stoppers:
Pop-up stoppers are controlled by a lever near the faucet and require access to the overflow drain. Locate the overflow plate, which is a small plate with a screw or two on the wall of the bathtub, usually near the faucet. Remove the screw(s) from the overflow plate and carefully pull the plate away from the wall. This will expose the linkage connected to the stopper. Depending on the design, the linkage may have a spring clip or a pivot rod connecting it to the stopper. Disconnect the linkage. Then, lift the stopper out of the drain. In some cases, the stopper might have to be twisted to align for it to be completely removed. Remember to note how the linkage is connected to facilitate reassembly.
Chain and Stopper:
The Chain and Stopper is the easiest to remove. Simply lift the stopper from the drain by pulling the chain. Inspect the chain for any damage or rust which may have caused it to break. The stopper itself can be removed from the chain by detaching it from the chain loop or hook.
It's important to exercise caution during these processes to avoid damaging the drain or the stopper itself. Gentle but firm movements are generally more effective than forceful pulling.
Troubleshooting Common Issues and Reassembly
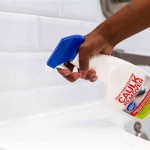
Despite following the instructions carefully, certain issues might arise during stopper removal. A common problem is a stuck stopper, often caused by mineral buildup or accumulated hair and debris. Before resorting to force, try applying a lubricant, such as WD-40 or a similar penetrating oil, around the base of the stopper. Allow the lubricant to sit for several minutes to penetrate the buildup. Then, gently try wiggling the stopper loose again.
If the screw on the stopper is stripped, making it impossible to loosen, a rubber band or steel wool placed between the screwdriver and the screw head can sometimes provide enough grip to turn the screw. Alternatively, a screw extractor tool designed for removing stripped screws can be used.
When dealing with pop-up stoppers, the linkage may be corroded or difficult to disconnect. Applying penetrating oil and using pliers to gently wiggle the linkage components can help loosen them. Be careful not to damage the linkage, as it is essential for the proper functioning of the stopper.
After successfully removing the stopper, clean it thoroughly to remove any accumulated grime, hair, and mineral deposits. Use a mild detergent and a scrub brush to clean the stopper and the surrounding drain area. Removing this debris during reassembly helps to prevent future clogging.
Reassembly should be done in reverse order of the disassembly process. For pop-up stoppers, ensure the linkage is correctly reconnected to the stopper and the overflow plate before tightening the overflow plate screws. For other stopper types, make sure the stopper is properly seated in the drain and the side screw (if applicable) is tightened securely.
After reassembly, test the stopper by filling the bathtub with a small amount of water and checking for leaks. If the stopper is not sealing properly, double-check the alignment and tightness of all components. Sometimes, slight adjustments are needed to achieve a proper seal.
By following these steps and addressing potential issues with patience and care, removing and reinstalling a bathtub stopper can be a straightforward process that can significantly improve the functionality and hygiene of the bathroom.

Remove A Bathtub Drain Stopper To Unclog The Quick Easy

How To Easily Remove Bathtub Drain Plug Stopper Unclog In 1 Minute Jonny Diy
:max_bytes(150000):strip_icc()/remove-tub-stopper-clear-a-drain-2718786-03-8a44cb29b73347d0bbd1528ffe968544.jpg?strip=all "How To Remove 6 Diffe Kinds Of Drain Stoppers")
How To Remove 6 Diffe Kinds Of Drain Stoppers
:max_bytes(150000):strip_icc()/remove-tub-stopper-clear-a-drain-2718786-hero-425b2598739f43718b6905767d2616d8.jpg?strip=all "How To Remove 6 Diffe Kinds Of Drain Stoppers")
How To Remove 6 Diffe Kinds Of Drain Stoppers

How To Remove A Bathtub Drain Stopper Mr Rooter

How To Remove A Bathtub Drain Stopper

4 Easy Ways To Remove A Tub Drain Stopper Wikihow

How To Remove Bathtub Drain Stopper That Spins Freely

How To Remove A Bathtub Drain The Home Depot

How To Remove A Bathtub Drain Stopper