How to Remove a Water Stopper From a Bathtub
Removing a bathtub water stopper is a common maintenance task that homeowners may need to undertake for various reasons, including unclogging a drain, replacing a damaged stopper, or general cleaning. While the specific method varies depending on the type of stopper installed, understanding the underlying mechanisms and possessing the right tools can make the process relatively straightforward. This article provides a comprehensive guide to removing various types of bathtub stoppers, offering step-by-step instructions and helpful tips to ensure a successful outcome.
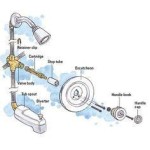
Before commencing any removal procedure, it is important to identify the type of stopper present in the bathtub. Common types include lift-and-turn stoppers, pop-up stoppers, toe-touch stoppers, push-and-pull stoppers, and chain and stopper mechanisms. Each type requires a slightly different approach to removal. Attempting to force a stopper without understanding its mechanism can lead to damage to the stopper itself or the drain assembly.
Proper preparation is vital before starting any plumbing work. This includes gathering the necessary tools, such as a screwdriver (both flathead and Phillips head), pliers, WD-40 or a similar penetrating oil, a small container or towel to catch debris, and a flashlight. Ensuring the work area is well-lit and accessible will also contribute to a smoother and more efficient removal process.
Removing a Lift-and-Turn Stopper
Lift-and-turn stoppers are characterized by a knob on top of the stopper that is rotated to open and close the drain. The stopper is typically connected to a vertical rod that extends down into the drain assembly. To remove this type of stopper, follow these steps:
First, locate the small screw that secures the knob to the stopper. This screw is usually located on the side of the knob, near the top. Use a screwdriver of the appropriate size to loosen the screw. It may be necessary to apply a small amount of penetrating oil if the screw is corroded or stuck.
Once the screw is loosened, gently lift the knob and stopper assembly upwards. If the stopper is stuck, try wiggling it gently while pulling upwards. Avoid excessive force, as this could damage the stopper or the drain assembly. If resistance is encountered, apply more penetrating oil and allow it to soak for a few minutes before attempting to lift the stopper again.
As the stopper is lifted, it will reveal a vertical rod connected to the bottom. This rod is typically connected to a rocker arm or other mechanism within the drain assembly. Observe how the rod is connected to this mechanism. This observation will be helpful during reinstallation.
Depending on the design, the rod may simply slide out of the rocker arm, or it may be secured with a small clip or screw. If a clip or screw is present, carefully remove it using pliers or a screwdriver. Once the rod is disconnected, the stopper and rod assembly can be completely removed from the drain.
Before reassembling the stopper, thoroughly clean the stopper, drain flange, and the surrounding area. This will remove any debris or buildup that may be hindering the stopper’s operation. Inspect the stopper for any signs of damage, such as cracks or corrosion. If damage is present, consider replacing the stopper with a new one.
Removing a Pop-Up Stopper
Pop-up stoppers operate using a lever located behind the overflow plate on the bathtub. This lever is connected to a linkage inside the drain, which raises and lowers the stopper. To remove a pop-up stopper, access to this linkage is required, which involves removing the overflow plate.
The overflow plate is typically secured with one or two screws. Use a screwdriver to remove these screws. Be careful not to drop the screws down the drain. Once the screws are removed, gently pull the overflow plate away from the bathtub wall. This will expose the linkage mechanism.
The linkage mechanism consists of a rod that connects to the stopper. This rod usually has a series of holes or adjustments that allow the stopper height to be adjusted. Locate the point where the rod connects to the stopper. This connection may be a simple clip, a spring-loaded mechanism, or a screw.
Depending on the type of connection, use pliers or a screwdriver to disconnect the rod from the stopper. Be careful not to damage the linkage or the stopper. Once the rod is disconnected, the stopper can be lifted out of the drain. If the stopper is stuck, try wiggling it gently while pulling upwards. Applying penetrating oil can also help to loosen the stopper.
It is important to note the position of the linkage and how it connects to the stopper before disconnecting it. Taking a photograph or making a sketch can be helpful during reassembly. This will ensure that the stopper is reinstalled correctly and functions properly.
After removing the stopper, inspect it for any signs of damage or wear. Clean the stopper and the drain flange thoroughly to remove any debris or buildup. Inspect the linkage mechanism for any signs of corrosion or damage. If necessary, lubricate the linkage with a silicone-based lubricant to ensure smooth operation.
Removing a Toe-Touch Stopper
Toe-touch stoppers, also known as push-and-seal stoppers, are operated by pressing down on the top of the stopper to close the drain and pressing again to open it. These stoppers typically have a threaded body that screws into the drain flange. Removal usually involves unscrewing the entire stopper assembly.
Grip the top of the stopper firmly. Some stoppers have a knurled or textured surface to improve grip. Rotate the stopper counterclockwise to unscrew it from the drain flange. It may be necessary to apply some force to break the initial seal.
If the stopper is difficult to turn, try applying penetrating oil around the base of the stopper where it meets the drain flange. Allow the oil to soak for a few minutes before attempting to unscrew the stopper again. Using a rubber glove can also improve grip and make it easier to turn the stopper.
As the stopper is unscrewed, it will eventually come free from the drain flange. Be careful not to cross-thread the stopper during reinstallation. Clean the stopper and the drain flange thoroughly to remove any debris or buildup. Inspect the stopper for any signs of damage, such as worn threads or a damaged sealing surface. If damage is present, consider replacing the stopper with a new one.
Some toe-touch stoppers have a removable cap on top. This cap can be removed to access an adjustment screw that controls the stopper’s height and seal. If the stopper is not sealing properly, adjusting this screw may resolve the issue. However, removing the cap and adjusting the screw is not necessary for simply removing the stopper from the drain.
Removing a Push-and-Pull Stopper
Push-and-pull stoppers are operated by pushing the stopper down to close the drain and pulling it up to open it. These stoppers typically have a simple design and are relatively easy to remove. The stopper is usually held in place by friction or a simple locking mechanism.
Grip the stopper firmly and pull it straight up. It may be necessary to apply some force to overcome the friction or locking mechanism. Wiggling the stopper gently while pulling upwards can also help to loosen it.
If the stopper is difficult to remove, try applying penetrating oil around the base of the stopper where it meets the drain flange. Allow the oil to soak for a few minutes before attempting to pull the stopper out again. Avoid using excessive force, as this could damage the stopper or the drain flange.
Once the stopper is removed, clean it and the drain flange thoroughly to remove any debris or buildup. Inspect the stopper for any signs of damage, such as a worn or cracked seal. If damage is present, consider replacing the stopper with a new one.
Removing a Chain and Stopper Mechanism
Chain and stopper mechanisms are a simple and traditional type of bathtub stopper. The stopper is connected to a chain that is attached to a lever on the overflow plate. To remove this type of stopper, simply lift the stopper out of the drain.
The main issue with this type of stopper is often the accumulation of hair and debris around the stopper itself. Before attempting to lift the stopper, ensure that any visible debris is removed. Sometimes, the chain itself can become entangled within the drain assembly.
If the chain is entangled, gently try to untangle it. If it is impossible to untangle the chain from above, accessing the drain from below (if possible) may be necessary. This may involve removing the drain pipe to gain access to the chain.
After removing the stopper, clean both the stopper and the drain thoroughly. Inspect the chain for any signs of corrosion or damage. Replace the chain if necessary. Ensure that the lever on the overflow plate is functioning properly and that the chain is properly connected to the lever.
Regardless of the type of stopper being removed, safety precautions should always be observed. Wear gloves to protect hands from dirt and grime. Avoid using excessive force, as this could damage the stopper or the drain assembly. If encountering significant resistance, consult a qualified plumber.
:max_bytes(150000):strip_icc()/remove-tub-stopper-clear-a-drain-2718786-03-8a44cb29b73347d0bbd1528ffe968544.jpg?strip=all "How To Remove 6 Diffe Kinds Of Drain Stoppers")
How To Remove 6 Diffe Kinds Of Drain Stoppers

How To Easily Remove Bathtub Drain Plug Stopper Unclog In 1 Minute Jonny Diy

How To Remove Bathtub Drain Stopper That Spins Freely

How To Remove A Bathtub Drain The Home Depot

How To Remove A Bathtub Drain Stopper

How To Remove A Bathtub Drain Stopper Mr Rooter

Remove A Bathtub Drain Stopper To Unclog The Quick Easy

4 Easy Ways To Remove A Tub Drain Stopper Wikihow
:max_bytes(150000):strip_icc()/remove-tub-stopper-clear-a-drain-2718786-hero-425b2598739f43718b6905767d2616d8.jpg?strip=all "How To Remove 6 Diffe Kinds Of Drain Stoppers")
How To Remove 6 Diffe Kinds Of Drain Stoppers

How To Remove A Bathtub Drain Stopper
Related Posts