Can I Replace Bathtub Faucet Handles? A Comprehensive Guide
Bathtub faucet handles, like any component subjected to constant use, can wear down or become damaged over time. From superficial scratches and mineral buildup to internal corrosion and stripped threads, various issues can necessitate replacement. The question then arises: is replacing bathtub faucet handles a task achievable by the average homeowner, or does it require the expertise of a licensed plumber? This article explores the process, considerations, and potential challenges involved in replacing bathtub faucet handles, offering a detailed guide to determine if this is a feasible DIY project.
The prospect of replacing bathtub faucet handles often depends on a homeowner's pre-existing plumbing skills and the complexity of the existing faucet system. Some handles are designed for simple, straightforward removal and replacement, while others are integrated into more intricate systems. Recognizing the type of faucet and handle assembly is the first critical step in determining the feasibility of a DIY replacement. Improperly attempting a complex replacement could lead to water damage and require professional intervention, ultimately costing more than hiring a plumber initially.
Identifying the Faucet Type and Handle Style
Before embarking on a bathtub faucet handle replacement, it is imperative to accurately identify the type of faucet installed. Different faucet types require different approaches for disassembly and reassembly, and using the wrong method can damage the faucet body or the plumbing connections. Common bathtub faucet types include compression faucets, ball faucets, cartridge faucets, and ceramic disc faucets. Each of these operates using a distinct internal mechanism, and the handle is often directly connected to this mechanism.
Compression faucets are the oldest and arguably simplest type. They typically have two separate handles for hot and cold water, and each handle controls a valve stem that compresses a rubber washer against a valve seat to stop the flow of water. To identify a compression faucet, look for handles that require significant turning to fully open or close the valve. Removing the handle usually involves unscrewing a decorative cap, removing a screw, and then pulling the handle off the valve stem.
Ball faucets, cartridge faucets, and ceramic disc faucets are all categorized as single-handle faucets, although some variations exist. Ball faucets use a ball-shaped component with slots and openings to control water flow. Cartridge faucets utilize a cylindrical cartridge that moves up and down or side to side to regulate water temperature and flow. Ceramic disc faucets employ two ceramic discs that slide against each other to control water flow. Identifying these faucet types is usually possible by observing the handle's motion and the overall design of the faucet body. Repairing or replacing handles on these faucet types can be more complicated than on compression faucets, as the internal components are more intricate.
Beyond the faucet type, the style of the handle attachments plays a significant role in the difficulty of the replacement. Some handles are secured with visible screws, while others are hidden under decorative caps. Some older handles might be press-fit onto the valve stem and require significant force to remove. Understanding the attachment method is crucial to avoid damaging the faucet during the removal process.
Gathering the Necessary Tools and Materials
Once the faucet type and handle style have been identified, the next step is to gather the necessary tools and materials. Attempting a repair without the right tools can lead to frustration, damage to the faucet, and potentially injury. A basic plumbing toolkit should include adjustable wrenches, screwdrivers (both flathead and Phillips), pliers, a basin wrench (for reaching plumbing fixtures in tight spaces), and a plumber's tape (Teflon tape).
In addition to general plumbing tools, some specific items might be needed depending on the faucet type and handle style. For example, a handle puller might be necessary to remove stubborn handles that are press-fit onto the valve stem. A deep socket wrench might be required to access hidden screws. A set of O-rings and washers in various sizes can be helpful for replacing worn-out seals within the faucet body. It is also prudent to have a small container to store removed screws and small parts to prevent them from being lost.
Crucially, the replacement handles must be compatible with the existing faucet. Ideally, the new handles should be the exact make and model as the originals. However, if the original handles are no longer available, a compatible replacement needs to be identified. This often involves researching the faucet manufacturer and model number or consulting with a plumbing supply store. Universal faucet handles are also available, but these might not be a perfect fit and can sometimes compromise the faucet's functionality or aesthetic.
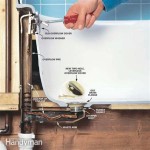
Before starting any work, it is essential to shut off the water supply to the bathtub faucet. Typically, there are shut-off valves located near the bathtub or in the basement or crawl space. Turning off the water supply prevents flooding and potential water damage during the repair process. After shutting off the water, open the faucet to relieve any residual pressure in the pipes.
Step-by-Step Replacement Procedure and Potential Challenges
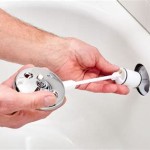
The replacement procedure varies depending on the faucet type and handle style, but a general outline can be provided. First, protect the bathtub surface with a cloth or towel to prevent scratches or damage. Next, remove the existing handles. This might involve unscrewing a decorative cap, removing a screw, or using a handle puller. If the handle is stuck, try applying a penetrating oil (like WD-40) to loosen it.
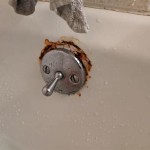
Once the old handles are removed, inspect the valve stems for any signs of corrosion or damage. If the valve stems are damaged, they might need to be replaced as well. This can significantly increase the complexity of the repair. Clean the valve stems with a wire brush to remove any mineral buildup. Apply a thin layer of plumber's grease to the valve stems to facilitate smooth operation of the new handles.
Install the new handles, ensuring that they are properly aligned and securely fastened. Tighten any screws or fasteners to the manufacturer's specifications. Avoid over-tightening, as this can damage the handles or the faucet body. Replace any decorative caps or trim pieces. Turn the water supply back on slowly and check for leaks around the handles and the faucet body. If leaks are present, tighten the connections or replace any worn-out O-rings or washers.
Despite following these steps carefully, several challenges can arise. Stripped screws are a common problem, especially in older faucets. If a screw is stripped, try using a screw extractor to remove it. If that fails, you might need to drill out the screw, which can be risky and might require professional help. Another common challenge is dealing with corroded or seized parts. Penetrating oil and patience are key to loosening stubborn components. However, excessive force can damage the faucet or plumbing connections.
Mineral buildup, particularly calcium and lime deposits, can hinder the removal of handles and other faucet components. Vinegar or commercially available descaling solutions can help dissolve these deposits. Apply the solution to the affected area and let it soak for a while before attempting to remove the handle. In severe cases, repeated applications might be necessary.
Matching the new handles to the existing faucet body can also prove difficult. If the original handles are discontinued, finding a compatible replacement that fits properly and matches the aesthetic of the faucet can be challenging. Universal handles are an option, but they might not provide a perfect fit or match the faucet's style. In some cases, replacing the entire faucet might be the only solution.
Ultimately, deciding whether to replace bathtub faucet handles yourself depends on your comfort level and experience with plumbing repairs, the complexity of the existing faucet system, and the availability of the necessary tools and materials. If you are unsure about any aspect of the process, it is always best to consult with a licensed plumber. A professional plumber can quickly and efficiently diagnose the problem, identify the appropriate replacement parts, and perform the repair without causing further damage.

How To Replace Bathtub Faucet Handles

How To Replace Bathtub Faucet Handles

How To Fix A Leaking Bathtub Faucet Diy Family Handyman

Replace Faucet Handles In Existing Bathtub Home Improvement Stack Exchange

How To Change A Bathtub Faucet 14 Steps With Pictures Wikihow

How To Replace Bathtub Faucet Handles

How To Change A Bathtub Faucet 14 Steps With Pictures Wikihow

How To Replace A Bathtub Faucet

Bathroom How To Replace Old Separate Hot Cold Bathtub Knobs With Modern Option Home Improvement Stack Exchange

How To Replace A Bathtub Faucet The Home Depot
Related Posts