Bathtub Surround Kits with Window Trim: A Comprehensive Guide
Bathtub surround kits offer a practical and aesthetically pleasing solution for remodeling or upgrading a bathroom. They provide a waterproof barrier, protecting walls from water damage and simplifying cleaning. When these kits include window trim, they address the unique challenges posed by windows within the bathing area, ensuring a seamless and watertight installation. This article will delve into the intricacies of bathtub surround kits with window trim, covering materials, installation considerations, design options, and maintenance.
Understanding the Components and Benefits
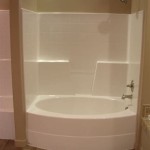
A bathtub surround kit typically comprises several wall panels designed to cover the area surrounding the bathtub. These panels are usually made of acrylic, PVC, fiberglass, or composite materials, each offering varying degrees of durability, water resistance, and aesthetic appeal. The inclusion of window trim is a crucial element when a window is located within the bathtub enclosure. This trim effectively seals the gap between the surround panels and the window frame, preventing water infiltration and potential mold growth.
The primary benefit of using a bathtub surround kit is its ability to create a waterproof environment. Traditional tiled walls, while visually appealing, often require meticulous grout maintenance to prevent water seepage. Surround kits, on the other hand, offer a solid, non-porous surface that is easy to clean and inherently resistant to water damage. The window trim component further enhances this protection by addressing a common weak point in traditional bathroom installations. Other benefits include ease of installation compared to tile, a wide range of design options, and resistance to stains and mildew.
The window trim usually consists of several pieces designed to frame the window within the surround. These pieces are typically made from the same material as the surround panels, ensuring a cohesive look. The trim pieces are designed to overlap the edges of the surround panels and the window frame, creating a watertight seal. Some kits offer adjustable trim options to accommodate different window sizes and frame depths, providing a more customized fit.
Material Options and Their Characteristics
The choice of material for a bathtub surround kit significantly impacts its performance, longevity, and aesthetic appeal. Each material has its own set of advantages and disadvantages, which should be carefully considered before making a purchase.
Acrylic: Acrylic is a popular choice for bathtub surrounds due to its durability, non-porous surface, and resistance to scratches and stains. It is also relatively lightweight and easy to install. Acrylic surrounds often come with a high-gloss finish, which is easy to clean and maintain. However, acrylic can be more expensive than other options.
PVC (Polyvinyl Chloride): PVC is a cost-effective option that is highly resistant to water damage and mold growth. It is also lightweight and easy to cut and install. However, PVC is generally less durable than acrylic and may be more susceptible to scratches and dents. The aesthetic appeal of PVC can also be limited compared to other materials.
Fiberglass: Fiberglass is another affordable option that is relatively lightweight and easy to handle. It is also resistant to water damage and mildew. However, fiberglass is less durable than acrylic and can be prone to cracking or chipping. It also tends to have a less appealing finish compared to acrylic or composite materials.
Composite Materials: Composite materials combine the best features of different materials to create a superior product. For example, some composite surrounds consist of an acrylic layer over a fiberglass core, providing the durability and aesthetic appeal of acrylic with the affordability and strength of fiberglass. These materials often offer enhanced resistance to scratches, stains, and impacts.
When selecting a material, consider the level of traffic the bathroom receives, the budget, and the desired aesthetic. For high-traffic bathrooms or those prone to heavy use, acrylic or composite materials are generally recommended. For budget-conscious installations, PVC or fiberglass may be suitable alternatives.
Installation Considerations and Best Practices
Proper installation is crucial for ensuring the effectiveness and longevity of a bathtub surround kit. While many kits are designed for DIY installation, it's essential to have a solid understanding of the process and the necessary tools. Incorrect installation can lead to water leaks, mold growth, and premature failure of the surround.
Preparation: Before beginning the installation, thoroughly clean and prepare the walls. Remove any existing tile, wallpaper, or other wall coverings. Ensure that the walls are level and plumb. Repair any damaged areas, such as holes or cracks, to create a smooth and stable surface for the surround panels. It is important to find and mark the location of wall studs as these will be needed for securing the panels.
Measurements: Accurately measure the dimensions of the bathtub area and the window opening. Use these measurements to determine the proper placement and alignment of the surround panels. Double-check all measurements before cutting any panels to avoid costly mistakes. It is advisable to consult the manufacturer's instructions carefully before proceeding.
Cutting and Fitting: Most surround kits require some cutting and fitting to accommodate the specific dimensions of the bathroom. Use appropriate tools, such as a circular saw or a utility knife, to cut the panels to size. When cutting around the window, ensure that the cuts are precise and clean to provide a tight fit with the window trim. Dry-fit the panels before applying any adhesive or sealant to ensure that they fit properly.
Adhesive and Sealant: Use a high-quality adhesive and sealant recommended by the manufacturer to adhere the surround panels to the walls. Apply the adhesive evenly to the back of the panels and press them firmly against the walls. Use sealant to seal the joints between the panels and around the window trim. Ensure that all seams and edges are completely sealed to prevent water infiltration. Pay particular attention to the corners and the area around the bathtub rim.
Window Trim Installation: The window trim is typically installed after the surround panels are in place. Follow the manufacturer's instructions for installing the trim pieces. Use sealant to create a watertight seal between the trim and the window frame, as well as between the trim and the surround panels. Ensure that the trim is securely attached to the wall and that it provides a clean and finished look.
Ventilation: Proper ventilation is essential for preventing moisture buildup in the bathroom. Ensure that the bathroom has an adequate exhaust fan to remove excess moisture after showering or bathing. This will help to prevent mold growth and prolong the life of the bathtub surround.
Design Options and Aesthetic Considerations
Bathtub surround kits with window trim are available in a wide range of designs, colors, and textures, allowing homeowners to customize the look of their bathrooms. From classic white to modern gray, and from smooth surfaces to textured patterns, there are options to suit virtually any style.
Color and Finish: Choose a color and finish that complements the overall design of the bathroom. White and neutral colors are popular choices for creating a clean and bright look. Darker colors can add a touch of sophistication and drama. Consider the finish of the surround panels, such as glossy, matte, or textured, to achieve the desired aesthetic. Some kits offer simulated tile patterns or stone textures for a more realistic look.
Window Trim Style: The style of the window trim can also contribute to the overall aesthetic of the bathroom. Choose a trim style that complements the design of the surround panels and the window itself. Some trim styles are simple and minimalist, while others are more ornate and decorative. Consider the material and finish of the window frame when selecting the trim style.
Accessorizing: Accessorize the bathtub surround with shelves, niches, or grab bars to enhance functionality and style. Consider incorporating these accessories during the installation process to ensure that they are properly integrated into the surround. Choose accessories that complement the color and finish of the surround panels.
Lighting: Proper lighting is essential for creating a welcoming and functional bathroom. Consider adding recessed lighting or a vanity light to illuminate the bathtub area. Use waterproof or moisture-resistant fixtures to ensure safety and longevity. The location and intensity of the lighting can significantly impact the ambiance of the bathroom.
By carefully considering these design options and aesthetic considerations, homeowners can create a beautiful and functional bathroom that meets their specific needs and preferences. The flexibility and versatility of bathtub surround kits with window trim make them an excellent choice for bathroom remodeling projects.
Maintenance and Care
Proper maintenance and care are essential for prolonging the life of a bathtub surround kit and maintaining its appearance. Regular cleaning and inspection can prevent the buildup of soap scum, mold, and mildew, ensuring that the surround remains in good condition for years to come.
Cleaning: Clean the surround panels regularly with a mild soap and water solution. Avoid using abrasive cleaners or scouring pads, as these can scratch or damage the surface. Rinse the panels thoroughly with clean water and dry them with a soft cloth. Pay particular attention to the seams and edges, where soap scum and mildew tend to accumulate.
Sealing: Inspect the sealant around the window trim and the joints between the panels regularly. If the sealant is cracked, peeling, or damaged, replace it promptly to prevent water infiltration. Use a high-quality sealant specifically designed for bathroom applications. Clean the area thoroughly before applying new sealant.
Ventilation: Ensure that the bathroom is properly ventilated to prevent moisture buildup. Use the exhaust fan during and after showering or bathing to remove excess moisture. Consider installing a dehumidifier in the bathroom if necessary. Adequate ventilation will help to prevent mold growth and prolong the life of the bathtub surround.
Repairs: Repair any scratches, chips, or dents as soon as possible to prevent further damage. Use a repair kit specifically designed for the material of the surround panels. Follow the manufacturer's instructions carefully when making repairs. Prompt repairs will help to maintain the appearance and integrity of the surround.
By following these maintenance and care tips, homeowners can ensure that their bathtub surround kit with window trim remains in excellent condition for many years. Regular cleaning, sealing, ventilation, and repairs will help to prevent water damage, mold growth, and premature failure of the surround.

Window Kits For Bath Showers Liberty Home Solutions

Diy Tub Surround Shower Panel Base Kits Innovate Building Solutions

Professional Bathtub Wall Surround Kits Duraflex

Shower Window Trim Kit Showers At Com

4 Shower Trim Options For Rotten Wood Window

Diy How To Trim Waterproof A Bathtub Window With Plastic Glue Up Tub Surround

Shower Window Trim Kit Showers At Com

Solution To The Large Window In Shower Simple Diy Cover

How To Install A Bath Tub Surround

Window Kits For Bath Showers Liberty Home Solutions
Related Posts