Grohe Bathtub Faucet Repair: A Comprehensive Guide
Grohe faucets are renowned for their quality, durability, and design. However, even the most well-crafted fixtures can experience issues over time. A dripping or malfunctioning Grohe bathtub faucet can be more than just an annoyance; it can lead to increased water bills and potential water damage. This article provides a comprehensive guide to understanding common Grohe bathtub faucet problems and offers detailed instructions for diagnosing and repairing them. It is important to note that attempting repairs yourself may void any existing warranty. If unsure, contacting a qualified plumber is always recommended.
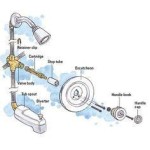
Before commencing any repair work, it is crucial to identify the specific model of your Grohe bathtub faucet. Grohe offers a wide range of faucet styles, each potentially requiring different repair procedures. The model number can typically be found on the faucet's body, packaging, or in the original installation manual. Knowing the model allows you to access specific schematics and parts lists, essential for accurate diagnosis and procurement of replacement components.
Safety is paramount when working with plumbing. Always turn off the water supply to the bathtub faucet before starting any repairs. The shut-off valves are typically located underneath the sink or in the basement near the main water line. If you are unsure how to locate or operate these valves, consult a qualified plumber. Consider using appropriate personal protective equipment (PPE), such as safety glasses and gloves, to protect yourself from potential hazards.
Identifying Common Grohe Bathtub Faucet Problems
Several common issues can affect Grohe bathtub faucets. Understanding these problems is the first step towards effective repair.
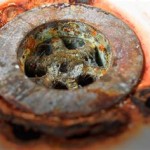
Dripping Faucet: A persistent drip is perhaps the most common complaint. This can be caused by a worn-out cartridge, damaged O-rings, or a corroded valve seat. The location of the drip (from the spout, handle, or diverter) can provide clues about the underlying cause.
Low Water Pressure: Reduced water flow from the faucet can be attributed to several factors, including mineral buildup in the aerator, clogged cartridges, or issues with the water supply lines. Checking other fixtures in the house can help determine if the problem is isolated to the bathtub faucet.
Stiff or Difficult Handle Operation: Hard-to-turn handles often indicate a build-up of mineral deposits or corrosion within the faucet’s internal components. This can strain the handle mechanism and potentially lead to further damage.
Leaking Around the Handle: Water leaking from around the handle usually points to worn or damaged O-rings or seals within the handle assembly. Replacing these components is typically a straightforward repair.
Diverter Valve Problems: If the diverter valve (used to switch water flow between the tub spout and showerhead) is not functioning correctly, it can result in water flowing from both outlets simultaneously or failing to divert water at all. This often indicates a faulty diverter valve cartridge or a build-up of mineral deposits.
Step-by-Step Guide to Grohe Bathtub Faucet Repair
The following steps outline the general process for repairing a Grohe bathtub faucet. However, specific procedures may vary depending on the faucet model. Always refer to the manufacturer's instructions or consult a professional plumber if you are unsure about any step.
1. Preparation: Gather the necessary tools and materials. This typically includes a screwdriver set (Phillips and flathead), adjustable wrench, pliers, Allen wrench (if applicable), penetrating oil, a new cartridge or O-rings (depending on the issue), plumber's grease, and a soft cloth. Ensure the water supply is turned off.
2. Disassembly: Carefully disassemble the faucet, starting with the handle. Locate and loosen any set screws or retaining clips securing the handle to the faucet body. Gently pull the handle away from the faucet. Take note of the order in which components are removed to facilitate reassembly.
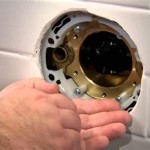
3. Cartridge Removal (if applicable): Many Grohe bathtub faucets utilize a cartridge system. Once the handle is removed, you should be able to access the cartridge. Some cartridges are held in place by a retaining clip or nut. Carefully remove the clip or nut and gently pull the cartridge straight out. If the cartridge is stuck, apply penetrating oil and allow it to soak for a few minutes before attempting to remove it again. Avoid using excessive force, as this can damage the faucet body.
4. O-Ring Replacement: If the problem stems from worn or damaged O-rings, carefully remove the old O-rings from the faucet body or cartridge. Clean the grooves where the O-rings sit and apply a thin coat of plumber's grease to the new O-rings before installing them. Ensure the O-rings are properly seated in their grooves.
5. Cleaning: Inspect all faucet components for mineral buildup or corrosion. Clean the components with a soft cloth and a mild cleaning solution. A toothbrush can be used to scrub away stubborn deposits. Rinse the components thoroughly with clean water.
6. Valve Seat Inspection and Cleaning: The valve seat is the surface against which the cartridge or valve seals. Inspect the valve seat for any signs of corrosion or damage. If necessary, use a valve seat wrench or reseating tool to smooth out any imperfections. Clean the valve seat thoroughly.
7. Reassembly: Reassemble the faucet in the reverse order of disassembly. Ensure all components are properly aligned and securely fastened. Apply plumber's grease to any moving parts to ensure smooth operation.
8. Testing: Turn the water supply back on slowly and check for leaks. Operate the faucet handles and diverter valve to ensure they are functioning correctly. If leaks are present, double-check the installation of the O-rings and cartridges. If the leaks persist, you may need to tighten the connections further or consult a qualified plumber.
Grohe Bathtub Faucet Cartridge Replacement: A Detailed Look
Replacing the cartridge is a common repair for dripping Grohe bathtub faucets. This section provides a deeper dive into the cartridge replacement process.
Identifying the Correct Cartridge: It is essential to use the correct replacement cartridge for your specific Grohe faucet model. Using an incorrect cartridge can result in improper operation or even damage to the faucet. Refer to the faucet's documentation or the Grohe website to identify the correct part number. Many plumbing supply stores can also assist you in finding the right cartridge.
Removing the Old Cartridge: After turning off the water supply and disassembling the faucet handle, you will need to remove the retaining clip or nut that secures the cartridge. This clip is often located on the side of the cartridge or underneath a decorative cap. Carefully remove the clip or nut using pliers or an adjustable wrench. Once the retaining mechanism is removed, gently pull the cartridge straight out. If the cartridge is stuck, apply penetrating oil and allow it to soak for several minutes. Avoid twisting or forcing the cartridge, as this can damage the faucet body.
Installing the New Cartridge: Before installing the new cartridge, inspect the faucet body for any debris or mineral buildup. Clean the faucet body thoroughly with a soft cloth. Apply a thin coat of plumber's grease to the O-rings on the new cartridge. This will help ensure a proper seal and prevent the cartridge from sticking. Align the cartridge with the faucet body and gently push it into place. Secure the cartridge with the retaining clip or nut. Ensure the clip or nut is properly tightened to prevent leaks.
Testing the New Cartridge: After installing the new cartridge, reassemble the faucet handle and turn the water supply back on slowly. Check for leaks around the handle and spout. Operate the faucet handles to ensure the cartridge is functioning correctly. The water flow should be smooth and consistent, and there should be no dripping.
While this guide offers detailed instructions, it's crucial to remember that specific faucet models may have unique repair procedures. Always prioritize safety and consult a professional plumber if you're uncomfortable performing any of these steps. Properly maintaining your Grohe bathtub faucet can extend its lifespan and prevent costly repairs in the future.

Grohe Shower Valve Handles Keep Falling Off Lets Get To Fixin

Parts For Grohe Kensington Series Bath S

How To Fix A Leaking Grohe Shower Valve

Parts For Grohe Talia Series Bathroom Fixtures

Grohe Leaky Faucet Repair

Grohe Metal Tub Shower Repair Kit In The Faucet Kits Components Department At Com

Grohe Mixer Valve 34211 000 Shower Spares And Parts 34211000 National

Parts For Grohe Talia Series Bathroom Fixtures

Grohe K4 32 072 Pull Out Spray Faucet Replacement Parts