Replacing a Bathtub Handle: A Comprehensive Guide
Replacing a bathtub handle is a common home maintenance task that can often be accomplished without the need for a professional plumber. Whether the existing handle is broken, corroded, or simply outdated, understanding the process of replacement can save time and money. This article provides a detailed guide to replacing a bathtub handle, covering the necessary tools, different handle types, and a step-by-step approach to ensure a successful installation.
Before undertaking any plumbing repair, safety should be the primary concern. Turning off the water supply to the bathtub or the entire house is crucial to prevent flooding and potential water damage. Locating the main water shut-off valve is essential. This valve is typically found near the water meter or where the water line enters the house. Once located, close the valve completely and verify that the water supply is indeed turned off by opening the bathtub faucet and observing a cessation of water flow. Consider placing a towel around the work area to absorb any residual water that may drip during the process.
Identifying the Type of Bathtub Handle
Bathtub handles come in various designs and configurations, and understanding the type of handle being replaced is vital for selecting the correct replacement and employing the appropriate removal technique. The most common types include single-handle faucets, two-handle faucets, and diverter valves.
Single-handle faucets control both the water temperature and flow with a single lever. These handles often utilize a cartridge, ball, or ceramic disc mechanism to regulate the water mix. Identifying the specific mechanism type is crucial for selecting the correct replacement part if only the internal components are being repaired. Two-handle faucets, on the other hand, typically have separate handles for hot and cold water. These handles often operate with compression stems or ceramic disc cartridges. Diverter valves, commonly found in bathtubs with showers, redirect the water flow from the bathtub faucet to the showerhead. These valves may have a separate handle or be integrated into the bathtub faucet handles.
Visual inspection is the first step in identifying the handle type. Examine the handle itself and the surrounding escutcheon (the decorative plate covering the valve stem). Note the shape, size, and any markings or brand names. A close-up photograph of the existing handle can also be helpful when searching for a replacement part online or at a hardware store. If the handle has been disassembled previously, noting the arrangement of the internal components can provide further clues about its type and construction.
If uncertain about the handle type, consulting the original product documentation or contacting the manufacturer directly can be helpful. Many manufacturers provide detailed diagrams and parts lists for their products. If such documentation is unavailable, searching online forums or plumbing supply websites with detailed descriptions and photographs of various handle types can aid in identification. Determining the make and model of the faucet, which may be stamped on the faucet body or handle base, can also greatly assist in identifying the appropriate replacement parts.
Gathering the Necessary Tools and Materials
Having the right tools and materials readily available before starting the replacement process is essential for efficiency and preventing delays. The specific tools required may vary depending on the type of handle and the complexity of the installation, but some common tools include:
*
Screwdrivers:
A set of both flathead and Phillips head screwdrivers of various sizes is crucial for removing screws that hold the handle and escutcheon in place. Consider using a magnetic screwdriver to prevent screws from falling into inaccessible areas. *Allen wrenches (Hex keys):
Some handles are secured with set screws that require Allen wrenches for removal. Having a set of different sizes ensures the correct wrench is available. *Pliers:
Slip-joint pliers or adjustable pliers can be used to grip and loosen stubborn compression nuts or other components. *Wrench (Adjustable or Basin Wrench):
A wrench, either adjustable or a specialized basin wrench, is necessary for loosening and tightening larger plumbing connections, such as the valve body. A basin wrench is particularly useful for accessing tight spaces behind the bathtub. *Penetrating Oil:
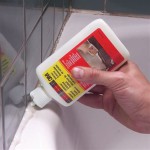
Applying penetrating oil to corroded or stuck screws and nuts can help loosen them and prevent damage during removal. *Plumber's Putty or Teflon Tape:
Plumber's putty is used to seal the escutcheon against the wall and prevent water leaks. Teflon tape is applied to threaded connections to create a watertight seal. *Cleaning Supplies:
Cleaning supplies, such as a rag and mild cleaner, are needed to clean the area around the faucet before and after installation. *New Bathtub Handle:
It is essential to have a compatible replacement handle. Verify the type and dimensions match the original handle. *Safety Glasses:
Wearing safety glasses protects the eyes from debris and potential splashes.In addition to these tools, consider having a small container to hold screws and other small parts to prevent them from being lost. A flashlight or headlamp can also be helpful for illuminating dark areas behind the bathtub.
Step-by-Step Guide to Replacing the Bathtub Handle
Once you have identified the handle type and gathered the necessary tools and materials, the replacement process can begin. The following steps provide a general guide to replacing a bathtub handle, but the specific steps may vary depending on the handle type and faucet configuration.
Step 1: Shut off the Water Supply:
As previously mentioned, the first step is always to shut off the water supply to the bathtub or the entire house.Step 2: Remove the Existing Handle:
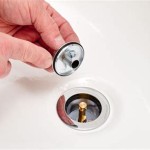
The method for removing the existing handle will depend on its type. Some handles are held in place by a set screw, which is typically located on the side or underside of the handle. Use an Allen wrench of the correct size to loosen the set screw and then pull the handle straight off the valve stem. Other handles may be held in place by a decorative cap that conceals a screw. Use a small flathead screwdriver or knife to gently pry off the cap and then remove the screw. Once the screw is removed, the handle should pull off easily.Step 3: Remove the Escutcheon (If Applicable):
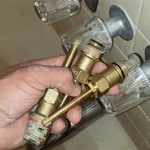
If the handle is attached to an escutcheon, it will need to be removed to access the valve stem. The escutcheon may be held in place by screws or by a compression fitting. If held by screws, simply remove the screws and pull the escutcheon away from the wall. If held by a compression fitting, use pliers or an adjustable wrench to loosen the compression nut and then pull the escutcheon off the valve stem. Care should be taken to avoid scratching the surrounding surface.Step 4: Inspect the Valve Stem:
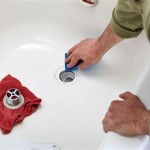
Once the handle and escutcheon are removed, inspect the valve stem for any signs of damage or corrosion. If the valve stem is corroded or damaged, it may need to be replaced. If the valve stem appears to be in good condition, clean it with a rag and mild cleaner.Step 5: Install the New Handle:
The installation process is essentially the reverse of the removal process. First, slide the escutcheon (if applicable) onto the valve stem. Then, align the new handle with the valve stem and push it into place. Tighten the set screw or install the screw and decorative cap, depending on the handle type. When tightening the set screw, do not overtighten, as this can damage the valve stem.Step 6: Apply Plumber's Putty (If Applicable):
If the escutcheon makes contact with the bathtub or wall, apply a bead of plumber's putty to the back of the escutcheon before installing it. This will create a watertight seal and prevent water from seeping behind the escutcheon.Step 7: Turn on the Water Supply:
After the new handle is installed, slowly turn on the water supply and check for leaks around the handle and escutcheon. If any leaks are detected, tighten the connections or apply more plumber's putty as needed.Step 8: Test the Handle:
Once the water supply is turned on and there are no apparent leaks, test the handle to ensure that it functions properly. Check that the water flow is smooth and that the temperature control is working correctly.Following these steps will generally result in a successful bathtub handle replacement. However, some situations may require more advanced plumbing knowledge or specialized tools. If encountering difficulties or uncertainties, consulting a qualified plumber is always recommended.

How To Fix A Leaking Bathtub Faucet Diy Family Handyman

How To Replace A Bathtub Faucet

Plumbing How To Replace A Jacuzzi Bathtub Faucet Home Improvement Stack Exchange

How To Replace Bathtub Faucet Handles

How To Fix A Leaking Bathtub Faucet Diy Family Handyman

Replace Faucet Handles In Existing Bathtub Home Improvement Stack Exchange

How To Change A Bathtub Faucet 14 Steps With Pictures Wikihow

How To Fix A Leaking Bathtub Faucet The Home Depot

How To Fix A Leaking Bathtub Faucet Diy Family Handyman

How To Replace Bathtub Faucet Stem Home For Relax