What To Do If Your Bathtub Is Leaking Through the Ceiling
Discovering a water stain on the ceiling beneath a bathroom is a distressing experience, often indicating a leak originating from the bathtub or shower area. A leak of this nature, if left unaddressed, can lead to significant structural damage, mold growth, and costly repairs. Identifying the source of the leak and implementing appropriate measures is crucial to mitigate further damage and restore the integrity of the building.
The initial step in addressing a bathtub leak is to cease all water usage in the affected bathroom. This includes refraining from using the shower, bathtub, and sink. The cessation of water usage helps to isolate the problem and prevent the exacerbation of the leak, thereby minimizing the extent of damage to the ceiling and surrounding structures.
Subsequently, a careful inspection of the bathroom and the area beneath the leak is required. This assessment aims to pinpoint the origin of the water intrusion and determine the severity of the problem. The inspection should encompass various components, including the bathtub's drain, overflow drain, faucet connections, and the surrounding tiling and grout.
Identifying the Source of the Leak
Pinpointing the specific source of the leak is paramount to implementing effective repairs. Several potential culprits may contribute to water leaking through the ceiling beneath a bathtub.
One common source is a faulty or deteriorated bathtub drain. Over time, the drain assembly can corrode, crack, or loosen, allowing water to seep through the connections and into the subfloor. The overflow drain, designed to prevent the bathtub from overflowing, can also develop leaks if the gasket or connections become compromised. Inspecting these areas for visible signs of water damage, corrosion, or looseness is crucial.
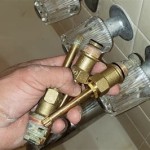
Faucet connections, including the supply lines and the faucet itself, are another potential source of leaks. Over time, the fittings connecting the faucet to the water supply lines may weaken, corrode, or become loose, resulting in water leakage. Similarly, the faucet cartridge or valve stem can wear out, leading to dripping or leakage around the faucet base. Close examination of these connections for any signs of moisture or corrosion is imperative.
The surrounding tiling and grout play a critical role in preventing water from penetrating the subfloor. Damaged, cracked, or missing grout can create pathways for water to seep through, eventually leading to leaks in the ceiling below. Inspecting the tile and grout for any signs of damage, such as cracks, missing pieces, or discoloration, is necessary to identify potential points of water entry.
In some instances, the leak may originate from a plumbing issue within the walls or floors. This may involve a cracked or damaged water supply pipe or drainpipe. Detecting such leaks often requires more invasive inspection techniques, potentially involving the removal of sections of drywall or flooring to access the plumbing lines.
Immediate Actions to Mitigate Damage
Once a leak is suspected, taking immediate action to mitigate further damage is critical. These actions focus on containing the water, preventing mold growth, and ensuring the safety of the occupants. Failure to address the leak promptly can lead to more extensive and costly repairs in the long run.
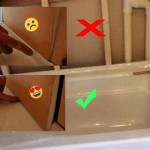
The first step in mitigating damage is to contain the water dripping from the ceiling. Placing a bucket or container beneath the leak can help to collect the water and prevent it from spreading further. If the leak is substantial, consider using a larger container or multiple containers to accommodate the volume of water. Empty the containers regularly to prevent overflow and potential water damage to the surrounding area.
To prevent mold growth, it is essential to dry the affected area as quickly as possible. Mold thrives in damp and humid environments, and prolonged exposure to moisture can lead to mold infestation. Using fans to circulate air and dehumidifiers to remove excess moisture can help to accelerate the drying process. It is also crucial to remove any wet or damaged materials, such as drywall or insulation, as these materials can harbor mold spores.
Addressing the structural integrity of the ceiling is another important consideration. If the ceiling is sagging or appears unstable due to water damage, it is essential to provide temporary support to prevent collapse. This can be achieved by placing a support beam or post beneath the affected area to reinforce the ceiling. However, it is crucial to exercise caution when working around a water-damaged ceiling, as it may be unstable and pose a safety hazard.
Safety is paramount when dealing with water leaks. Water can conduct electricity, so it is essential to avoid contact with any electrical outlets or wiring in the affected area. If necessary, turn off the power to the bathroom circuit breaker to prevent electrical shock. Additionally, be cautious of slippery surfaces and potential slip hazards caused by water accumulation. Place warning signs or barriers around the affected area to alert others to the potential hazards.
Documenting the damage is crucial for insurance purposes. Take photographs and videos of the water leak, the affected ceiling, and any other damaged areas. These images will serve as evidence of the damage and can be used to support your insurance claim. Keep a record of all communication with insurance companies and contractors, as well as any expenses incurred related to the leak repair.
Repairing the Bathtub Leak
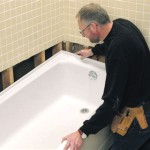
Once the source of the leak has been identified and the immediate damage has been mitigated, the focus shifts to repairing the underlying problem. The appropriate repair strategy will depend on the specific cause and extent of the leak.
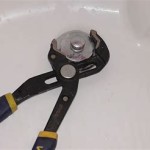
If the leak originates from a faulty bathtub drain, the drain assembly may need to be repaired or replaced. The process typically involves removing the old drain assembly, cleaning the drain opening, and installing a new drain with fresh plumber's putty or silicone sealant to ensure a watertight seal. Tightening the drain nut securely is crucial to prevent future leaks. For overflow drain leaks, replacing the gasket or tightening the connections may suffice. In more severe cases, the entire overflow drain assembly may need to be replaced.
Faucet leaks can often be resolved by tightening loose connections or replacing worn-out parts. If the faucet is leaking from the base, tightening the mounting nuts or replacing the O-rings may be sufficient. For dripping faucets, replacing the cartridge or valve stem is often necessary. When replacing faucet components, it is essential to shut off the water supply to the bathroom and to use the correct replacement parts to ensure a proper fit and seal.
Leaks caused by damaged tile or grout require removing the affected tiles and re-grouting the area. Before re-grouting, it is essential to clean the area thoroughly and allow it to dry completely. Applying a sealant to the grout lines can help to prevent future water penetration. If the underlying subfloor is damaged, it may need to be repaired or replaced before installing new tiles.
Leaks originating from plumbing issues within the walls or floors often require the expertise of a licensed plumber. A plumber can diagnose the problem accurately and perform the necessary repairs to the water supply lines or drainpipes. This may involve cutting into the walls or floors to access the damaged pipes, followed by repairing or replacing the pipes and patching up the affected areas.
Following the repairs, it is crucial to monitor the area for any signs of recurrence. Check for any new water stains on the ceiling or walls, and inspect the repaired components for leaks. If the leak persists, it is essential to re-evaluate the situation and seek further professional assistance.
Preventative measures can help to minimize the risk of future bathtub leaks. Regularly inspect the bathtub's drain, overflow drain, faucet connections, and surrounding tiling and grout for any signs of damage or wear. Address any minor issues promptly before they escalate into major problems. Applying a sealant to the grout lines periodically can help to prevent water penetration. Additionally, avoid using abrasive cleaners on the bathtub or tile surfaces, as these can damage the finish and create pathways for water to seep through.
In conclusion, addressing a bathtub leak through the ceiling requires a systematic approach involving identification, mitigation, and repair. Prompt action and careful attention to detail are crucial to preventing further damage and restoring the integrity of the building. When in doubt, seeking professional assistance from a qualified plumber or contractor is always a prudent decision.

Bath Leaking Through Ceiling Top Likely Causes

What To Do When The Bathtub Overflows And Leaks Downstairs

Is Water Leaking Through Ceiling After You Shower Robinson Plumbing

Why Is Water Leaking From My Ceiling Ranshaw

Shower Leaking Through Ceiling Diy Repair Doityourself Com Community Forums

How To Tub Leak Detect Ceiling Under Bathroom Stop Leaking Easy

How To Address Water Damage On The Ceiling Under Bathroom

Shower Leaking Through Ceiling 8 Likely Causes

Bathtub Leaking Through Ceiling How To Fix A Leaky

Bathtub Drain Leak Repair Leaking How To Fix
Related Posts