How To Measure For Alcove Bathtub Surround
Accurate measurements are critical when installing an alcove bathtub surround. Precise measurements ensure a proper fit, prevent water damage, and contribute to the overall aesthetic appeal of the bathroom. This article provides a comprehensive guide on how to measure for an alcove bathtub surround, covering the necessary tools, step-by-step instructions, and essential considerations for a smooth and successful installation.
Required Tools and Materials
Before beginning the measurement process, it is essential to gather the necessary tools and materials. This preparation ensures accuracy and efficiency throughout the process. The following list outlines the recommended items:
Measuring Tape:
A durable and retractable measuring tape is essential for accurate length and width measurements. Choose a tape measure that extends beyond the largest dimension of the alcove to avoid limitations.Level:
A level, preferably a spirit level or laser level, is vital for determining the horizontal and vertical alignment of the walls surrounding the bathtub. This ensures the surround is installed straight and true.Straight Edge:
A long, straight edge, such as a metal ruler or a level, can be used to check for any bowing or unevenness in the walls. This will help identify areas that may require shimming or adjustment during installation.Pencil:
A pencil is needed to mark measurements and reference points on the walls and the bathtub itself.Paper or Notebook:
A notepad is necessary for recording the measurements as they are taken. Accurate record-keeping prevents errors and ensures easy reference during the surround selection and installation process.Safety Glasses:
Wearing safety glasses is recommended to protect the eyes from dust or debris that may be present during the measurement process.Gloves:
Gloves can be used to provide a better grip and protect hands during the measuring process.
Step-by-Step Measurement Guide
The following steps outline the process for accurately measuring an alcove bathtub for a surround. Accurate adherence to these instructions is essential for a successful installation.
Step 1: Preparation of the Alcove
Begin by clearing the alcove area of any obstructions, such as shower curtains, toiletries, or cleaning supplies. Ensure the bathtub is clean and dry. This preparation allows for unobstructed access to the walls and bathtub edges, ensuring accurate measurements. If there is an existing surround present, it is important to remove it before beginning the measurement process. This ensures that the measurements are based on the actual dimensions of the alcove and the bathtub itself.
Step 2: Measuring the Width
Measure the width of the alcove at three different points: the top, the middle, and the bottom. Place the end of the measuring tape against one wall and extend it to the opposite wall at each of these three points. Record each measurement separately. The width measurements are critical for ensuring that the back panel of the surround fits properly within the alcove. Discrepancies in these measurements indicate potential variations in the wall alignment, which is important for precise installation considerations.
Step 3: Measuring the Depth
Measure the depth of the alcove from the front edge of the bathtub to the back wall. Ensure the measuring tape is perpendicular to the bathtub's edge for an accurate measurement. Record this measurement. The depth measurement determines the necessary length of the side panels of the surround for a proper fit. Accurate depth measurements prevent gaps or overhangs, ensuring the surround seamlessly integrates with the bathtub.
Step 4: Measuring the Height
Measure the height from the top edge of the bathtub to the desired height of the surround. This measurement will typically extend to the ceiling or a predetermined point on the wall. Measure the height at three different points: the left, center, and right. Record each measurement. The height measurements determine the overall height of the surround panels. Varying height measurements can indicate unevenness in the walls or ceiling, which needs to be addressed during installation with appropriate shimming or adjustments. If a shower head is already installed, it is crucial to consider its position when determining the desired height of the surround to make sure it fits properly after the surround is installed. Consider the shower head arm and its projection. This helps ensure the surround panels do not interfere with the shower head's functionality.
Step 5: Checking for Squareness
Use a large square or a level to check if the corners of the alcove are square. Place the square against the walls to determine if they form a perfect 90-degree angle. If the corners are not square, note the degree of deviation. Non-square corners require adjustments during installation to ensure the surround panels fit properly. This may involve trimming or shimming the panels to conform to the alcove's shape. Accurate assessment of squareness prevents gaps or misalignment in the installed surround.
Step 6: Identifying Obstructions
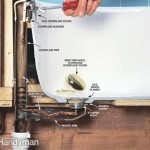
Carefully inspect the walls for any obstructions, such as pipes, faucets, or window frames. Measure the distance from these obstructions to the surrounding walls and the top edge of the bathtub. Record these measurements accurately. Identifying obstructions is crucial for selecting a surround that can accommodate these features. Some surrounds have pre-cut openings for standard plumbing fixtures, while others require custom modifications. Accurate measurements of obstruction locations prevent installation challenges and ensure a seamless fit.
Step 7: Account for the Bathtub Flange
Most alcove bathtubs have a tiling flange that extends up the wall. It's important to measure from this flange to the top of the bathtub to determine the actual surface that the surround will cover. This ensures the surround covers the intended area and doesn't leave gaps.
Key Considerations for Accurate Measurements
While following the step-by-step guide is essential, certain key considerations can further ensure the accuracy of the measurements. These considerations address potential challenges and ensure a successful alcove bathtub surround installation.
1. Account for Wall Imperfections
Walls are rarely perfectly straight or plumb. Using the straight edge and level, identify any bowing, warping, or unevenness in the walls. Note these imperfections and factor them into the measurements. Uneven walls may require shimming the surround panels to create a flush and level surface. These considerations will also influence the amount of adhesive or sealant necessary for a secure installation. Careful assessment of wall imperfections prevents gaps and ensures a professional finish.
2. Use the Smallest Measurement
When measuring the width and height, use the smallest measurement recorded. This ensures that the surround panels will fit within the alcove, even if the walls are slightly out of square. Trimming the panels to fit a smaller space is easier than trying to force them into a space that is too small. Using the smallest measurement provides a margin of error and minimizes the need for extensive modifications during installation.
3. Select the Right Type of Surround
There are different types of tub surrounds, including acrylic, fiberglass, and tile. When choosing a surround, it is essential to consider the dimensions of the alcove and the specific features of the bathtub. Some surrounds are designed to be cut to fit, while others are pre-fabricated to certain sizes. If the alcove dimensions are unusual, a custom-made surround may be necessary. Selecting the appropriate type of surround ensures a proper fit and minimizes installation challenges.
4. Accuracy and Double-Checking
The most important point of measuring for the alcove bathtub surround is accuracy. Double-check all measurements before selecting the surround or beginning the installation. Small errors in measurement can lead to significant problems during installation, such as gaps, misalignment, or the need for extensive modifications. Take the time to verify each measurement and ensure that all dimensions are accurate. If possible, have another person independently verify the measurements. This reduces the risk of errors and ensures a smooth and successful installation process.

How To Measure A Bathtub Standard Tub Sizes Measuring Guide Vevano

How To Measure A Bathtub Standard Tub Sizes Measuring Guide Vevano

How To Measure A Bathtub Standard Tub Sizes Measuring Guide Vevano

Acrylic Alcove Bathtub Shower Replacement Innovate Building Solutions

How To Measure A Bathtub Standard Tub Sizes Measuring Guide Vevano

60 X 32 Sitka Acrylic Alcove Soaking Tub White Signature Hardware

Acrylic Alcove Bathtub Shower Replacement Innovate Building Solutions

What Is An Alcove Bathtub Family Handyman

An Overview Of Acrylic Tub Installation Extreme How To

Alcove Bathtub Skirted Tub With Tile
Related Posts