Installing a New Bathtub Faucet: A Comprehensive Guide
Replacing a bathtub faucet can significantly improve the aesthetic appeal and functionality of a bathroom. A leaky or outdated faucet can lead to water wastage and reduced water pressure, potentially increasing utility bills and diminishing the bathing experience. This article provides a detailed, step-by-step guide to installing a new bathtub faucet, covering essential preparations, necessary tools, and the installation procedure itself. Adhering to these instructions ensures a smooth and successful faucet replacement.
Before commencing the installation, meticulous planning and preparation are crucial. This includes selecting the appropriate type of faucet, gathering the necessary tools and materials, and shutting off the water supply to prevent flooding and water damage. Each of these pre-installation steps is essential for a safe and efficient installation process.
Preparing for Bathtub Faucet Installation
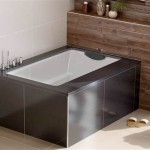
Prior to initiating any physical work, several preparatory steps are vital. First, identify the existing type of faucet and select a replacement that is compatible with the existing plumbing configuration. Bathtub faucets come in various styles, including wall-mount, deck-mount, and freestanding models. Ensuring the new faucet aligns with the existing plumbing setup prevents potential complications and the need for extensive plumbing modifications.
Measure the distance between the hot and cold water supply lines. This measurement is crucial for ensuring the new faucet will fit without requiring adjustments to the existing plumbing. Different faucets have varying spout lengths and handle configurations, so choosing a model with compatible dimensions is essential for a proper fit. Failure to do so could result in difficulties connecting the water supply lines and securing the faucet in place.
Gather the necessary tools and materials before starting the installation. Essential tools include: an adjustable wrench, a pipe wrench, a plumber's tape (Teflon tape), a screwdriver (both flathead and Phillips head), a basin wrench, a putty knife, and a bucket. Additional materials include: new supply lines (if needed), plumber's putty, and cleaning supplies. Having all these items readily available will streamline the installation process and prevent interruptions.
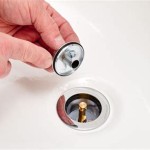
The next crucial step is to shut off the water supply to the bathroom. Locate the main water shut-off valve for the bathroom, which is typically found in the basement, utility room, or near the water heater. Turning off this valve will prevent water from flowing during the installation process. After turning off the main valve, open the existing bathtub faucet to relieve any remaining pressure in the pipes. Ensure all water has drained from the pipes before proceeding to the next step.
Protect the surrounding area by placing a drop cloth or old towels around the bathtub to prevent scratches and protect the floor from water damage. Removing any obstructions around the bathtub, such as shower curtains or bath mats, provides ample working space and minimizes the risk of accidents or damage to surrounding fixtures.
Removing the Old Bathtub Faucet
Once the preparations are complete, the next step involves removing the existing bathtub faucet. This process requires careful handling to avoid damaging the surrounding tiles or plumbing connections. Depending on the type of faucet, the removal process might vary slightly, but the general principles remain the same.
Begin by disconnecting the water supply lines from the old faucet. Use an adjustable wrench to loosen the nuts connecting the supply lines to the faucet. If the nuts are corroded or difficult to loosen, apply penetrating oil and allow it to sit for a few minutes before attempting to loosen them again. Exercise caution to avoid twisting or damaging the supply lines or the pipes connected to them.
After disconnecting the water supply lines, remove any screws or bolts securing the faucet to the wall or deck. The location of these fasteners varies depending on the type of faucet. Wall-mount faucets typically have screws concealed behind decorative caps, while deck-mount faucets may have screws accessible from underneath the bathtub. Use the appropriate screwdriver to remove these fasteners carefully.
If the faucet is sealed with plumber's putty or caulk, use a putty knife to gently break the seal around the faucet base. Work the putty knife around the perimeter of the faucet to loosen it from the surface. Be careful not to scratch the bathtub or tiles while doing so. Once the seal is broken, carefully pull the faucet away from the wall or deck.
Inspect the exposed plumbing connections for any signs of corrosion or damage. Clean the area thoroughly to remove any old plumber's putty, caulk, or debris. If the existing supply lines are corroded or damaged, replace them with new ones. This ensures a secure and leak-free connection with the new faucet.
Before installing the new faucet, check the shut-off valves themselves. Over time, these valves can become corroded or stiff, making them difficult to operate. If the shut-off valves appear to be in poor condition, replacing them before installing the new faucet can prevent future plumbing issues and ensure a reliable water supply.
Installing the New Bathtub Faucet
With the old faucet removed and the area prepared, the installation of the new faucet can commence. This process involves connecting the water supply lines, securing the faucet in place, and testing for leaks. Proper installation ensures the faucet functions correctly and prevents water damage.
Apply plumber's tape (Teflon tape) to the threads of the water supply pipes. Wrap the tape clockwise around the threads, overlapping each layer slightly. This creates a watertight seal and prevents leaks at the connection points. Use two to three layers of plumber's tape for optimal sealing.
Connect the water supply lines to the new faucet. Tighten the nuts securely using an adjustable wrench, but avoid over-tightening, which can damage the threads. Ensure the connections are snug and leak-free. If using flexible supply lines, bend them carefully to avoid kinking or damaging them.
Position the new faucet in its designated location and secure it to the wall or deck using the appropriate screws or bolts. Depending on the type of faucet, this may involve tightening screws from underneath the bathtub or through decorative caps on the faucet body. Ensure the faucet is properly aligned and securely fastened to prevent movement or instability.
Apply a bead of plumber's putty around the base of the faucet where it meets the bathtub or wall. This creates a watertight seal and prevents water from seeping behind the faucet. Smooth the putty with your finger to create a neat and uniform seal. Remove any excess putty with a damp cloth.
Turn the water supply back on slowly and check for leaks around the faucet connections and supply lines. If any leaks are detected, tighten the connections slightly or reapply plumber's tape if necessary. Allow the water to run for a few minutes to flush out any debris from the pipes.
Test the hot and cold water functions to ensure they are working correctly. Check the water pressure and temperature to ensure they are satisfactory. If there are any issues with the water pressure or temperature, consult a professional plumber.
Clean up the surrounding area and remove any tools, materials, or debris. Dispose of the old faucet and packaging materials responsibly. Inspect the installation one last time to ensure everything is properly aligned and functioning correctly.
Following these instructions meticulously ensures a successful bathtub faucet installation. While this guide provides a comprehensive overview, specific models may require additional steps or considerations outlined in the manufacturer's instructions. Always refer to the manufacturer's instructions for detailed guidance and safety precautions. If any uncertainties or difficulties arise during the installation process, consulting a professional plumber is always recommended to prevent damage and ensure a safe and reliable installation.

Installing A Tub Faucet Fine Homebuilding

How To Fix A Leaking Bathtub Faucet Diy Family Handyman
:strip_icc()/SCP_191_05-7b8dd5fde3f140a3ac838f2330698648.jpg?strip=all "How To Install A Shower Or Tub Faucet")
How To Install A Shower Or Tub Faucet

Install A 1 Handle Tub And Shower Faucet Rona

Learn How To Remove And Install Various Tub Spouts

How To Change A Bathtub Faucet 14 Steps With Pictures Wikihow

Learn How To Remove And Install Various Tub Spouts

Plumbing How To Replace A Jacuzzi Bathtub Faucet Home Improvement Stack Exchange
:strip_icc()/SCP_191_07-2e153d67cdbf447eb1415fa9a30a13b9.jpg?strip=all "How To Install A Shower Or Tub Faucet")
How To Install A Shower Or Tub Faucet

Installing A Tub Faucet Fine Homebuilding