Bathworks DIY Bathtub Tile Refinishing Kit Instructions: A Comprehensive Guide
Refinishing a bathtub and its surrounding tile can significantly improve the aesthetic appeal of a bathroom while avoiding the costly and disruptive process of a full replacement. The Bathworks DIY Bathtub Tile Refinishing Kit offers a viable option for homeowners seeking to rejuvenate their existing fixtures. This article provides a detailed walkthrough of the kit's instructions, ensuring a successful and long-lasting refinishing project.
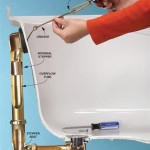
Before initiating the refinishing process, a thorough assessment of the existing surface is crucial. Look for signs of significant damage such as large chips, cracks, or rust penetration. While the Bathworks kit can address minor imperfections, extensive damage may necessitate professional repair or replacement. The condition of the existing grout should also be evaluated. Crumbling or heavily stained grout should be removed and replaced prior to applying the refinishing coating.
Proper preparation is paramount for achieving a durable and visually appealing finish. Neglecting preparation steps can lead to adhesion failures, peeling, and an unsatisfactory final result. Patience and attention to detail during this phase are essential.
Surface Cleaning and Etching: Key to Adhesion
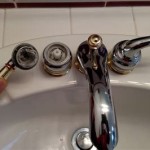
The initial step involves a rigorous cleaning of the bathtub and tile surfaces. The Bathworks kit typically includes a cleaning solution designed to remove soap scum, mineral deposits, and other contaminants. Apply the cleaning solution liberally and scrub the entire surface using a non-abrasive scouring pad. Pay particular attention to areas with stubborn stains or residue. Rinse thoroughly with clean water to ensure all traces of the cleaning solution are removed.
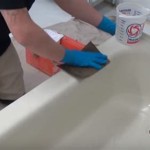
Following the cleaning process, etching is required to create a slightly roughened surface that promotes adhesion of the refinishing coating. The kit usually includes an etching powder or liquid that reacts chemically with the existing surface. Follow the manufacturer's instructions precisely regarding the application and dwell time of the etching solution. Typically, the etching solution is applied, allowed to sit for a specified period, and then thoroughly rinsed with clean water. It is critical to ensure all traces of the etching solution are removed as residual chemicals can interfere with the coating's adhesion.
After etching and rinsing, allow the surfaces to dry completely. Any residual moisture can compromise the bond between the existing surface and the refinishing coating. Depending on the ambient humidity and temperature, this drying process may take several hours or even overnight. Using a clean, lint-free cloth to wipe down the surfaces can help expedite the drying process. The surfaces should be completely dry to the touch before proceeding to the next step.
Applying the Primer: Creating a Uniform Base
The Bathworks kit includes a primer that serves as a bonding agent between the existing surface and the topcoat. The primer typically consists of a two-part epoxy formulation that requires mixing immediately before application. Carefully follow the manufacturer's instructions regarding the mixing ratio and mixing time. Insufficient mixing can result in a poorly cured primer that lacks the necessary adhesion properties.
Apply the primer in thin, even coats using a high-quality brush, roller, or spray gun, depending on the kit's specifications. Avoid applying the primer too thickly, as this can lead to runs, drips, and uneven drying. Pay particular attention to areas that may be difficult to reach, such as corners and edges. Multiple thin coats are generally preferred over a single thick coat. Allow each coat of primer to dry completely before applying the next. The drying time will vary depending on the ambient temperature and humidity. Refer to the manufacturer's instructions for the recommended drying time.
After the primer has dried completely, inspect the surface for any imperfections, such as runs, drips, or areas where the primer is thin or uneven. Lightly sand any imperfections using fine-grit sandpaper to create a smooth and uniform surface for the topcoat. Remove any sanding dust with a tack cloth before proceeding.
Applying the Topcoat: Achieving the Desired Finish
The topcoat is the final layer that provides the color, gloss, and protective properties of the refinished surface. The Bathworks kit typically includes a two-part epoxy or polyurethane coating that requires mixing immediately before application. As with the primer, carefully follow the manufacturer's instructions regarding the mixing ratio and mixing time. Insufficient mixing can result in a poorly cured topcoat that lacks the desired durability and appearance.
Apply the topcoat in thin, even coats using a high-quality brush, roller, or spray gun, depending on the kit's specifications. Maintaining a consistent application technique is crucial for achieving a uniform and professional-looking finish. Overlap each stroke slightly to avoid gaps or streaks. Avoid applying the topcoat too thickly, as this can lead to runs, drips, and uneven drying. Multiple thin coats are generally preferred over a single thick coat.
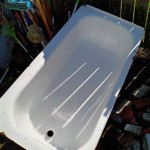
Allow each coat of topcoat to dry completely before applying the next. The drying time will vary depending on the ambient temperature and humidity. Refer to the manufacturer's instructions for the recommended drying time. After the final coat has been applied, allow the surface to cure completely before using the bathtub or shower. The curing time may be significantly longer than the drying time. Using the refinished surface prematurely can damage the coating and compromise its durability. Consult the manufacturer's instructions for the recommended curing time, which may be several days or even a week.
During the drying and curing process, ensure adequate ventilation in the bathroom to allow the fumes from the coating to dissipate. Keep the bathroom door and windows open, and consider using a fan to circulate the air. Avoid using the bathroom during this time to prevent accidental contact with the wet coating.
Once the topcoat has fully cured, carefully inspect the surface for any imperfections. Minor imperfections, such as small dust particles or air bubbles, can be lightly sanded using ultra-fine-grit sandpaper. Polishing the surface with a polishing compound can further enhance the gloss and smoothness of the finish. Avoid using abrasive cleaners or scrub brushes on the refinished surface, as these can scratch or damage the coating. Clean the surface regularly with a mild soap and water solution to maintain its appearance and longevity.
Following these detailed instructions will contribute to a successful bathtub and tile refinishing project using the Bathworks DIY kit. While DIY projects can be fulfilling, remember that achieving professional-level results requires patience, attention to detail, and adherence to the manufacturer's guidelines. In situations where significant damage exists or if you lack the necessary skill or confidence, consulting a professional refinisher is always a prudent option.

Bathworks Thrift Diving How To Refinish A Bathtub Using The 1 Best Kit In America

Bathworks Bathtub Refinishing Kit Review Diy Resurfacing 1970s Bathroom Renovation

Premium Kit With Non Slip Protection Bathworks

Bathworks Thrift Diving How To Refinish A Bathtub Using The 1 Best Kit In America

Bathworks 22 Oz Standard Tub And Tile Refinishing Kit With Non Slip Protection Bone Bmrk 112 The Home Depot

Bathworks Thrift Diving How To Refinish A Bathtub Using The 1 Best Kit In America

Bathworks 108 Oz White Bathtub Paint Refinish Kit With Non Slip Case Of 6 Bwkc 07 The Home Depot

Diy Shower Wall Refinishing Using Bathworks Kit

Bathtub Refinishing Kits By Bathworks Premium Tub Tile And Shower Paint Kit Refinish

Bathworks 22 Oz Diy Bathtub And Tile Refinishing Kit With Slip Guard Protection Red Bwns 12 The Home Depot
Related Posts