How to Fix a Bathtub Drain Stopper
A malfunctioning bathtub drain stopper can be a significant inconvenience, leading to slow draining, standing water, and a generally unpleasant bathing experience. While calling a plumber is always an option, many common stopper issues can be resolved with basic tools and a little know-how. This article provides a comprehensive guide to diagnosing and repairing various types of bathtub drain stoppers.
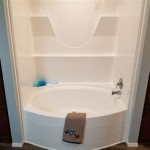
Before beginning any repair, it is important to identify the type of stopper mechanism in place. This knowledge will dictate the appropriate troubleshooting steps and required tools. Common types include lift-and-turn stoppers, pop-up stoppers, toe-touch stoppers, and trip-lever stoppers. Each type operates differently and requires unique repair methods.
Identifying the Type of Bathtub Drain Stopper
Firstly, observe the drain area carefully. A
lift-and-turn stopper
is characterized by a knob or lever directly on the stopper itself. The user lifts and turns the knob to open and close the drain. Apop-up stopper
features a simple, smooth stopper that is pressed down to close and pressed again to open. Atoe-touch stopper
is similar to a pop-up, but is larger and designed to be operated with a tap of the foot. Finally, atrip-lever stopper
utilizes a lever located on the overflow plate, typically near the faucet. Activating the lever raises and lowers the stopper via an internal linkage system.Understanding which type of stopper is present is crucial because the location of the problem and the method of repair will vary significantly. Attempting to fix a pop-up stopper using instructions intended for a trip-lever stopper, for example, will likely be unsuccessful and could potentially damage the fixture.
After identifying the stopper type, gather the necessary tools. A common toolkit should include a screwdriver (both Phillips head and flathead), pliers, a small wrench, a drain snake or wire coat hanger, rubber gloves, and potentially some penetrating oil. Having these tools readily available will streamline the repair process.
Troubleshooting Common Stopper Problems
Once the stopper type has been identified, the next step is to diagnose the problem. Common issues include slow draining, the stopper not sealing properly, the stopper being stuck in the open or closed position, and the linkage mechanism being broken or disconnected. Each of these issues can stem from different underlying causes.
Slow Draining:
This is often caused by a buildup of hair, soap scum, and other debris in the drainpipe. Regardless of the stopper type, the first step is to attempt to remove any visible debris around the stopper itself. If this does not resolve the issue, a drain snake or straightened wire coat hanger can be used to probe further down the drainpipe and dislodge any larger obstructions.To use a drain snake, carefully insert it into the drain opening and rotate it as it progresses downward. If resistance is encountered, continue rotating and applying gentle pressure to break up or grab the obstruction. Once the snake has passed the obstruction, slowly retract it, pulling the debris out with it. Repeat this process until the drain flows freely. For a wire coat hanger, create a small hook at the end and carefully fish around for hair and debris. Be careful not to scratch the drainpipe with the wire.
Stopper Not Sealing Properly:
This usually indicates a problem with the stopper's adjustment or the presence of debris preventing a tight seal. For lift-and-turn and pop-up stoppers, there is often an adjustment screw located on the stopper itself or just below it. Loosening this screw allows the stopper to be raised or lowered, adjusting its position relative to the drain opening. Experiment with small adjustments until a proper seal is achieved. For trip-lever stoppers, the adjustment is typically located on the linkage behind the overflow plate. The overflow plate needs to be removed to access this mechanism.In some cases, even with proper adjustment, a small amount of debris lodged between the stopper and the drain opening can prevent a complete seal. Thoroughly cleaning both the stopper and the drain opening can resolve this issue.
Stopper Stuck Open or Closed:
A stuck stopper can be caused by corrosion, mineral buildup, or a dislodged linkage. Applying penetrating oil around the stopper and allowing it to sit for several minutes can help loosen any corrosion or mineral deposits. Gently wiggling or tapping the stopper may also help to break it free.For trip-lever stoppers, a stuck stopper is often due to a disconnected or jammed linkage. Removing the overflow plate and inspecting the linkage mechanism is necessary. If the linkage is disconnected, attempt to reattach it. If it is bent or damaged, replacement parts may be required. In some cases, the entire linkage mechanism may need to be replaced.
Repairing Specific Stopper Types
While the general troubleshooting steps apply to all stopper types, the specific repair procedures differ. A closer look at each type will reveal specific areas of concern and common repair methods.
Lift-and-Turn Stoppers:
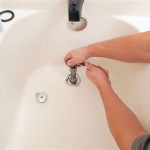
These stoppers are relatively simple in design. The most common problems are loose adjustment screws and buildup of debris around the stopper base. To adjust the stopper, loosen the adjustment screw, reposition the stopper, and retighten the screw. To clean the stopper, remove it entirely and scrub it with a brush and cleaning solution. Check the drain opening for any debris and remove it accordingly. If the threads on the stopper or the drain are damaged, replacement is often the best solution.Pop-Up Stoppers:
These stoppers rely on a spring-loaded mechanism to open and close. Over time, this mechanism can become corroded or clogged with debris. To clean a pop-up stopper, remove it from the drain and thoroughly clean the spring and the stopper body. A small brush or cotton swab can be used to remove debris from hard-to-reach areas. If the spring is damaged or broken, replacement is necessary. The stopper may also be adjusted by rotating the body after removing it allowing for the seal to be better.Toe-Touch Stoppers:
Similar to pop-up stoppers, toe-touch stoppers use a spring-loaded mechanism. The repair process is identical to that of a pop-up stopper. Often the sealing ring around the stopper can deteriorate leading to a leak or not sealing properly. Check this ring and replace if needed.Trip-Lever Stoppers:
These stoppers are the most complex due to the internal linkage system. The most common problems are disconnected linkages, bent rods, and corroded components. Accessing the linkage requires removing the overflow plate. Once the plate is removed, the entire linkage assembly can be pulled out. Inspect the assembly for any damage and reconnect any disconnected parts. If any parts are bent or corroded, they should be replaced. Lubricating the moving parts with a silicone-based lubricant can also help to prevent future problems.When working with trip-lever stoppers, taking a picture of the linkage arrangement before disassembly can be helpful for reassembly. There are often multiple connection points, and it can be difficult to remember the correct configuration without a reference.
Regardless of the stopper type, it is important to avoid using excessive force when attempting to remove or adjust the stopper. Applying too much force can damage the stopper or the drainpipe, leading to more significant repairs.
If the above steps do not resolve the issue, it may be necessary to consult a professional plumber. More complex problems, such as damaged drainpipes or severe corrosion, require specialized tools and expertise.
Preventative maintenance can significantly reduce the likelihood of future stopper problems. Regularly cleaning the drain and stopper to remove debris, using a drain strainer to catch hair, and avoiding the use of harsh chemicals can all help to keep the drain running smoothly.

Bathroom Repair How To A Pop Up Tub Drain Stopper

Diy How To Replace Bathtub Drain Stopper Tutorial Clogged

How To Remove 6 Diffe Bath Drain Types

Replace And Adjust Ing Bath Drain

How To Remove A Bathtub Drain Stopper Mr Rooter

How To Remove A Bathtub Drain Stopper

How To Remove A Bathtub Drain Forbes Home

How To Remove And Replace A Bathtub Drain Stopper

8 Ways To Block A Bathtub Drain Without Plug

How To Replace A Bathtub Drain Stopper With Lift And Turn Old Shower Installation
Related Posts