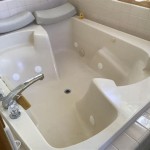
How to Remove a Bathtub Faucet (Single Handle)
Removing a single-handle bathtub faucet might become necessary due to a variety of reasons, including replacing a worn-out fixture, upgrading to a more modern design, or addressing leaks and other plumbing issues. Although it might appear to be a complex task, with the right tools and a step-by-step approach, a homeowner can successfully remove the old faucet and prepare the plumbing for a new installation. This article provides a detailed guide on how to safely and effectively remove a single-handle bathtub faucet.
Before commencing any plumbing work, safety should be the foremost priority. Therefore, gathering all necessary tools and materials, and understanding the basic plumbing principles involved are crucial steps. Rushing into the procedure without adequate preparation can lead to complications such as damaged pipes, water damage, and potential personal injury.
I. Preparation: Gathering Tools and Shutting off the Water Supply
The first and most crucial step in this process is preparation. Gathering the necessary tools ensures a smooth and efficient removal process. Moreover, shutting off the water supply is absolutely critical to prevent water damage and potential flooding during the faucet removal. Ignoring this step can result in a plumbing emergency.
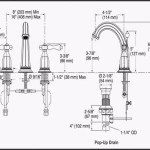
Tools and Materials Needed:
A successful faucet removal requires the following tools:
- Adjustable Wrench: This is used to loosen and tighten nuts and bolts.
- Basin Wrench (Faucet Wrench): Specifically designed for reaching tight spaces under the sink or bathtub, this tool is invaluable for loosening connections within the wall cavity.
- Screwdrivers (Phillips and Flathead): These are needed to remove screws that hold the trim and handle in place. Selecting the correct screwdriver size is vital to avoid stripping the screw heads.
- Pliers: Used for gripping and maneuvering small parts.
- Penetrating Oil (e.g., WD-40): Helpful for loosening corroded or stuck connections. Allow the oil ample time to penetrate for best results.
- Towels or Rags: To absorb any spilled water and protect the bathtub surface from scratches.
- Flashlight or Headlamp: To provide adequate lighting in the often-dark areas under the bathtub or behind the access panel.
- Safety Glasses: To protect eyes from debris.
- Gloves: To protect hands and provide a better grip.
Shutting off the Water Supply:
Locating and shutting off the water supply to the bathtub is non-negotiable. Typically, there are two shut-off valves located near the bathtub, often behind an access panel. These valves control the hot and cold water supply respectively. If individual shut-off valves are not present, the main water supply to the entire house will need to be turned off. This is usually located in the basement, garage, or near the water meter.
To shut off the water:
- Locate the shut-off valves (either individual bathtub valves or the main water supply valve).
- Turn the valves clockwise until they are completely closed.
- After shutting off the water, turn on the bathtub faucet to relieve any remaining pressure in the pipes. This ensures that no water will spray out when the faucet is disconnected. Have a towel ready to catch any residual water.
II. Removing the Faucet Handle and Trim
Once the water supply is shut off and the necessary tools are gathered, the next step is to remove the faucet handle and trim. This process typically involves disassembling the visible components of the faucet to access the internal connections. Care should be taken to avoid damaging the surrounding tile or bathtub surface during this phase.
Removing the Handle:
Single-handle faucets have various designs, but the basic principle of handle removal remains similar. The handle is usually attached with a set screw or a hidden screw under a decorative cap.
- Locate the Set Screw or Decorative Cap: Look for a small set screw on the side of the handle, often hidden beneath a removable cap or plug. Some handles may have a concealed screw under a decorative button on the top or front of the handle.
- Remove the Set Screw or Cap: If there is a set screw, use the appropriate size Allen wrench (hex key) to loosen and remove it. If there is a decorative cap, carefully pry it off with a small flathead screwdriver. Be gentle to avoid scratching the finish.
- Remove the Screw (if applicable): Once the set screw or cap is removed, there may be a screw underneath. Use a Phillips or flathead screwdriver to unscrew and remove it.
- Pull off the Handle: With the screw or set screw removed, the handle should now pull straight off. If it's stuck, gently wiggle it back and forth while pulling. Avoid excessive force, as this could damage the valve stem.
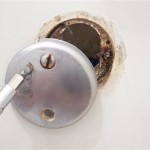
Removing the Trim Plate or Escutcheon:
The trim plate, also known as the escutcheon, is the decorative plate that covers the faucet body and the holes in the bathtub surround. It is usually attached with screws, or it may be pressure-fitted.
- Locate the Screws: The trim plate may have visible screws around its perimeter. Some trim plates are held in place by screws hidden under snap-on covers.
- Remove the Screws: Use the appropriate screwdriver to remove any visible screws. If there are snap-on covers, carefully pry them off to access the screws underneath.
- Remove the Trim Plate: Once the screws are removed, the trim plate should come off easily. If it is stuck, gently pry around the edges with a putty knife or flathead screwdriver. Use caution to avoid damaging the surrounding surface.
III. Disconnecting the Faucet Body and Water Supply Lines
With the handle and trim removed, the faucet body and the water supply lines are now accessible. This is where the basin wrench and adjustable wrench become indispensable. This step requires careful attention to avoid damaging the pipes or creating leaks when the new faucet is installed.
Accessing the Faucet Connections:
Depending on the bathtub design, access to the faucet connections may be gained through an access panel located behind the bathtub, typically in an adjacent closet or room. If an access panel is not available, working from the front of the bathtub might be the only option, which can be more challenging.
Disconnecting the Water Supply Lines:
- Identify the Connections: There are usually two water supply lines connected to the faucet body: one for hot water and one for cold water. These lines are typically connected with threaded couplings.
- Loosen the Connections: Use the basin wrench to loosen the couplings on the water supply lines. If the connections are corroded or stuck, apply penetrating oil and allow it to penetrate for several minutes before attempting to loosen them. The basin wrench is designed to reach into tight spaces and grip the couplings securely.
- Disconnect the Water Supply Lines: Once the couplings are loosened, carefully disconnect the water supply lines from the faucet body. Have a towel or bucket ready to catch any residual water that may be in the lines.
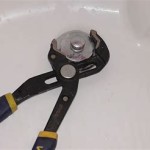
Removing the Faucet Body:
- Identify the Faucet Mounting: The faucet body is usually mounted to a bracket or directly to the bathtub surround. The mounting method can vary.
- Loosen Mounting Nuts or Screws: Loosen all nuts, screw, or any other mounting methods.
- Remove the Faucet Body: Gently remove the faucet body from the mounting bracket or bathtub surround. If it’s stuck, apply a small amount of force to wiggle it free.
Examining the Old Faucet and Fittings:
Before discarding the old faucet, examine it and its fittings for any signs of wear, corrosion, or damage. This can provide clues about the cause of any previous leaks or plumbing problems. Also, a visual inspection is helpful for preparation for the new faucet.
Clean Up:
Clean up the area around the faucet connections before installing the new faucet. Remove any debris, corrosion, or old plumber's putty. Ensure that the pipes are clean and free of any obstructions. A clean surface will help ensure a good seal when the new faucet is installed.
Removing a single-handle bathtub faucet involves several steps, from gathering the necessary tools and shutting off the water supply, to disassembling the handle and trim, and finally disconnecting the faucet body and water supply lines. By following the steps outlined in this guide, a homeowner can successfully remove an old faucet and prepare the plumbing for a new installation. Remember to prioritize safety, take your time, and consult with a professional plumber if you encounter any difficulties or uncertainties during the process.

How To Fix A Leaking Single Handle Bathtub Faucet Quick And Easy

How To Fix A Leaking Bathtub Faucet Diy Family Handyman

How To Replace A Bathtub Faucet

How To Fix A Leaky Single Handle Tub Shower Faucet Danco

Faucet Repair How To Remove A Single Handle Bath Shower

How To Fix A Leaky Bathtub Faucet 6 Ways Stop Drips

How To Fix A Leaking Bathtub Faucet The Home Depot

How To Fix A Leaking Bathtub Faucet The Home Depot

How To Replace A Single Handle Shower Cartridge In 3 Steps

Faucet Repair How To Remove A Single Handle Bath Shower
Related Posts