How To Replace Bathtub Faucet Handles
Replacing bathtub faucet handles is a common plumbing task that homeowners can often undertake themselves, saving on professional service costs. While the difficulty of the project can vary depending on the type of faucet assembly and the corrosion present, understanding the basic steps and necessary tools can empower individuals to successfully complete this home improvement project.
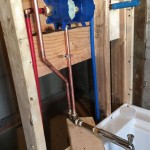
Before beginning any plumbing work, safety should be prioritized. This includes turning off the water supply to the fixture being worked on. Locating the shut-off valves for the bathtub is the first step. These valves are usually found behind an access panel in an adjacent wall, or in the basement directly below the bathroom. If individual shut-off valves are not accessible, the main water supply to the entire house must be turned off. Confirming that the water is completely shut off by turning on the existing faucet is crucial before proceeding. Additionally, wearing safety glasses is recommended to protect the eyes from debris or splashing water. A small container and towels should also be kept nearby to catch any residual water that may be present in the pipes.
Identifying the type of faucet handles being replaced is critical for selecting the correct replacement parts and understanding the disassembly process. There are several common types of bathtub faucet handles, including compression faucets, ball faucets, cartridge faucets, and ceramic disc faucets. Each type operates differently and requires a specific approach for handle removal and installation. If unsure of the faucet type, consulting the manufacturer's documentation or seeking advice from a plumbing supply store is advisable.
Identifying Your Faucet Type
Understanding the type of existing faucet is fundamental to a successful replacement. A compression faucet is characterized by separate hot and cold water handles that, when turned, compress a rubber washer against a valve seat to stop the flow of water. Ball faucets typically feature a single handle that controls both water temperature and flow by rotating a ball valve inside the faucet body. Cartridge faucets also use a single handle but employ a cartridge containing internal components to regulate water flow and temperature. Finally, ceramic disc faucets are known for their smooth operation and durability, utilizing two ceramic discs that slide against each other to control water flow.
The identification process may involve examining the handle design, the way the handle operates, and the presence of any visible screws or caps. Consulting online resources with visual examples of different faucet types can be beneficial if a physical inspection doesn't provide clear answers. Knowing the faucet type allows for the purchase of compatible replacement handles and ensures the correct disassembly and reassembly procedures are followed.
Once the faucet type is identified, gathering the necessary tools and materials is the next crucial step. Essential tools typically include a screwdriver set (both flathead and Phillips head), an adjustable wrench, pliers, a utility knife, and penetrating oil. Depending on the specific faucet type and the age of the fixture, additional tools like a basin wrench or a faucet handle puller might be required. Replacement handles should be purchased that are compatible with the existing faucet type and stem. Plumber's grease is also useful for lubricating the faucet stems and threads during reassembly, preventing future corrosion and ensuring smooth operation.
Preparing for the Replacement
Preparation extends beyond gathering tools and materials. It involves a careful assessment of the existing faucet assembly’s condition. Look for signs of corrosion, mineral buildup, or damage to the existing handles and stems. Applying penetrating oil to corroded screws or handles several hours before attempting removal can significantly ease the process. Protect the surrounding surfaces of the bathtub and sink with drop cloths or towels to prevent scratches or damage during the replacement procedure. A well-prepared workspace minimizes the risk of complications and ensures a smoother, more efficient replacement process.
The actual removal of the old faucet handles varies based on the faucet type. For most handles, a decorative cap or screw cover is present, which must be carefully removed using a small screwdriver or utility knife. Beneath the cap, a screw typically secures the handle to the faucet stem. Removing the screw allows the handle to be pulled off the stem. If the handle is stuck due to corrosion or mineral buildup, a faucet handle puller can be used to apply even pressure and dislodge the handle without damaging the faucet stem. For compression faucets, the handle removal process is generally straightforward, involving unscrewing a set screw or simply pulling the handle off the stem.
Once the old handles are removed, inspecting the faucet stems and valve seats is essential. The stems are the rods that connect the handles to the internal components of the faucet. Over time, these stems can corrode or become damaged, affecting the faucet’s performance. If the stems show signs of significant wear or corrosion, replacing them along with the handles is recommended. Valve seats, located inside the faucet body, are the surfaces against which the faucet washers press to stop the flow of water. If the valve seats are pitted or damaged, a specialized valve seat wrench can be used to remove and replace them. Clean the area around the faucet stems and valve seats thoroughly to remove any debris or mineral buildup before proceeding with the installation of the new handles.
Installing the New Faucet Handles
Installing the new faucet handles is generally the reverse of the removal process. Before installing the new handles, applying a thin coat of plumber’s grease to the faucet stems helps to ensure smooth operation and prevents future corrosion. Align the new handles with the faucet stems and securely tighten the retaining screws. Ensure that the handles are properly aligned and that they turn smoothly without binding or resistance. If decorative caps or screw covers are used, carefully snap them into place. After installing the new handles, turn on the water supply slowly and check for leaks around the handles and faucet base. If any leaks are detected, tighten the handle screws or stem packing nuts slightly until the leaks stop. Avoid over-tightening, as this can damage the faucet components.
After completing the installation, test the faucet thoroughly to ensure that both the hot and cold water handles function correctly. Check for proper water flow and temperature control. Observe the faucet for any drips or leaks over a period of several hours to ensure that the installation is secure and watertight. If any problems are encountered, re-examine the installation process and make any necessary adjustments. In some cases, replacing the entire faucet assembly may be necessary if the internal components are severely damaged or corroded.
When dealing with stubborn or corroded handles, applying penetrating oil liberally and allowing it to soak for several hours can significantly ease the removal process. Using a heat gun to gently warm the handle can also help to loosen corrosion and make removal easier. However, exercise caution when using heat to avoid damaging the faucet or surrounding surfaces. If a faucet handle puller is not available, a makeshift puller can be created using a block of wood and a hammer. Place the block of wood against the handle and gently tap it with the hammer to dislodge the handle. Avoiding excessive force is crucial to prevent damage to the faucet stem or surrounding parts.
Regular maintenance of bathtub faucets can help to prevent future problems and extend the lifespan of the handles and internal components. This includes periodically cleaning the faucet handles with a mild soap and water solution to remove mineral buildup and grime. Applying a thin coat of plumber’s grease to the faucet stems and threads can also help to prevent corrosion and ensure smooth operation. Inspect the faucet regularly for leaks or drips and address any issues promptly to prevent further damage. By following these simple maintenance tips, homeowners can keep their bathtub faucets in good working condition for years to come.

How To Fix A Leaking Single Handle Bathtub Faucet Quick And Easy

How To Fix A Leaking Bathtub Faucet Diy Family Handyman

How To Fix A Leaky Single Handle Tub Shower Faucet Danco

How To Replace A Bathtub Faucet

Faucet Repair How To Remove A Single Handle Bath Shower

How To Replace A Single Handle Shower Cartridge In 3 Steps

Shower Handle Replacement

How To Fix A Leaky Bathtub Faucet 6 Ways Stop Drips

Faucet Repair How To Remove A Single Handle Bath Shower

How To Change A Bathtub Faucet 14 Steps With Pictures Wikihow