Replacing Bathtub Drain Plumbing: A Comprehensive Guide
Replacing bathtub drain plumbing is a common home maintenance task that homeowners often encounter. Whether due to leaks, corrosion, or simply aging pipes, understanding the process and necessary steps can save significant costs associated with professional plumbing services. This guide provides a detailed explanation of how to replace bathtub drain plumbing, including preparation, removal of the old drain, installation of the new drain, and testing for leaks.
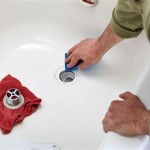
Before beginning any plumbing project, it's essential to gather the appropriate tools and materials. Safety should always be a primary concern. Shutting off the water supply to the bathroom is paramount. The main water shut-off valve is typically located near the water meter, either inside the home or outside in a utility box. Once the water is shut off, turn on the bathtub faucet to relieve any residual pressure in the pipes. Covering the drain opening with a rag prevents tools or small parts from falling into the drainpipe.
Essential tools for replacing bathtub drain plumbing include a pipe wrench, channel-lock pliers, a screwdriver (both flathead and Phillips head), a plumber's putty knife, a basin wrench (also known as a sink wrench), a hacksaw, a measuring tape, rags, and a bucket. Materials needed are the new bathtub drain assembly (including the drain flange, shoe, overflow tube, and connecting pipes), plumber's putty, Teflon tape, and potentially replacement pipes if the existing ones are corroded or damaged beyond repair. Having these tools and materials readily available will streamline the replacement process.
The existing bathtub drain assembly consists of several interconnected parts. The drain flange is the visible piece within the bathtub. Below the tub is the drain shoe, which connects to the drain flange and the overflow tube. The overflow tube is the pipe that runs from the overflow plate (located near the top of the bathtub) down to the drain shoe. These components work together to ensure proper water flow and prevent overflows.
Key Point 1: Removing the Old Bathtub Drain
The initial step in replacing the bathtub drain plumbing is removing the existing drain assembly. Begin by removing the overflow plate, which is typically held in place by one or two screws. Unscrew these screws and gently pull the overflow plate and the attached linkage away from the overflow tube. In some cases, the linkage may be connected to the stopper mechanism, so handle it carefully.
Next, focus on removing the drain flange. There are several methods for removing this component, dependent on the type of drain. Some drains feature a visible screw in the center. Removing this screw allows the drain flange to be lifted out. Other drains utilize a "dumbbell" shaped stopper. Special drain removal tools exist to grip and twist this type of stopper loose. If neither of these is present, a specialized drain removal tool, sometimes called a "drain wrench" or "tub drain extractor," is required. This tool inserts into the drain opening and grips the internal crossbars of the drain flange, allowing it to be turned counterclockwise to loosen it.
If the drain flange is severely corroded or stuck, penetrating oil can be applied around the edges of the drain flange to help loosen it. Allow the oil to soak in for several minutes before attempting to remove the flange again. In extreme cases, it may be necessary to use a hacksaw to carefully cut through the flange, being cautious not to damage the bathtub itself. After cutting, use pliers to carefully pry out the remaining pieces.
Once the drain flange is removed, access the drain shoe from underneath the bathtub. The drain shoe is connected to the drain flange and the overflow tube. Using a pipe wrench and channel-lock pliers, loosen the nuts connecting the drain shoe to the drain flange and the overflow tube. It may be necessary to hold one pipe steady with the channel-lock pliers while loosening the nut with the pipe wrench to prevent the pipes from twisting. Once the nuts are loosened, carefully disconnect the pipes and remove the drain shoe.
Inspect the existing pipes for any signs of corrosion or damage. If the pipes are corroded or damaged, they should be replaced along with the drain assembly. Use a hacksaw to cut the existing pipes to the appropriate length, ensuring that the new pipes will properly connect to the existing plumbing. Deburr the cut edges of the pipes to prevent leaks and ensure a smooth connection.
Key Point 2: Installing the New Bathtub Drain Assembly
After removing the old drain assembly and inspecting the pipes, the next step is to install the new bathtub drain assembly. Begin by applying a generous bead of plumber's putty around the underside of the new drain flange. Plumber's putty creates a watertight seal between the drain flange and the bathtub. Press the drain flange firmly into the drain opening, ensuring that the putty makes good contact with the bathtub surface. Remove any excess putty that squeezes out from around the edges of the flange.
From underneath the bathtub, attach the new drain shoe to the drain flange. Tighten the nut connecting the drain shoe to the drain flange securely, but be careful not to overtighten it, as this could damage the drain flange or the bathtub. Ensure that the drain shoe is properly aligned with the drain flange to prevent leaks.
Next, attach the new overflow tube to the drain shoe and the overflow plate. Before connecting the overflow tube, apply Teflon tape to the threads of the pipe fittings to create a watertight seal. Teflon tape is a thin, white tape that wraps around the threads of pipe fittings to prevent leaks. Wrap the Teflon tape around the threads several times, overlapping each wrap slightly. Tighten the nuts connecting the overflow tube to the drain shoe and the overflow plate securely, but again, avoid overtightening.
Ensure the overflow plate is correctly positioned and that the linkage is properly connected to the stopper mechanism, if applicable. Replace the screws that hold the overflow plate in place and tighten them securely. Verify that the overflow mechanism functions correctly by testing the stopper and ensuring that it opens and closes smoothly.
If replacement pipes were necessary, connect them to the existing plumbing using appropriate fittings. Apply Teflon tape to the threads of the pipe fittings before connecting them. Tighten the fittings securely, ensuring that the new pipes are properly aligned with the existing plumbing.
Key Point 3: Testing for Leaks and Final Adjustments
After installing the new bathtub drain assembly, it is crucial to test for leaks. First, visually inspect all connections to ensure that they are properly tightened and that there are no visible gaps or cracks. Then, turn the water supply back on slowly. Monitor the connections closely for any signs of leaks.
With the water supply on, fill the bathtub with a few inches of water and check for leaks around the drain flange and the overflow tube. If any leaks are detected, immediately turn off the water supply and tighten the connections further. Reapply Teflon tape to the threads of the pipe fittings if necessary. Repeat the leak test until all leaks are resolved.
Once the bathtub drain assembly is leak-free, fill the bathtub completely and allow it to sit for several hours to ensure that there are no hidden leaks. Check the area underneath the bathtub for any signs of water damage. If no leaks are detected after several hours, the installation is complete.
Finally, make any necessary adjustments to the stopper mechanism to ensure that it functions correctly. The stopper should seal tightly against the drain opening to prevent water from draining out of the bathtub. If the stopper is not sealing properly, adjust the linkage or the stopper itself until it creates a tight seal. Proper functionality of the stopper ensures efficient water retention during use.
Following these steps diligently and carefully will ensure a successful replacement of the bathtub drain plumbing. While this guide provides comprehensive instructions, homeowners who are uncomfortable performing plumbing repairs should consult with a qualified plumber to avoid potential damage to the plumbing system or the bathtub itself.
Regular maintenance, such as cleaning the drain periodically to remove hair and debris, can help prevent future problems with the bathtub drain plumbing. Using a drain strainer can also help catch hair and other debris before they enter the drainpipe. By taking these preventative measures, homeowners can prolong the lifespan of their bathtub drain plumbing and avoid costly repairs.

How To Replace A Bathtub Drain

Plumbing How Do I Replace A Broken Bathtub Drain Home Improvement Stack Exchange

Tub Drain How To Seal And Unclog A Bathtub Knoxville Plumbing

7 Bathtub Plumbing Installation Drain Diagrams

How To Remove A Bathtub Drain Forbes Home

Replacing A Bathtub Fine Homebuilding

How To Replace A Bathtub Drain Plumbing Diagram

How To Replace A Tub Drain Ask This Old House

7 Bathtub Plumbing Installation Drain Diagrams

Bathtub Drain Replacement How To Replace Or Install A Homeserve Usa
Related Posts