How To Install a Bathtub Apron
Installing a bathtub apron, the decorative panel that conceals the plumbing and frame of a bathtub, can significantly enhance the bathroom's aesthetics and create a more finished appearance. Proper installation ensures a secure fit, prevents water damage, and maintains the integrity of the bathtub enclosure. The process varies slightly depending on the type of apron and tub, but the fundamental principles remain consistent. This article provides a comprehensive guide on installing a bathtub apron, covering essential steps, tools, and considerations for a successful installation.
Before commencing the installation, it is crucial to determine the type of bathtub apron suitable for the existing tub. Bathtub aprons are commonly constructed from acrylic, fiberglass, or metal, and often match the material of the bathtub itself. Some aprons are designed for specific tub models, while others are more universal. Careful measurement of the opening and a thorough understanding of the attachment mechanisms are essential for selecting the appropriate apron.
Gathering the necessary tools and materials is the next important step. Having everything on hand before starting the installation minimizes disruptions and ensures a smoother workflow. Essential tools typically include a measuring tape, level, drill with appropriate drill bits, screwdriver (both Phillips and flathead), caulk gun, sandpaper, safety glasses, and work gloves. Materials required may consist of construction adhesive, shims, screws, and painter's tape.
Preparing the Bathtub Opening
The initial preparatory stage involves thoroughly cleaning the area where the apron will be installed. Remove any existing debris, dirt, or old sealant from the tub’s surround and the floor. A clean surface ensures proper adhesion of the construction adhesive and prevents potential problems during installation.
Accurate measurement of the bathtub opening is paramount for a successful installation. Measure both the height and width of the opening at multiple points to account for any irregularities or variations. Record the smallest measurements, as these will determine the maximum size of the apron that can be installed. Minor discrepancies can be addressed with shims or adjustments to the apron itself.
Inspect the bathtub rim and surrounding surfaces for any imperfections or damage. Repair any chips, cracks, or uneven surfaces before installing the apron. Small imperfections can be filled with epoxy or patching compound and sanded smooth. Ensuring a level and even surface will contribute to a more professional and secure installation.
For some installations, particularly with prefabricated aprons, test fitting is advisable. Carefully position the apron in the opening to assess the fit and identify any areas that require adjustment. Mark any areas where the apron is too tight or where gaps exist. These markings will guide subsequent adjustments and ensure a more precise fit.
If the original bathtub apron was attached using screws or other fasteners, locate and remove any remaining hardware. This may involve using a screwdriver, pliers, or other specialized tools. Take care not to damage the bathtub or surrounding surfaces during the removal process. Filling and smoothing any leftover screw holes with a suitable patching compound might be necessary.
Installing the Bathtub Apron
Once the opening is properly prepared, begin the installation process. Apply a bead of construction adhesive to the back of the apron, focusing on the areas that will make contact with the bathtub rim and the floor. Use a high-quality adhesive suitable for the materials involved, ensuring a strong and durable bond. Avoid applying excessive adhesive, as this can create a messy installation and potential cleanup issues.
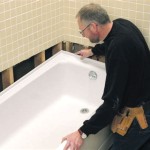
Carefully position the apron in the opening, aligning it with the bathtub rim and ensuring it is level. Gently press the apron against the tub and floor to create a secure bond with the adhesive. Use a level to verify that the apron is perfectly vertical and adjust as necessary. Any shims can be inserted during this phase to ensure proper alignment, especially if the floor or tub is not perfectly level.
Depending on the apron design and installation instructions, additional fastening methods may be required. Some aprons are secured with screws, while others utilize clips or brackets. Drill pilot holes through the apron and into the tub surround, if necessary, using the appropriate drill bit size. Secure the apron with screws, ensuring they are tightened sufficiently but not over-tightened, which can damage the apron or the tub surround.
If the apron is designed to be removable for access to plumbing, ensure that the fastening mechanisms are installed correctly and function smoothly. Test the removal and reinstallation process to confirm that the apron can be easily accessed when necessary. Labeling the location of any hidden fasteners can simplify future maintenance.
After the apron is securely fastened, apply painter's tape along the edges where the apron meets the bathtub and the floor. This will create a clean line for caulking and prevent adhesive or caulk from smearing onto the surrounding surfaces.
Sealing and Finishing Touches
Apply a bead of caulk along all the edges of the apron, where it meets the bathtub and the floor. Use a high-quality, mildew-resistant caulk specifically designed for bathroom applications. Ensure the caulk is applied evenly and smoothly, creating a watertight seal. A caulking tool or a finger can be used to smooth the caulk bead and remove any excess.
Remove the painter's tape carefully after applying the caulk, before the caulk fully dries. This will leave a clean and professional-looking caulk line. Allow the caulk to cure completely according to the manufacturer's instructions, typically 24 to 48 hours, before exposing the area to water. Protect the newly installed apron from excessive moisture during the curing process.
Inspect the completed installation for any gaps, imperfections, or areas where the caulk is not properly sealed. Address any issues promptly to prevent water damage and ensure a long-lasting installation. Additional caulk may be required in certain areas to achieve a completely watertight seal.
Clean the bathtub apron and surrounding surfaces thoroughly. Remove any excess caulk, adhesive residue, or debris. Use a mild detergent and a soft cloth to avoid scratching or damaging the apron. A clean surface will enhance the appearance of the installation and make it easier to maintain in the future.
Consider adding decorative trim or molding around the apron to further enhance its appearance and blend it seamlessly with the bathroom décor. Choose trim that complements the style of the bathroom and can withstand moisture. Secure the trim with adhesive or small nails, ensuring it is properly aligned and sealed. This step is optional but can greatly improve the overall aesthetic of the installation.
Regular maintenance is crucial for prolonging the life of the bathtub apron and preventing water damage. Clean the apron regularly with a mild detergent and a soft cloth. Avoid using abrasive cleaners or harsh chemicals, as these can damage the surface. Inspect the caulk regularly for any cracks or deterioration and reapply as needed.
If the bathtub apron becomes damaged or discolored over time, consider repairing or replacing it. Small cracks or chips can often be repaired with epoxy or patching compound. More significant damage may require replacing the entire apron. Following the steps outlined in this guide will ensure a successful replacement installation.

Installing A Hydro Systems 60 Alcove Tub With Apron

How To Install A Bath Tub Surround

Diy Tub Skirt Decorative Panel For A Standard Soaking

Diy Bathtub Skirt Remodelando La Casa

Install A Tub And Shower New Construction Rona

Diy Tub Skirt Decorative Panel For A Standard Soaking

Diy Bathroom Remodeling Part 1 Bathtub Installation

Diy Bathtub Skirt Remodelando La Casa

Installing A Hydro Systems 60 Alcove Tub With Apron

Update A Bathtub Surround Using Beadboard
Related Posts