How to Replace a Bathtub Overflow Drain Cover
A bathtub overflow drain cover is a small but essential part of your bathroom. It prevents water from overflowing the tub when the faucet is left running. However, over time, these covers can become damaged, discolored, or simply worn out. Replacing them is a straightforward task that can be done with basic tools and a few simple steps.
1. Gather the Necessary Materials
Before you begin, ensure you have the following items readily available:
- A new bathtub overflow drain cover that matches the existing one
- A small screwdriver
- A pair of pliers (optional)
- A rag or towel
- A bucket or bowl (optional)
It is crucial to choose a replacement cover that is compatible with your existing drain assembly. If unsure, consult with a plumbing supply store or refer to the manufacturer's instructions.
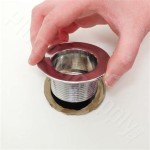
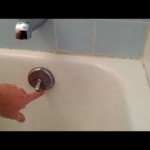
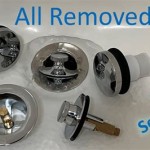
2. Remove the Old Overflow Drain Cover
The first step is to remove the old cover. This is typically done by unscrewing it. Locate the screw that secures the cover to the drain assembly. This screw may be visible, or it might be hidden beneath a decorative escutcheon.
If the screw is visible, use a small screwdriver to unscrew it. If it is concealed beneath an escutcheon, gently pry the escutcheon off with a screwdriver to access the screw. Once the screw is removed, the cover should come off easily. If it is stubborn, you might need to gently pry it off with pliers.
Be cautious while removing the cover as it might be stuck to the assembly due to mineral deposits or corrosion. If necessary, soak the edge of the cover with warm water to loosen it up.
3. Clean the Drain Assembly
Once the old cover is removed, take the opportunity to clean any debris or mineral deposits from the drain assembly. A rag or towel dampened with warm water and a mild detergent can be used to do this. Avoid using harsh chemicals that may damage the metal or plastic components of the assembly. Once clean, allow the drain assembly to dry completely.
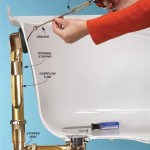
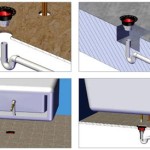
4. Install the New Overflow Drain Cover
Now, it's time to install the new cover. If you purchased a new cover with a screw, simply align the screw hole on the cover with the corresponding hole on the drain assembly. Insert the screw and tighten it securely. If the new cover comes with a decorative escutcheon, align it with the cover and place it over the drain assembly. Press the escutcheon firmly to ensure it is securely in place.
5. Test for Leaks
After installing the new cover, turn on the water and let it run for a few minutes. This will allow you to check for any leaks. If you see any leaks, immediately turn off the water and re-tighten the screw or adjust the escutcheon. If the leak persists, it may indicate a faulty cover or a larger plumbing issue that needs to be addressed by a professional plumber.
Replacing an overflow drain cover is a simple and essential maintenance task that can help keep your bathroom functioning smoothly. By following these steps, you can ensure that your bathtub continues to drain properly and prevent the risk of overflowing.

How To Install A New Bathtub Overflow Plate Assembly

Replace A Bathtub Overflow Plate

How To Replace Bathtub Overflow Plate With Trip Lever Easy Simple

Replace A Bathtub Overflow Drain Plate Cover Overflowing Diy Plumbing

How To Replace A Bathtub Drain

When And How You Should Replace A Bathtub Overflow Cover Plate Service Plus Plumbing

Replacing Bathtub Drain Lever No Holes S Rusted Off Doityourself Com Community Forums

Bathtub Overflow Drain Leaking

How To Replace Bathtub Overflow Drain Gasket

Slipx Solutions Bottomless Bath Overflow Drain Cover Review
Related Posts