How to Remove a Bathtub Faucet Stem
Removing a bathtub faucet stem is a common plumbing task often necessary for repairing leaks, addressing mineral buildup, or replacing worn-out parts. The faucet stem, also known as a valve stem, controls the flow of water coming from the faucet. Over time, seals and threads within the stem can deteriorate, causing drips or making it difficult to turn the faucet on and off. The process requires careful attention to detail and the right tools to avoid damage to the surrounding plumbing.
Different types of bathtub faucets exist, each with slightly varying stem removal procedures. Compression faucets, ball faucets, cartridge faucets, and ceramic disc faucets all feature unique internal mechanisms. Identifying the type of faucet is crucial before starting the removal process to ensure the correct approach is used. Attempting to remove a stem incorrectly can lead to stripped screws, broken components, or damage to the valve body itself.
Prior to beginning the removal process, safety is paramount. Shutting off the water supply to the bathtub is the first and most important step. Locating the main water shut-off valve for the house is ideal, as it prevents water from flowing throughout the entire plumbing system. If a dedicated shut-off valve exists specifically for the bathroom, this can be used instead. Once the water is shut off, open the faucet to relieve any remaining pressure in the pipes. Place a towel or bucket in the tub to catch any residual water that may escape during the stem removal process.
Identifying the Faucet Type
The first step in removing a bathtub faucet stem is accurately identifying the faucet type. This will determine the specific tools and techniques required for the task. Understanding the nuances of each faucet type will minimize the risk of accidental damage.
Compression Faucets: These are the most common and typically the simplest type of faucet. They operate by compressing a rubber or neoprene washer against a valve seat to stop the flow of water. They often have separate handles for hot and cold water. Characteristically, compression faucets display noticeable wear and tear over time, often requiring more force to turn on and off as the washer deteriorates. The handles might also exhibit visible leakage. The stem is usually accessed by removing a decorative cap or handle held in place by a screw.
Ball Faucets: These faucets use a slotted plastic or metal ball inside the faucet body to control water flow and temperature. A single handle operates both temperature and volume. Leaks in ball faucets frequently occur around the base of the handle. Identifying the manufacturer of the ball faucet can be useful, as some brands require dedicated tools for disassembly. The stem removal typically involves loosening a setscrew or removing a retaining clip.
Cartridge Faucets: These faucets utilize a cylindrical cartridge to regulate water flow. Like ball faucets, they are often controlled by a single handle. Cartridge faucets are known for their smooth operation and resistance to dripping compared to compression faucets, at least initially. The stem (cartridge) is usually held in place by a retaining clip or nut, which must be removed before the cartridge can be pulled out. Look for a small plastic or metal cap that covers the handle screw to access the cartridge.
Ceramic Disc Faucets: These are the most modern and often the most expensive type of faucet. They employ two ceramic discs that slide against each other to control water flow. Ceramic disc faucets are known for their durability and drip-free performance, often with a quarter-turn on/off mechanism. The removal of the stem assembly in a ceramic disc faucet is more complex and may involve unscrewing the entire faucet body or removing a retaining nut or screw to access the ceramic discs and the valve components below. This type of faucet may require more specialized tools or expertise.
Tools and Materials Needed
Having the correct tools and materials readily available will make the faucet stem removal process significantly smoother and more efficient. Gathering these items beforehand prevents interruptions and reduces the likelihood of damaging the faucet or surrounding plumbing.
Screwdrivers: Both flathead and Phillips head screwdrivers are essential for removing handles, caps, and screws that secure the faucet stem in place. Having a variety of sizes ensures the right fit for different screw heads, preventing stripping or damage.
Adjustable Wrench: An adjustable wrench is needed to loosen and tighten packing nuts or other fittings that hold the stem assembly in place. Ensure the wrench is appropriately sized to avoid rounding off the edges of the nuts. Avoid using excessive force when tightening, as this can damage the valve body.
Basin Wrench: A basin wrench, also known as a faucet wrench, is particularly useful for reaching nuts and fittings in tight spaces under the sink or bathtub. Its long handle and pivoting head allow access to difficult-to-reach areas. This is often required for older bathtub faucets where the access is limited.
Penetrating Oil: Penetrating oil can help loosen corroded or stuck parts, especially in older faucets. Applying a small amount and allowing it to soak for several minutes can make removing stubborn nuts and screws much easier. Avoid using excessive amounts, as this can make the area slippery.
Faucet Stem Puller: A faucet stem puller is a specialized tool designed to remove stubborn stems that are seized due to mineral buildup or corrosion. It provides a more controlled and powerful way to extract the stem without damaging the valve body.
New Faucet Stem or Repair Kit: Before disassembling the faucet, have a replacement faucet stem or a repair kit containing new washers, o-rings, and packing nuts available. This ensures that the faucet can be repaired immediately after the stem is removed. Ensure the replacement parts are compatible with the specific faucet model.
Plumber's Grease: Plumber's grease can be applied to new washers and o-rings to ensure a smooth seal and prevent future corrosion. This also makes it easier to assemble the faucet stem and other components.
Clean Rags or Towels: Clean rags or towels are essential for wiping up spills, cleaning parts, and protecting surfaces from scratches. They also provide a clean work area and prevent debris from entering the plumbing system.
Safety Glasses: Wearing safety glasses protects the eyes from debris and splashes during the removal process. This is especially important when working with older faucets that may have accumulated mineral deposits.
The Bathtub Faucet Stem Removal Process
Once the faucet type has been identified and the necessary tools and materials have been gathered, the actual removal process can begin. This process typically involves the following steps:
Step 1: Shut Off the Water Supply: As mentioned previously, this is the most critical step. Locate the main water shut-off valve or the dedicated bathroom shut-off valve and turn it off. Open the faucet to relieve any remaining pressure in the pipes. Ensure no water is flowing before proceeding.
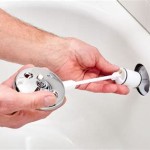
Step 2: Remove the Handle: The method for removing the handle depends on the faucet type. For compression faucets, there is often a decorative cap covering a screw. Pry off the cap with a flathead screwdriver and remove the screw. For ball and cartridge faucets, look for a setscrew or retaining clip that secures the handle. Loosen the setscrew or remove the clip to detach the handle. For ceramic disc faucets, the handle removal may involve a combination of these methods.
Step 3: Remove the Packing Nut: Once the handle is removed, a packing nut or retaining nut will be visible. This nut holds the faucet stem in place. Use an adjustable wrench or basin wrench to loosen the packing nut. If the nut is corroded or stuck, apply penetrating oil and allow it to soak for several minutes before attempting to loosen it again. Turn the nut counterclockwise to loosen it.
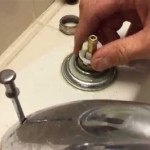
Step 4: Remove the Faucet Stem: After loosening the packing nut, the faucet stem can be carefully pulled out of the valve body. For compression faucets, the stem may require some gentle twisting and pulling to dislodge it. If the stem is stuck, consider using a faucet stem puller. For cartridge and ball faucets, the stem (cartridge or ball) should slide out relatively easily once the retaining clip or nut has been removed. Be mindful of any small parts, such as washers or o-rings, that may be attached to the stem.
Step 5: Inspect and Clean the Valve Body: Once the stem is removed, inspect the valve body for any signs of damage, such as cracks or corrosion. Use a cleaning brush or cloth to remove any mineral buildup or debris from the valve seat. If the valve seat is damaged, a valve seat wrench may be required to repair or replace it.
Step 6: Install the New Faucet Stem or Repair Kit: If using a repair kit, replace any worn-out washers or o-rings on the existing faucet stem. Apply plumber's grease to the new washers and o-rings to ensure a proper seal. If replacing the entire stem, ensure the new stem is compatible with the faucet model. Carefully insert the new stem into the valve body.
Step 7: Reassemble the Faucet: Reinstall the packing nut and tighten it securely with an adjustable wrench. Be careful not to overtighten, as this can damage the valve body or stem. Reattach the handle and secure it with the screw or retaining clip. Test the faucet by turning the water supply back on slowly. Check for leaks around the handle and packing nut. If leaks are present, tighten the packing nut slightly until the leaks stop.
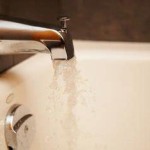
Step 8: Test the Faucet: After reassembling the faucet, test the water flow and temperature to ensure the faucet is functioning correctly. Check for any drips or leaks around the handle, spout, and packing nut. If any issues are detected, troubleshoot the problem and make any necessary adjustments.

How To Fix A Leaking Bathtub Faucet Diy Family Handyman

How To Remove Bathtub Faucet Stems Quick And Easy

How To Fix A Leaking Bathtub Faucet Diy Family Handyman

How To Replace A Shower Valve 12 Steps With Pictures Wikihow

Fixing Faucets How To Replace A Difficult Tub Faucet Cartridge

How To Repair A Shower Valve Stem Ask This Old House

How To Fix A Leaking Bathtub Faucet Diy Family Handyman

How To 008 Leaking Bathtub Faucet Delta Handle Removal

How To Change A Bathtub Faucet 14 Steps With Pictures Wikihow

How To Change A Bathtub Faucet 14 Steps With Pictures Wikihow
Related Posts