Replacing a Bathtub Faucet Stem: A Comprehensive Guide
A dripping bathtub faucet is more than just an annoyance; it wastes water and can significantly increase water bills. Often, the culprit behind this incessant dripping is a worn or damaged faucet stem. Replacing a bathtub faucet stem is a relatively straightforward plumbing repair that most homeowners can accomplish with basic tools and a bit of patience, avoiding the expense of hiring a plumber. This article provides a step-by-step guide, equipping readers with the necessary knowledge to successfully replace a bathtub faucet stem.
The faucet stem, also known as a valve stem or cartridge, is the central component that controls the flow of water in a compression or ceramic disc faucet. Over time, the rubber washers and O-rings within the stem can degrade due to constant water exposure, mineral buildup, and the pressure exerted during repeated turning. This degradation leads to leaks, which manifest as a persistent drip from the faucet spout.
Before embarking on the replacement process, identifying the type of faucet and the specific stem required is crucial. There are generally two main types of bathtub faucets: compression faucets and cartridge (or ceramic disc) faucets. Compression faucets are identifiable by requiring the user to tighten the handle to completely shut off the water flow. Cartridge faucets often involve a single handle that moves up and down to control water flow and side to side to adjust temperature. Knowing which type of faucet is installed dictates the replacement stem needed. Attempting to use the wrong stem will likely result in improper fit and continued leaking.
Identifying the Correct Replacement Stem
The first step in replacing a bathtub faucet stem is identifying the exact replacement part. This involves a process of careful observation and, in some cases, disassembly of the existing faucet. To begin, examine the faucet handle. Is it a two-handle system, where one controls hot water and the other controls cold water? Or is it a single-handle system that controls both? This distinction will help narrow down the search for the correct stem.
Once the faucet type is determined, turn off the water supply to the bathtub. Typically, there are shut-off valves located directly beneath the bathtub, or in an accessible area nearby. If individual shut-off valves are not present, the main house water supply must be turned off. After shutting off the water supply, open the faucet to relieve any remaining pressure in the pipes. This prevents water from spraying out when the stem is removed.
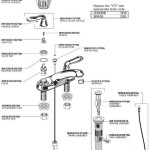
Next, carefully remove the faucet handle. This usually involves removing a decorative cap or screw that secures the handle to the stem. With the handle removed, the faucet stem will be visible. Take the old stem to a hardware store or plumbing supply store to find an exact match. It is important to take the old stem with you, as there are various sizes and configurations of stems. Hardware store representatives can assist in finding a compatible replacement.
An alternative method is to search online for replacement stems based on the faucet manufacturer and model number, if known. Many faucets have model numbers stamped on the faucet body or included in the original documentation. Online retailers often provide detailed specifications and diagrams to assist in identifying the correct part. Regardless of the method chosen, ensuring the replacement stem is an exact match is paramount. A mismatch will result in leaks and render the replacement ineffective.
Step-by-Step Replacement Procedure
With the correct replacement stem in hand, the actual replacement process can commence. This involves disassembling the faucet, removing the old stem, and installing the new one. The following steps outline the procedure:
1.
Shut off the water supply:
As mentioned previously, ensure the water supply to the bathtub is completely shut off. This prevents any water from flowing during the repair. Open the faucet to relieve any remaining pressure in the water lines.2.
Remove the faucet handle:
Remove the decorative cap or screw securing the handle to the stem. Use a screwdriver or Allen wrench, depending on the fastener type. Once the fastener is removed, gently pull the handle off the stem. Be careful not to damage the handle or the faucet body.3.
Remove the escutcheon:
The escutcheon is the decorative plate that covers the faucet body. It is often held in place by screws or a threaded connection. Remove the screws or unscrew the escutcheon to expose the faucet stem.4.
Remove the retaining nut:
The faucet stem is held in place by a retaining nut. Use a wrench to loosen and remove the retaining nut. It may be necessary to use penetrating oil to loosen the nut if it is corroded or stuck.5.
Remove the old faucet stem:
Once the retaining nut is removed, carefully pull the old faucet stem out of the faucet body. It may be necessary to use pliers or a stem puller to remove the stem if it is stuck. Inspect the faucet body for any debris or corrosion. Clean the inside of the faucet body with a small brush or cloth.6.
Install the new faucet stem:
Insert the new faucet stem into the faucet body, ensuring it is properly aligned. The stem should slide in easily. If it does not, double-check that the stem is the correct size and that there is no debris blocking the opening.7.
Reinstall the retaining nut:
Tighten the retaining nut to secure the new faucet stem in place. Do not overtighten the nut, as this can damage the stem or the faucet body. Tighten it firmly but avoid excessive force.8.
Reinstall the escutcheon:
Align the escutcheon with the faucet body and secure it with screws or by tightening the threaded connection. Ensure the escutcheon is flush with the wall or the faucet body.9.
Reinstall the faucet handle:
Place the handle back onto the stem and secure it with the decorative cap or screw. Tighten the fastener securely but avoid overtightening.10.
Turn on the water supply:
Slowly turn on the water supply to the bathtub. Check for leaks around the faucet spout, the handle, and the escutcheon. If there are any leaks, tighten the connections or replace any worn washers or O-rings.11.
Test the faucet:
Test the faucet by turning it on and off and adjusting the water temperature. Ensure the water flows smoothly and that the faucet shuts off completely without any dripping.Preventative Measures and Troubleshooting
Once the replacement stem is installed, implementing preventative measures can help prolong the lifespan of the new stem and prevent future leaks. Furthermore, understanding common issues that may arise during or after the replacement process is important for effective troubleshooting.
To prevent premature wear and tear on the faucet stem, avoid applying excessive force when turning the faucet handle. Over-tightening the handle can compress the rubber washers and O-rings, leading to leaks. Instead, turn the handle only until the water flow stops completely. Regularly inspect the faucet for any signs of leaks or drips. Addressing minor leaks promptly can prevent more significant damage to the stem and other faucet components.
Hard water, which contains high levels of minerals like calcium and magnesium, can accelerate the deterioration of faucet stems. Consider installing a water softener to reduce the mineral content of the water. A water softener can extend the lifespan of faucet stems and other plumbing fixtures. Regularly clean the faucet to remove mineral buildup and debris. Use a mild cleaning solution and a soft cloth to avoid scratching the faucet finish.
If the faucet continues to drip after replacing the stem, several potential issues could be the cause. One possibility is that the seat, which is the part of the faucet body that the stem presses against, is damaged or corroded. The seat can be resurfaced or replaced, depending on the faucet design. In some cases, the new stem may be slightly different from the old stem, resulting in a poor seal. Double-check that the new stem is an exact match for the old one and that it is properly installed.
If the handle is difficult to turn after replacing the stem, the stem may be too tight. Loosen the retaining nut slightly to allow the stem to move more freely. Also, ensure that the stem is properly lubricated. Applying a small amount of silicone grease to the stem threads and washers can help ensure smooth operation.
Replacing a bathtub faucet stem is a manageable task for most homeowners. By carefully identifying the correct replacement stem, following the step-by-step replacement procedure, and implementing preventative measures, it is possible to resolve a dripping faucet and prevent future leaks.

How To Fix A Leaking Bathtub Faucet Diy Family Handyman

How To Fix A Leaking Bathtub Faucet Diy Family Handyman

How To Remove Bathtub Faucet Stems Quick And Easy

How To Repair A Shower Valve Stem Ask This Old House

How To Fix A Leaking Bathtub Faucet Diy Family Handyman

How To Fix A Leaking Bathtub Faucet The Home Depot

How To Replace A Shower Valve 12 Steps With Pictures Wikihow

Fixing Faucets How To Replace A Difficult Tub Faucet Cartridge

How To Fix A Leaking Bathtub Faucet The Home Depot

How To Change A Bathtub Faucet 14 Steps With Pictures Wikihow
Related Posts