Installing a Bathtub Faucet Rough-In: A Comprehensive Guide
Installing a bathtub faucet rough-in is a crucial step in any bathroom renovation or new construction project. The rough-in stage involves installing the necessary plumbing components behind the wall, setting the stage for the visible faucet fixtures that will eventually control the water flow to the bathtub. A properly installed rough-in ensures a leak-free and functional bathtub for years to come. This article provides a detailed guide to understanding and executing this essential task.
Before commencing the installation, careful planning and preparation are essential. This includes selecting the appropriate rough-in valve, gathering the necessary tools and materials, and understanding the local plumbing codes. Neglecting these preliminary steps can lead to costly mistakes and delays.
Selecting the Right Rough-In Valve
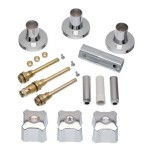
The rough-in valve is the heart of the bathtub faucet system. It controls the flow of hot and cold water to the spout and showerhead, if applicable. Choosing the correct type of valve is paramount for ensuring compatibility with the desired faucet trim and the overall plumbing system. Several types of rough-in valves are available, each with its own set of advantages and disadvantages. The most common types include:
Pressure-Balancing Valves: These valves are designed to maintain a consistent water temperature, even when there are fluctuations in water pressure. They are particularly useful in homes with multiple users sharing the water supply. Pressure-balancing valves are often preferred for their safety features, as they prevent scalding if there is a sudden drop in cold water pressure.
Thermostatic Valves: Thermostatic valves offer even greater control over water temperature. They allow the user to set a precise temperature, and the valve will automatically adjust the hot and cold water mix to maintain that temperature. These valves are ideal for individuals who are sensitive to temperature changes or for those who want to ensure a consistent and comfortable showering experience.
Diverter Valves: A diverter valve is necessary if the bathtub faucet includes a showerhead. This valve redirects the water flow from the tub spout to the showerhead and back again. Diverter valves can be integrated into the rough-in valve itself or installed separately.
When selecting a rough-in valve, it is crucial to consider the type of plumbing pipes used in the home. Copper pipes require different fittings than PEX pipes, and the chosen valve must be compatible with the existing plumbing system. Additionally, it is advisable to choose a rough-in valve from a reputable manufacturer to ensure quality and reliability.
The rough-in valve's connections (usually threaded or press-fit) should be clearly marked and easily accessible for future maintenance or repairs. Some valves offer adjustable depth settings, which can be beneficial if the wall thickness is uncertain.
Gathering the Necessary Tools and Materials
Having the right tools and materials on hand before starting the installation is essential for a smooth and efficient process. The following list outlines the typical items required for installing a bathtub faucet rough-in:
- Rough-in valve (chosen based on system needs)
- Pipes (copper, PEX, or CPVC, depending on existing plumbing)
- Fittings (compatible with the chosen pipes)
- Pipe cutter or PEX cutter
- Pipe wrench
- Adjustable wrench
- Soldering torch and flux (if using copper pipes)
- PEX crimping tool or expansion tool (if using PEX pipes)
- CPVC cement and primer (if using CPVC pipes)
- Measuring tape
- Level
- Screwdriver
- Drill (with appropriate drill bits)
- Plumber's tape (Teflon tape)
- Drop cloth or protective covering
- Safety glasses and gloves
The specific tools and materials required may vary depending on the type of rough-in valve and the existing plumbing system. It is always advisable to consult the manufacturer's instructions for the rough-in valve to ensure that all necessary items are available.
Safety should be a top priority when working with plumbing. Always wear safety glasses and gloves to protect against debris and potential injuries. If soldering copper pipes, ensure proper ventilation and take precautions to prevent burns. When using power tools, follow the manufacturer's instructions and safety guidelines.
The Installation Process: Step-by-Step Guide
The installation process for a bathtub faucet rough-in typically involves the following steps:
1. Shut off the Water Supply: Before starting any plumbing work, it is imperative to shut off the main water supply to the house or at least the water supply to the bathroom. This will prevent water from flowing out of the pipes when they are cut. Locate the main shut-off valve, usually near the water meter or where the water line enters the house, and turn it off. Then, open a faucet in the bathroom to relieve any remaining pressure in the pipes.
2. Expose the Existing Plumbing: If replacing an existing rough-in, carefully remove the old faucet trim and any surrounding wall material to expose the existing plumbing pipes. If this is new construction, the framing should already be in place. Protect the surrounding area with drop cloths to prevent damage from debris.
3. Cut and Prepare the Pipes: Measure and cut the pipes to the appropriate lengths, ensuring they are long enough to connect to the rough-in valve and the water supply lines. Use a pipe cutter or PEX cutter to make clean, straight cuts. Deburr the cut ends of the pipes to remove any sharp edges or burrs that could impede water flow or damage the fittings. Clean the pipe ends thoroughly before proceeding.
4. Install the Rough-In Valve: Follow the manufacturer's instructions for installing the rough-in valve. Typically, this involves connecting the valve to the hot and cold water supply lines using appropriate fittings. Ensure that the valve is securely mounted to the wall framing, using screws or nails. Use a level to ensure that the valve is properly aligned horizontally and vertically. Many rough-in valves have mounting brackets or pre-drilled holes to facilitate secure attachment.
5. Make the Connections: Connect the pipes to the rough-in valve using the appropriate fittings. If using copper pipes, solder the fittings to the pipes, ensuring a strong and leak-free connection. If using PEX pipes, use a PEX crimping tool or expansion tool to secure the fittings to the pipes. If using CPVC pipes, apply CPVC cement and primer to the fittings and pipes and connect them securely. Apply plumber's tape to any threaded connections to ensure a watertight seal.
6. Pressure Test the Connections: Once all the connections are made, turn the water supply back on slowly and carefully. Check for any leaks around the fittings and connections. If any leaks are detected, immediately turn off the water supply and repair the leaks. Tighten the fittings, resolder the connections, or recrimp the PEX fittings as necessary. Repeat the pressure test until all leaks are eliminated.
7. Install the Escutcheon Plate (Optional): Some rough-in valves come with an escutcheon plate, which is a decorative cover that conceals the plumbing connections behind the wall. Install the escutcheon plate according to the manufacturer's instructions. This step might be completed after the wall is finished if the plate will rest flush against the finished surface.
8. Protect the Rough-In: After the pressure test is successful and the escutcheon plate is installed (if applicable), protect the rough-in valve and pipes from damage during the remaining construction or renovation process. Cover the valve with a protective cap or wrap it in plastic to prevent dust, debris, and paint from entering the valve. Clearly mark the location of the rough-in to prevent accidental damage.
9. Prepare for Wall Finishing: Before closing up the wall, ensure that the depth of the rough-in valve is appropriate for the thickness of the finished wall. Some rough-in valves have adjustable depth settings. Adjust the depth as necessary to ensure that the faucet trim will fit properly once the wall is finished. Take pictures of the installation before closing the wall; these images can be invaluable for future reference or repairs.
By following these steps carefully and paying attention to detail, one can successfully install a bathtub faucet rough-in, ensuring a functional and leak-free bathtub for years to come.

Install A 1 Handle Tub And Shower Faucet Rona
:strip_icc()/SCP_191_07-2e153d67cdbf447eb1415fa9a30a13b9.jpg?strip=all "How To Install A Shower Or Tub Faucet")
How To Install A Shower Or Tub Faucet

Installing A Tub Faucet Fine Homebuilding

Rough Plumbing Height For Bathtub Shower Installation Bathroom

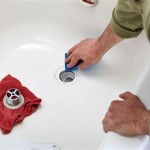
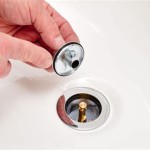
Learn How To Remove And Install Various Tub Spouts

Shower Tub Rough Valve What Length For Spout And Where To Buy Doityourself Com Community Forums

Learn How To Remove And Install Various Tub Spouts

Rough Framing For A Shower Valve Installation Ehow

Installing A Tub Faucet Fine Homebuilding
:strip_icc()/SCP_191_05-7b8dd5fde3f140a3ac838f2330698648.jpg?strip=all "How To Install A Shower Or Tub Faucet")
How To Install A Shower Or Tub Faucet
Related Posts