Installing a Bathtub Faucet and Shower Head: A Comprehensive Guide
Replacing a bathtub faucet and shower head can significantly improve the functionality and aesthetics of a bathroom. This project, while seemingly daunting, is manageable for a homeowner with basic plumbing knowledge and the right tools. This article provides a detailed guide to safely and effectively installing a new bathtub faucet and shower head, covering preparation, removal of the old fixtures, installation of the new components, and testing for leaks.
Before commencing any plumbing work, safety is paramount. Water supply lines should be shut off, and appropriate eye protection should be worn to prevent debris from entering the eyes. It is also advisable to cover the bathtub surface with a protective material to prevent scratches or damage during the installation process.
Preparation and Required Tools
Proper preparation is crucial for a smooth and efficient installation. This stage involves gathering the necessary tools and materials, selecting the appropriate replacement fixtures, and ensuring the water supply is completely shut off. Rushing this stage can lead to unforeseen complications and delays.
Firstly, the homeowner must carefully select the replacement bathtub faucet and shower head. These should be compatible with the existing plumbing configuration and reflect the desired aesthetic. Factors to consider include the faucet's mounting type (e.g., wall-mounted, deck-mounted), the shower head's spray pattern, and the overall finish to match other bathroom fixtures.
The following tools and materials are typically required for this project:
*Adjustable wrench: Used to loosen and tighten plumbing connections.
*Pipe wrench: Provides a stronger grip for larger pipes or stubborn fittings.
*Basin wrench: Designed to access and loosen nuts in tight spaces under the sink.
*Screwdrivers (Phillips and flathead): Necessary for removing screws and adjusting components.
*Plumber's tape (Teflon tape): Used to seal threaded connections and prevent leaks.
*Plumber's putty: Applied to create a watertight seal around the faucet base.
*Channel-lock pliers: Useful for gripping and turning various plumbing components.
*Utility knife: For cutting away old caulk or sealant.
*Measuring tape: To ensure proper alignment and spacing.
*Drop cloth or protective covering: To protect the bathtub surface.
*Bucket and towels: To catch any residual water.
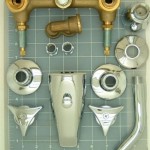
*New bathtub faucet and shower head set: Ensure all necessary components are included.
*Optional: Thread sealant paste (in addition to Teflon tape), penetrating oil (for loosening stubborn fittings).
Before proceeding, locate the water shut-off valves for the bathroom. These are typically located under the sink or in a nearby utility area. Turn off both the hot and cold water supply and open the existing faucet to relieve any remaining pressure in the pipes. Place a bucket under the faucet to catch any residual water that may drain out.
Removing the Existing Faucet and Shower Head
This step involves carefully disconnecting the old fixtures from the plumbing connections. Caution should be exercised to avoid damaging the pipes or surrounding surfaces. Applying penetrating oil to corroded fittings can ease the removal process.
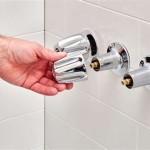
Start by removing the existing shower head. Typically, this involves unscrewing it from the shower arm, the pipe extending from the wall. Use an adjustable wrench to grip the shower head and turn it counterclockwise. If the shower head is stuck, apply penetrating oil to the threads and allow it to sit for several minutes before attempting to unscrew it again. Wrap the shower arm with a cloth to protect its finish from the wrench.
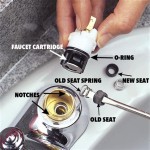
Next, focus on the bathtub faucet. The method for removing the old faucet depends on its mounting type. For wall-mounted faucets, locate the screws or nuts securing the faucet to the wall. These may be hidden behind decorative caps or plates. Remove the screws or nuts using the appropriate screwdriver or wrench. Carefully disconnect the faucet from the hot and cold water supply lines. This may involve unscrewing compression fittings or unions. Place a bucket underneath the connections to catch any remaining water.
For deck-mounted faucets, which are mounted on the bathtub itself, access the connections from underneath the tub. You may need a basin wrench to reach the nuts securing the faucet to the water supply lines. Loosen and disconnect the nuts, being mindful of any back-up water. Once the connections are detached, lift the faucet from the bathtub deck. Clean the area around the faucet openings, removing any old caulk or sealant using a utility knife or putty knife.
Inspect the exposed pipe threads for any damage or corrosion. If necessary, clean the threads with a wire brush to ensure a clean surface for the new connections. If the shower arm is corroded or damaged, consider replacing it with a new one. This is an opportune time to upgrade plumbing if needed, as it will be much easier now than after the new setup has been installed.
Installing the New Faucet and Shower Head
This stage involves connecting the new fixtures to the existing plumbing lines and ensuring a watertight seal. Careful attention to detail and proper use of plumber's tape and putty are crucial for preventing leaks. Adhering to the manufacturer's instructions is recommended.
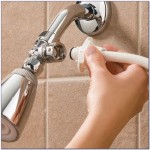
Begin with the shower head installation. Wrap the threads of the shower arm with several layers of plumber's tape, applying it in a clockwise direction. This will help create a watertight seal. Screw the new shower head onto the shower arm, tightening it by hand until snug. Use an adjustable wrench to gently tighten the connection an additional quarter turn, being careful not to overtighten and damage the threads. Ensure the shower head is oriented in the desired direction.
Now proceed with installing the bathtub faucet. For wall-mounted faucets, apply plumber's tape to the threads of the hot and cold water supply lines. Attach the faucet to the supply lines, tightening the connections with an adjustable wrench. Ensure the faucet is level and securely mounted to the wall. For deck-mounted faucets, apply plumber's putty around the base of the faucet where it will contact the bathtub deck. This will create a watertight seal. Insert the faucet through the openings in the bathtub deck and secure it from underneath with the provided nuts and washers. Tighten the nuts with a basin wrench, ensuring the faucet is firmly mounted and level. Connect the faucet to the hot and cold water supply lines, using flexible supply lines if necessary. Apply plumber's tape to the threads of the connections and tighten them with an adjustable wrench.
Once all connections are made, carefully inspect them for any signs of leaks. Turn on the water supply slowly and observe the connections closely. If any leaks are detected, tighten the connections slightly or reapply plumber's tape or putty as needed. It might be tempting to crank every connection very tightly, but this could cause additional issues. Slight adjustments are usually enough to mitigate small drips.
After ensuring all connections are watertight, test the operation of the faucet and shower head. Turn the faucet on and off, checking for smooth operation and proper water flow. Test the hot and cold water mix to ensure the temperature is correctly regulated. Check all parts again for leaks.
If the faucet includes a diverter valve to switch between the tub spout and shower head, test its function. Switch the diverter to the shower head position and check for proper water flow. Ensure the diverter valve seals properly and prevents water from flowing out of the tub spout when the shower head is in use. Similarly, test the tub spout to ensure proper flow.
Finally, clean up any debris or spills from the installation process. Remove the protective covering from the bathtub and dispose of any used materials properly. A clean, tidy working environment is an important part of any plumbing project.

Install A 1 Handle Tub And Shower Faucet Rona

Install A 1 Handle Tub And Shower Faucet Rona

No Shower Problem Install A Diverter In 1 Hour The Art Of Doing Stuff

No Shower Problem Install A Diverter In 1 Hour The Art Of Doing Stuff

Three Ways To Add A Shower Tub The Handyman S Daughter

Handheld Showerhead Guide The Basics Homeability Com

Juno Widespread Wall Installation Shower Head Faucet With Handheld

No Shower Problem Install A Diverter In 1 Hour The Art Of Doing Stuff

Bathroom Wall Drilling Installation Two Fucntions Simple Shower Set With Bathtub Faucet And Head China Sanitary Ware Complete Made In Com

Fix Leaking Shower Head Or Bathtub Faucet Rebuild Replace Valve
Related Posts