How To Remove A Lift And Turn Bathtub Drain Stopper
A lift and turn bathtub drain stopper is a common mechanism used to prevent water from draining out of a bathtub. While relatively simple in design, removing one can sometimes present a challenge, especially if it is corroded, clogged with hair, or stuck. Understanding the components of a lift and turn stopper and having the right tools and techniques are crucial for successful removal without damaging the tub or drain.
This article provides a comprehensive guide on how to remove a lift and turn bathtub drain stopper. It covers the necessary tools, preparation steps, and different methods for removing various types of stoppers, as well as troubleshooting common problems and preventive measures to keep the drain functioning properly.
Necessary Tools and Materials
Before starting the process of removing a lift and turn drain stopper, gathering the appropriate tools and materials is essential. Having everything readily available will streamline the task and prevent unnecessary delays.
First, a screwdriver set is vital. Both flathead and Phillips head screwdrivers may be required, depending on the stopper's design. The screwdriver should be of appropriate size to fit the screw on the stopper without stripping the head.
Next, a pair of needle-nose pliers can be useful for gripping small parts and loosening stubborn components. These pliers are particularly helpful in reaching into tight spaces within the drain assembly.
A bathtub drain wrench, also known as a dumbbell wrench or a spider wrench. This specialized tool is designed to grip the drain flange from the inside, providing leverage to loosen it from the drain pipe. While not always necessary, it can be invaluable for removing the entire drain assembly if needed.
Additionally, penetrating oil, such as WD-40 or Liquid Wrench, is beneficial for loosening corroded or stuck parts. Applying penetrating oil a few minutes before attempting to remove the stopper can significantly ease the process.
A flashlight or headlamp is necessary to provide adequate visibility inside the drain. Proper lighting is crucial for identifying the stopper's mechanism and any potential obstructions.
Finally, a rag or old towel should be used to protect the bathtub's surface from scratches and to wipe away any debris or spills. Gloves are also recommended to protect hands from dirt and grime.
Preparation Steps
Proper preparation is key to successfully removing a lift and turn bathtub drain stopper. These steps ensure a safe and efficient process, minimizing the risk of damage to the tub or drain.
The initial step is to protect the bathtub's finish. Place a towel or rag over the drain area to prevent scratches or dents from tools. This is particularly important for acrylic or porcelain tubs, which are more susceptible to damage.
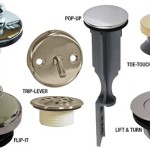
Next, assess the type of lift and turn stopper. There are several variations, including those with a visible screw on the top of the stopper, those with a hidden screw beneath a decorative cap, and those with a simple lift and turn mechanism without any visible screws.
Once the type of stopper is identified, examine it closely for any signs of corrosion, mineral buildup, or debris. These factors can make the stopper more difficult to remove. If necessary, use a small brush or pick to remove any loose debris from around the stopper.
Before attempting to remove the stopper, apply penetrating oil to the area where the stopper meets the drain flange. Allow the oil to soak in for at least 15 minutes to help loosen any corrosion or buildup. This step can significantly reduce the force required to remove the stopper and prevent damage to the drain assembly.
Ensure the work area is well-lit. Use a flashlight or headlamp to illuminate the drain and stopper, making it easier to see the components and identify any potential issues.
Methods for Removing Different Types of Lift and Turn Stoppers
Different types of lift and turn bathtub drain stoppers require different removal techniques. Understanding the specific mechanism of the stopper is essential for choosing the appropriate method and avoiding damage.
For stoppers with a visible screw on top, the process is relatively straightforward. First, use a screwdriver of the appropriate size to loosen the screw. Turn the screw counterclockwise until it is completely removed. In some cases, the screw may be difficult to turn if it is corroded or stuck. Applying penetrating oil and allowing it to soak in can help loosen the screw.
Once the screw is removed, gently lift the stopper straight up out of the drain. If the stopper is stuck, try wiggling it slightly from side to side while pulling upwards. Avoid using excessive force, as this can damage the stopper or the drain assembly.
Some stoppers have a hidden screw beneath a decorative cap. To remove this type of stopper, first locate the cap on top of the stopper. This cap may be held in place by friction or a set screw. If there is a visible notch or groove on the cap, use a small flathead screwdriver or a knife to gently pry it off. If there is a set screw, loosen it with a small Allen wrench or screwdriver.
Once the cap is removed, the screw beneath will be exposed. Use a screwdriver to loosen and remove the screw, then lift the stopper straight up out of the drain. As with the previous type, wiggling the stopper slightly while pulling upwards can help if it is stuck.
Some lift and turn stoppers have a simple lift and turn mechanism without any visible screws. These stoppers typically have a rod or plunger that extends down into the drain. To remove this type of stopper, grip the top of the stopper firmly and turn it counterclockwise. The stopper should unscrew from the drain assembly. If the stopper is difficult to turn, applying penetrating oil and using pliers for added grip can help.
Once the stopper is unscrewed, lift it straight up out of the drain. If the stopper is stuck, try wiggling it slightly from side to side while pulling upwards.
If the stopper is severely corroded or damaged, it may be necessary to remove the entire drain flange. This requires using a bathtub drain wrench. Insert the wrench into the drain and engage the crossbars with the inside of the drain flange. Turn the wrench counterclockwise to loosen the flange. This may require considerable force, especially if the flange is heavily corroded. Once the flange is loose, carefully remove it from the drain pipe.
After removing any type of stopper, it is important to clean the drain thoroughly. Use a drain snake or a bent wire to remove any hair, soap scum, or other debris from the drain pipe. Flushing the drain with hot water can also help remove any remaining residue.
Troubleshooting Common Problems
Various issues can arise during the removal of a lift and turn bathtub drain stopper. Recognizing these problems and knowing how to address them can save time and prevent damage.
One common problem is a stuck screw. If the screw on the stopper is corroded or stripped, it can be difficult to remove. Applying penetrating oil and allowing it to soak in for several hours or overnight can help loosen the screw. If the screw head is stripped, use a rubber band or steel wool between the screwdriver and the screw head to provide better grip. As a last resort, a screw extractor may be necessary to remove the stripped screw.
Another issue is a stuck stopper. If the stopper is heavily corroded or clogged with debris, it may be difficult to lift out of the drain. Applying penetrating oil and wiggling the stopper gently can help loosen it. Avoid using excessive force, as this can damage the stopper or the drain assembly.
If the entire drain flange is stuck, it may be necessary to use a bathtub drain wrench. Make sure the wrench is properly engaged with the inside of the flange and apply steady, even pressure while turning counterclockwise. If the flange is heavily corroded, applying heat with a heat gun or hair dryer can help loosen it.
Sometimes, the drain pipe itself may be damaged or corroded. If the drain pipe is leaking or showing signs of corrosion, it may need to be replaced. This is a more complex repair that may require the assistance of a professional plumber.
After removing the stopper, inspect the drain assembly for any signs of damage or wear. Replace any damaged components before reinstalling the stopper.
Preventive Measures
Taking preventive measures can help maintain a lift and turn bathtub drain stopper and prevent future problems. Regular maintenance can extend the life of the stopper and ensure it functions properly.
One of the most effective preventive measures is to clean the drain regularly. Use a drain snake or a bent wire to remove any hair, soap scum, or other debris from the drain pipe at least once a month. This will prevent clogs from forming and keep the drain flowing freely.
Avoid using harsh chemical drain cleaners, as these can damage the drain pipes and the stopper. Instead, use natural drain cleaners, such as a mixture of baking soda and vinegar, or enzymatic drain cleaners.
Periodically inspect the stopper for signs of corrosion or wear. If the stopper is showing signs of damage, replace it before it becomes a major problem.
Apply a small amount of silicone grease to the stopper and the drain flange to prevent corrosion and make future removal easier. This will also help the stopper seal properly and prevent leaks.
Consider installing a hair catcher or screen over the drain to prevent hair and other debris from entering the drain pipe. This can significantly reduce the frequency of drain clogs and the need for stopper removal.

Cannot Un The Knob From Lift And Turn Bathtub Stopper R Fixit

Removing A Lift Turn Stopper 1 Step

4 Easy Ways To Remove A Tub Drain Stopper Wikihow

How To Properly Remove A Lift And Turn Bathtub Stopper

How To Remove A Bathtub Drain Stopper Mr Rooter

How To Remove A Bathtub Drain The Home Depot

4 Easy Ways To Remove A Tub Drain Stopper Wikihow

1st Simple Instructions How To Remove A Bathtub Stopper Lift And Turn Bathroom Tub Shower

How To Remove A Bathtub Drain Stopper

How To Remove A Bathtub Drain Temecula Handyman