Essential Aspects of Bathtub Wall Panel Installation
Revitalizing your bathroom's aesthetics and functionality involves careful consideration of every element, including the installation of bathtub wall panels. These panels transform the space around your bathtub, enhancing its visual appeal and protecting it from moisture damage. Installing them correctly ensures a seamless and long-lasting upgrade for your bathroom.
Planning and Preparation
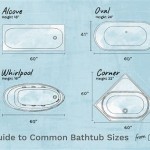
Proper planning and preparation lay the foundation for a successful installation. Measure the bathtub area accurately to determine the number and size of panels required. Gather all necessary tools, including a level, caulk gun, tape measure, and power drill. Ensure the bathtub surface is clean and dry, and remove any fixtures or accessories that may hinder the installation process.
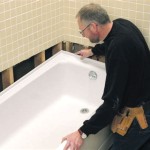
Panel Installation
Begin by applying a bead of caulk along the bottom edge of the first panel. Insert the panel into place, ensuring it is level and flush with the bathtub's edge. Secure it using screws or adhesive. Repeat this process for the remaining panels, ensuring they are aligned and tightly fitted together. Overlap the panels at corners and joints to prevent water seepage.
Corner Installations
Installing panels in corners requires special attention. Cut the panels at a 45-degree angle to create a clean mitered joint. Apply caulk to both edges and fit the panels into the corner. Use miter clamps or tape to hold the panels in place while the caulk dries.
Grouting and Finishing
Once the panels are secured, apply grout to the joints between them. Use a grout float to evenly distribute the grout and remove excess. Clean the surface with a damp sponge to remove any residue. Allow the grout to cure completely before using the bathtub.
Maintenance and Care
Regular cleaning and maintenance preserve the appearance and longevity of your bathtub wall panels. Use mild detergents and soft cloths to wipe down the panels. Avoid using abrasive cleaners or sponges that may scratch or damage the surface. Inspect the panels periodically for any signs of damage or leaks, and address any issues promptly.
Conclusion
Installing bathtub wall panels requires precision, attention to detail, and proper preparation. By following these essential aspects, you can upgrade your bathroom with a durable and visually appealing solution. Enhance the elegance and functionality of your space while ensuring it remains a haven of relaxation and rejuvenation.

How To Install A Shower Wall Panel Kit Hunker

How To Install A Bath Tub Surround

Create A Waterproof Bathtub Wall For Less Than 50 Small Shower Remodel Walls Mobile Home Bathtubs

How To Install A Bath And Shower Surround Delta Classic 400

How To Install A Shower Surround The Home Depot

Dreamline Qwall Vs 60 In L X 36 W 62 H Biscuit 4 Piece Glue Up Bathtub Wall Panel Kit The Walls Surrounds Department At Com

How To Install A Glue Up Shower Enclosure The Home Depot

How I Elevated Our Bathroom With Wall Panels Checking In Chelsea

Wetwall 32 In L X 60 W 72 H Vienna Marble 4 Piece Glue Up Bathtub Wall Panel Kit The Walls Surrounds Department At Com

Tub Wall Surround The Onyx Collection