Essential Aspects of Caulking a Bathtub with Silicone
Maintaining a watertight seal around your bathtub is crucial for preventing leaks and ensuring a dry and sanitary bathroom. Caulking the edges of the tub with silicone is a key task in achieving this goal, and understanding the essential aspects of this process can lead to a successful and durable result.
Preparation:
Before applying silicone, it is essential to prepare the surfaces thoroughly. Clean the areas around the bathtub and the tub flange with a mild cleaner and let them dry completely. Remove any old caulk or debris using a utility knife or caulk removal tool. Apply painter's tape to protect the adjacent surfaces from silicone.
Choosing the Right Silicone:
For caulking bathtubs, 100% silicone caulk is recommended. It provides a flexible and waterproof seal that withstands moisture and temperature fluctuations. Consider the color of the caulk to match the bathtub and grout, or opt for a clear silicone for a less noticeable finish.
Application Technique:
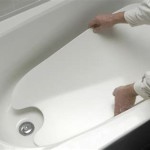
Apply a continuous bead of silicone along the seam between the bathtub and the wall or tub flange. Use a caulk gun with moderate pressure to ensure a consistent flow of silicone. Smooth the bead using a damp finger or a caulk finishing tool. Avoid over-applying silicone, as it can lead to a messy and uneven seal.
Removing Excess Silicone:
Once the silicone is applied, remove the painter's tape while the silicone is still wet. This prevents the tape from tearing the silicone seal when it is removed. Use a damp sponge or rag to gently wipe away any excess silicone that has spilled onto the tub or wall.
Curing Time:
Silicone typically takes 24 to 48 hours to cure completely. During this time, avoid using the bathtub or exposing the silicone to water. Allow the silicone to fully set before stepping into the tub to ensure a strong and leak-proof seal.
Maintenance:
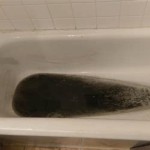
Regularly inspect the caulk around the bathtub for any cracks or signs of deterioration. If damage is found, clean the area and reapply silicone as needed. Maintaining the caulk ensures a lasting seal and prevents leaks.

How To Caulk A Bathtub 13 Steps With Pictures Wikihow

How To Caulk A Bathtub 13 Steps With Pictures Wikihow

Ge Silicone 1 Tub And Tile Kitchen Bath 10 Oz White Caulk In The Department At Com

Ge Supreme Silicone Kitchen And Bath Tub Tile 10 1 Oz White Caulk In The Department At Com

How To Caulk A Bathtub Or Shower Tile Pro Depot

White Lightning Ultra Kitchen And Bath 10 Oz Almond Silicone Caulk In The Department At Com

How To Caulk A Bathtub 13 Steps With Pictures Wikihow

Ge Tub And Tile Silicone 1 Caulk 10 Oz Kitchen Bath Sealant White 2749484 The Home Depot

Caulking With Silicone Don T Do It Instatrim

Baths Smoothing Silicone Caulk Plus Other Caulking Tips Fixing Our Historic House