Bathtub Drain Installation: A Comprehensive Guide to Essential Aspects
A well-functioning bathtub drain is essential for a comfortable and convenient bathroom experience. Installing a new bathtub drain may seem like a daunting task, but it's a manageable project with the right tools and knowledge. Here's a comprehensive guide to the essential aspects of bathtub drain installation.
Gather the Necessary Tools and Materials
Before starting the installation, gather the following tools and materials:
- Adjustable wrench or pliers
- Channel locks
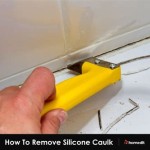
- Plumber's putty or silicone caulk
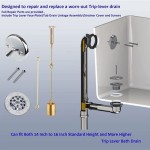
- New bathtub drain assembly
- Teflon tape
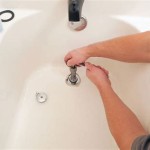
Remove the Old Drain
Turn off the water supply to the bathtub. Place a bucket or bowl under the drain to catch any water that may leak out. Use an adjustable wrench or pliers to loosen the drain strainer. Once the strainer is removed, reach under the bathtub and unscrew the drainpipe from the bottom of the drain assembly. Finally, remove the old drain assembly.
Prepare the Drain Hole
Inspect the drain hole for any debris or corrosion. Clean the area and apply a layer of plumber's putty or silicone caulk around the edge of the drain hole. This seal will prevent water from leaking around the drain assembly.
Install the New Drain Assembly
Take the new drain assembly and wrap Teflon tape around the threads of the drainpipe. Screw the drainpipe into the bottom of the drain assembly and tighten it securely using channel locks. Insert the drain assembly into the drain hole and press it down firmly into the plumber's putty or silicone caulk.
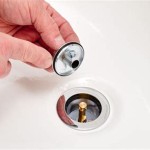
Install the Drain Strainer
Apply a bead of plumber's putty or silicone caulk around the base of the drain strainer. Screw the strainer onto the drain assembly and tighten it until it's snug. Wipe away any excess putty or caulk.
Turn on the Water Supply
Turn on the water supply to the bathtub and check for leaks. If there are any leaks, tighten the connections or apply additional plumber's putty or silicone caulk.
Conclusion
Installing a new bathtub drain requires careful planning and attention to detail. By following these steps and using the right tools and materials, you can ensure a proper and leak-free installation. Remember, if you encounter any difficulties or feel unsure, it's best to consult a licensed plumber professional.

7 Bathtub Plumbing Installation Drain Diagrams

Bathtub Plumbing Installation Drain Diagrams

How To Install A Bathtub Toolrev

Bathtub Drain System 2024 Guide Badeloft

How To Replace Bathtub Drain Stopper With A Lift And Turn Diy

Tub Drain How To Seal And Unclog A Bathtub Knoxville Plumbing

Trip Lever Bathtub Drain Assembly Stopper Kit Fit For 1 2 5 8 Strainer

How Can I Fix My Tub Drain Diy Bathtub Coil Ask Metafilter

Bathtub Plumbing Installation Drain Diagrams Diy

Sento Chrome Lift And Turn Bathtub Drain Assembly Stopper Kit Fit Both 1 2 Inch Or 5 8 Strainer Heavy Duty Metal With Matching S Easy Installation Polished Com