How To Take The Plug Out Of A Bathtub
Removing a bathtub plug might seem like a straightforward task, but various factors can contribute to its difficulty. Understanding the different types of plugs, potential issues that can prevent their easy removal, and the correct techniques for resolution is crucial for maintaining a functional and clean bathroom. This article addresses the methods for removing common bathtub plug types and troubleshooting common issues.
The functionality of a bathtub is contingent on the proper operation of its drainage system. The plug serves as the primary component for retaining water within the tub, enabling bathing and other water-related activities. When the plug malfunctions or becomes lodged, it can impede the tub’s use and lead to potential water damage if the tub overflows. Therefore, understanding the mechanisms involved in plug removal is an essential aspect of household maintenance.
Several different configurations of bathtub plugs are commonly encountered, each with its own method of operation and potential points of failure. These include lift-and-turn drains, pop-up drains, push-and-seal drains, and toe-touch drains. Each type has specific characteristics that determine the appropriate technique for removal or adjustment.
Identifying Your Bathtub Plug Type
Before attempting to remove a bathtub plug, accurately identifying the type is paramount. Applying the wrong method can damage the drain mechanism and exacerbate the problem. Common types include:
*Lift-and-Turn Drains:
These plugs typically feature a knob or handle that can be lifted and turned to open or close the drain. These are usually older styles but can still be found in many homes. *Pop-Up Drains:
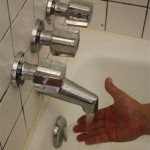
These are operated by a lever located on the overflow plate (the small plate with a lever typically found below the tub faucet). The lever controls a linkage that raises and lowers the plug. *Push-and-Seal Drains:
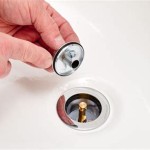
Also known as "clicker" drains, these plugs are operated by pushing down on the plug itself. One push seals the drain, and another push releases it. *Toe-Touch Drains:
Similar to push-and-seal drains, these are activated by pressing on the plug with one's toe. *Stopper Drains (Chain & Stopper):
A less common design these days, that features a rubber or metal stopper attached to a chain. The chain is manually lifted to remove the plug.The identification process should also include noting any visible signs of damage or malfunction, such as rust, corrosion, or loose components. This will help in determining the best course of action for removal.
Addressing Common Obstructions and Sticking
One of the most frequent reasons for difficulty in removing a bathtub plug is the accumulation of hair, soap scum, and other debris. These substances can bind the plug to the drain opening, making it difficult to lift or turn. Other factors may include corrosion, mineral build-up from hard water, and mechanical issues with the plug's operating mechanism.
When confronted with a stuck plug, the initial step should be to attempt to dislodge any visible debris. This can often be accomplished with a pair of tweezers or a bent wire. Avoid forcing the plug, as this may cause further damage. A gentle lifting and wiggling motion, coupled with the use of a lubricant like dish soap or WD-40, may help to loosen the plug.
For more stubborn obstructions, chemical drain cleaners can be used, but with caution. Ensure that the cleaner is compatible with the drain material to prevent corrosion or other damage. Always follow the manufacturer's instructions carefully and wear appropriate protective gear, such as gloves and eye protection. Alternatively, a mixture of baking soda and vinegar can be used as a less harsh, more environmentally friendly option. Allow the mixture to sit for at least 30 minutes before flushing with hot water.
Step-by-Step Removal Techniques for Various Plug Types
The following section outlines the specific procedures for removing each type of bathtub plug. These instructions assume that the plug is initially stuck or difficult to remove due to debris or other factors. Safety should always be the priority, so ensure that the water supply is turned off and that appropriate protective gear is worn.
#### Lift-and-Turn Drains:1.
Initial Assessment:
Examine the knob or handle of the plug for any signs of damage or looseness. If the knob is loose, tighten any visible screws.2.
Loosening:
Apply a small amount of lubricant, such as dish soap or WD-40, around the base of the plug where it meets the drain opening. Allow the lubricant to penetrate for a few minutes.3.
Removal:
Gently lift and turn the plug. If it is still stuck, try wiggling it back and forth while applying upward pressure. If the plug comes partially out, clean away any debris and repeat the lubrication process. Once the plug is fully removed, clean it thoroughly to prevent future sticking. #### Pop-Up Drains:1.
Accessing the Linkage:
The pop-up drain is controlled by a linkage connected to the overflow plate. Remove the overflow plate by unscrewing it. This will expose the linkage mechanism.2.
Disconnection:
Locate the clevis spring or retaining clip that connects the linkage rod to the stopper. Carefully detach the clevis spring or remove the retaining clip.3.
Stopper Removal:
Once the linkage is disconnected, the stopper can usually be lifted out of the drain. You may need to use pliers to gently pull it out if it is stuck. Be careful not to damage the drain pipe.4.
Cleaning and Reassembly:
Clean the stopper and the linkage rod thoroughly. Inspect for any damage and replace parts as needed. Reconnect the linkage and reattach the overflow plate. #### Push-and-Seal (Clicker) Drains:1.
Initial Attempt:
Try pushing the plug down again to see if it will release. Sometimes, a simple push is all that is needed to dislodge it.2.
Unscrewing (If Possible):
Some push-and-seal drains can be unscrewed. Grip the top of the plug firmly and try turning it counterclockwise. If it starts to unscrew, continue until it is completely removed.3.
Using a Suction Cup:
A small suction cup can be used to pull the plug out. Press the suction cup firmly onto the top of the plug and try lifting it straight up.4.
Last Resort - Prying (With Caution):
If all else fails, a thin, flat tool (like a putty knife or screwdriver) can be carefully inserted between the plug and the drain opening to gently pry it out. Be extremely cautious to avoid scratching or damaging the tub surface. #### Toe-Touch Drains:Toe-touch drains operate similarly to push-and-seal drains, and the removal techniques are largely the same.
1.
Initial Attempt:
Try pressing the plug with your toe or hand to see if it will release.2.
Unscrewing (If Possible):
Many units can be unscrewed. Grip the top of the plug firmly and try to turn it counterclockwise. If it starts to untwist, continue carefully until removed.3.
Suction Cup Use:
Press a small suction cup firmly onto the top of the plug and try to lift the plug straight up.4.
Prying (With Extreme Caution):
A very thin, flat tool can be cautiously inserted between the drain and plug, but be very careful about damage to the surface. Use only if other methods fail. #### Stopper Drains (Chain & Stopper):1.
Initial Removal:
Attempt to lift the stopper directly by the chain. If this is not possible due to sticking or obstruction, proceed to the next step.2.
Accessing the Stopper:
If the stopper is stuck, you may need to reach directly into the drain opening. Wearing gloves, attempt to manually dislodge any visible debris that may be obstructing the stopper.3.
Loosening:
Apply a small amount of lubricant around the base of the stopper. Let it sit for several minutes to penetrate. Afterwards, attempt to manipulate the stopper to dislodge it.4.
Removal:
Once the stopper is free, lift the stopper and its accompanying chain out of the drain.After removing the plug, thoroughly clean the drain opening to remove any remaining debris. This will help to prevent future blockages and ensure proper drainage. Replacing the plug with a new one is recommended if the original plug is damaged or excessively worn.
Depending on the severity of the sticking or the type of plug, specialized tools may be required. A drain snake, for example, can be used to remove deep-seated obstructions that are beyond the reach of simple tools. However, using such tools requires caution to avoid damaging the drainpipe.
Regular maintenance is essential for preventing bathtub plug issues. This includes periodically cleaning the plug and drain opening to remove hair, soap scum, and other debris. Using a drain strainer can also help to catch debris before it enters the drainpipe, reducing the frequency of blockages.
In cases where the plug cannot be removed using the techniques described above, or if the drain system is severely damaged, it may be necessary to consult a professional plumber. Attempting to force the plug or use inappropriate tools can cause further damage and lead to more costly repairs. A qualified plumber will have the expertise and equipment to diagnose and resolve the problem safely and effectively.

4 Easy Ways To Remove A Tub Drain Stopper Wikihow

How To Remove A Bathtub Drain The Home Depot

4 Easy Ways To Remove A Tub Drain Stopper Wikihow

How To Remove A Bathtub Drain Stopper

4 Easy Ways To Remove A Tub Drain Stopper Wikihow

How To Remove A Bathtub Drain Stopper

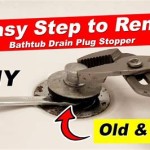
How To Easily Remove Bathtub Drain Plug Stopper Unclog In 1 Minute Jonny Diy

How To Remove The Bathtub Drain Diy Guide Fixed Today Plumbing

4 Easy Ways To Remove A Tub Drain Stopper Wikihow

How To Remove A Pop Up Tub Drain Plug Stopper Easy No Tools Needed