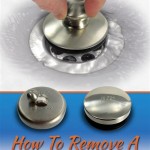
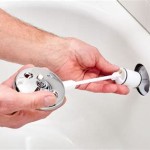
How To Remove a Bathtub Push Stopper
Bathtub push stoppers, also known as push-and-seal stoppers, are common plumbing fixtures designed to hold water in the tub. These stoppers operate via a spring-loaded mechanism that seals and unseals the drain with a simple push of the foot or hand. While generally reliable, these stoppers can malfunction, require cleaning due to hair and debris accumulation, or need replacement. Removing a bathtub push stopper correctly is crucial to avoiding damage to the drain assembly or the bathtub itself. This article provides a comprehensive guide to effectively removing a malfunctioning or dirty bathtub push stopper.
Before initiating the removal process, it is essential to gather the necessary tools. The specific tools required may vary depending on the type of push stopper, but generally, the following are recommended:
- Flathead Screwdriver: For prying and loosening components.
- Needle-Nose Pliers: For gripping and manipulating small parts.
- Small Allen Wrench Set: Some stoppers use set screws that require specific Allen wrench sizes.
- Penetrating Oil (e.g., WD-40): To loosen corroded or stuck parts.
- Clean Rags or Towels: To protect the bathtub surface and clean up any spills.
- Protective Gloves: To maintain hygiene and prevent skin irritation.
- Safety Glasses: To protect eyes from debris.
Having these tools readily available will streamline the removal process and minimize the risk of damage or injury.
Identifying the Type of Push Stopper
Different push stopper designs necessitate different removal techniques. Generally, push stoppers fall into one of a few categories. Recognizing the type of stopper installed in the bathtub is fundamental to selecting the appropriate removal method.
One common type is the screw-in push stopper. This type typically features a top cap that can be unscrewed, revealing the internal mechanism. Another type uses a set screw, usually located on the side of the stopper near the top. Loosening this screw allows the user to remove the stopper's top portion. Other push stoppers are designed with a simple push-and-turn mechanism that, when properly aligned, allows the stopper to be lifted out. Examining the stopper closely for any visible screws, indentations, or markings will provide clues regarding its design.
If the stopper's design is unclear, consulting the bathtub’s or stopper’s original documentation can be helpful. Product manuals often contain diagrams or instructions specifically detailing the removal process for that model.
Step-by-Step Removal Process
Once the type of push stopper has been identified and the necessary tools have been gathered, the actual removal process can begin. The following instructions provide a general guide, but they should be adapted based on the specific type of stopper being removed.
Step 1: Preparation: Before starting, ensure the bathtub area is well-lit. Place a towel or rag over the drain opening to prevent any small parts from falling into the drainpipe. This is important, as retrieving fallen components from the drainpipe can be difficult and time-consuming.
Step 2: Loosening the Stopper: If the stopper is stuck, apply a small amount of penetrating oil (e.g., WD-40) around the base of the stopper where it meets the drain flange. Allow the oil to sit for 10-15 minutes to penetrate and loosen any corrosion or debris that may be binding the stopper. Avoid using excessive amounts of penetrating oil, as it can be difficult to clean up.
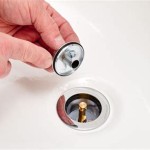
Step 3: Removing a Screw-In Stopper: If the stopper appears to have a threaded top cap, attempt to unscrew it. Grip the top cap firmly and rotate it counterclockwise. If the cap is difficult to turn, use a pair of pliers to provide additional leverage, but protect the finish with a cloth to prevent scratching. Once the top cap is removed, the internal mechanism should be accessible. Carefully lift out the internal stopper assembly.
Step 4: Removing a Stopper with a Set Screw: Locate the set screw on the side of the stopper. Use the appropriately sized Allen wrench to loosen the screw. Once the set screw is sufficiently loosened (but not completely removed, to avoid losing it), the top portion of the stopper should be able to be lifted off. After removing the top portion, the remaining components of the stopper assembly can be carefully pulled out.
Step 5: Removing a Push-and-Turn Stopper: Some push-and-turn stoppers require a specific alignment before they can be removed. Push down on the stopper and attempt to rotate it. There may be a point where the stopper feels looser or clicks into a specific position. In this position, try to gently lift the stopper straight up. If it doesn't lift easily, continue rotating it until the correct alignment is found.
Step 6: Removing a Stopper with Internal Linkage: Some push stoppers have an internal linkage that connects to a rocker arm beneath the drain opening. Removing the top stopper portion doesn't necessarily free this type of assembly. If this is the case, access to the drain from underneath the tub may be necessary. This may involve removing an access panel or working in a cramped space. If access to the drain from underneath the tub is available, disconnect the linkage from the rocker arm before attempting to remove the stopper. Consult the tub’s documentation for specific guidance.
Step 7: Cleaning the Stopper and Drain: Once the stopper is removed, inspect it and the drain opening for any accumulated hair, soap scum, or debris. Use needle-nose pliers or a bent wire to remove any obstructions. Cleaning the stopper and drain regularly can prevent future clogs and maintain proper drainage.
Step 8: Reassembly (if applicable): If the stopper is being removed for cleaning or maintenance and will be reinstalled, ensure all parts are thoroughly cleaned before reassembling the stopper. Follow the steps for removal in reverse order to reassemble the stopper, ensuring that all components are properly aligned and securely fastened.
Troubleshooting Common Problems
During the removal process, several common problems can arise. Understanding these issues and knowing how to address them can save time and prevent damage.
Stuck Stopper: If the stopper is tightly stuck, avoid using excessive force, as this can damage the drain assembly or the stopper itself. Instead, apply more penetrating oil and allow it to soak for a longer period. Gently tap the stopper with a rubber mallet to help loosen it. Patience is key; repeated applications of penetrating oil and gentle manipulation are often more effective than brute force.
Stripped Screws: If the set screw is stripped, making it impossible to loosen with an Allen wrench, try using a rubber band or steel wool between the wrench and the screw head to provide better grip. If this fails, a screw extractor may be necessary. A screw extractor is a specialized tool designed to remove damaged or stripped screws. Follow the manufacturer's instructions carefully when using a screw extractor.
Broken Components: If any of the stopper's components break during removal, such as a plastic clip or a brittle metal part, replacement parts may be available from the manufacturer or a plumbing supply store. Take the broken part with you to ensure you get the correct replacement.
Preventative Maintenance
Regular maintenance can significantly extend the life of a bathtub push stopper and prevent future problems. A simple preventive maintenance routine includes the following:
Regular Cleaning: Periodically remove the stopper (following the steps outlined above) and clean it thoroughly. Use a brush or cloth to remove hair, soap scum, and other debris that may have accumulated. Rinse the stopper with clean water and allow it to dry before reinstalling it.
Strainers: Consider using a drain strainer or hair catcher to prevent hair and large debris from entering the drainpipe. These inexpensive devices can significantly reduce the frequency of clogs and the need for stopper removal.
Avoid Harsh Chemicals: When cleaning the bathtub, avoid using harsh chemicals or abrasive cleaners that can damage the stopper's finish or internal components. Use mild soap and water instead.
Lubrication: Periodically, apply a small amount of silicone grease to the stopper's moving parts to keep them lubricated and prevent corrosion. This will help ensure smooth operation and prevent the stopper from sticking.
Safety Considerations
When working with plumbing fixtures, several safety precautions should be observed to prevent injury.
Eye Protection: Always wear safety glasses to protect your eyes from debris or splashes of water or cleaning products.
Hand Protection: Wear gloves to protect your hands from bacteria, chemicals, and sharp edges.
Proper Lighting: Ensure the work area is well-lit to prevent accidents and ensure clear visibility of the task at hand.
Caution with Tools: Use tools with care to avoid damaging the bathtub or injuring yourself. Avoid applying excessive force when loosening stuck parts.
Plumbing Knowledge: If uncomfortable performing the task, consult a qualified plumber to avoid damaging the plumbing system or causing expensive repairs.
By following these guidelines, removing a bathtub push stopper can be a straightforward process. Proper identification of the stopper type, careful execution of the removal steps, and adherence to safety precautions will ensure a successful outcome and minimize the risk of damage or injury.

How To Remove A Bathtub Drain The Home Depot

How To Remove A Bathtub Drain Stopper

How To Remove Pop Up Tub Stopper Easy Method

How To Remove A Bathtub Drain Stopper

4 Easy Ways To Remove A Tub Drain Stopper Wikihow

4 Easy Ways To Remove A Tub Drain Stopper Wikihow

How To Remove A Bathtub Drain Stopper Mr Rooter

Cannot Un The Knob From Lift And Turn Bathtub Stopper R Fixit

How To Easily Remove Bathtub Drain Plug Stopper Unclog In 1 Minute Jonny Diy

How To Remove A Bathtub Drain Stopper
Related Posts