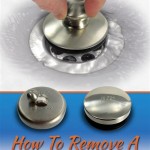
How To Remove The Drain Plug From A Bathtub
Every bathroom fixture needs some maintenance and care to keep it functional and clean. Your bathtub's drain plug is no exception. If you have a bathtub with a pop-up drain plug, there will come a time when you'll need to remove it. Maybe it's clogged with hair and soap scum, or maybe you want to replace it with a new one. Whatever the reason, removing a bathtub drain plug is a pretty simple task that anyone can do. Here's a step-by-step guide on how to do it:
Step 1: Gather your tools. You'll need a pair of pliers, a flathead screwdriver, and a cloth or rag.
Step 2: Turn off the water supply to the bathtub. This is usually done by turning the knobs on the hot and cold water supply lines under the sink. Once the water is turned off, open the faucet to release any remaining water in the lines.
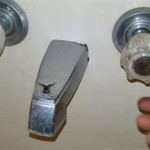
Step 3: Remove the overflow plate. The overflow plate is the round or oval metal plate located on the side of the bathtub, just below the rim. Use a flathead screwdriver to gently pry the overflow plate off. Be careful not to damage the plate or the surrounding area.
Step 4: Locate the drain stopper assembly. Once the overflow plate is removed, you'll see the drain stopper assembly. This is the metal part that the drain plug fits into. Use a pair of pliers to grip the drain stopper assembly and turn it counterclockwise to loosen it.
Step 5: Remove the drain plug. Once the drain stopper assembly is loosened, you can remove the drain plug. Simply pull up on the plug to remove it. You may need to use a little force, but be careful not to damage the plug.
Step 6: Clean the drain plug and drain stopper assembly. Once the drain plug is removed, take the opportunity to clean it and the drain stopper assembly. Use a cloth or rag to wipe away any hair, soap scum, or other debris. You can also use a mild cleaner to clean the parts if necessary.
Step 7: Reinstall the drain plug and drain stopper assembly. Once the drain plug and drain stopper assembly are clean, you can reinstall them. Simply insert the drain plug into the drain stopper assembly and turn the assembly clockwise to tighten it. Then, replace the overflow plate and turn on the water supply to the bathtub
That's all there is to it! Removing a bathtub drain plug is a simple task that can be completed in just a few minutes.

4 Easy Ways To Remove A Tub Drain Stopper Wikihow

4 Easy Ways To Remove A Tub Drain Stopper Wikihow

How To Remove A Bathtub Drain Stopper Bathroom Sink

4 Easy Ways To Remove A Tub Drain Stopper Wikihow

How To Easily Remove Bathtub Drain Plug Stopper Unclog In 1 Minute Jonny Diy

Remove Drain Plug Without Removing 59 Clogged Bathtub Unclog

How To Remove A Bathtub Drain Stopper Mr Rooter

How To Remove Bathtub Drain Stopper That Spins Freely

How To Remove A Bathtub Drain Stopper

How To Easily Remove Bathtub Drain Plug Stopper Unclog In 1 Minute Jonny Diy
Related Posts