Trim Around Bathtub Floor: Essential Details for a Flawless Installation
Trimming around the bathtub floor plays a critical role in enhancing the aesthetics and functionality of your bathroom. It not only conceals the exposed edges of the bathtub but also prevents water from seeping underneath, minimizing the risk of mold and mildew growth.
Selecting the right trim material is crucial to ensure durability and water resistance. Common options include:
- Ceramic: Durable, easy to clean, and resistant to water and moisture.
- Porcelain: Similar to ceramic, but denser and more resistant to wear and tear.
- Cultured Marble: A man-made material that mimics the appearance of natural stone, but is more durable and lightweight.
- Acrylic: A synthetic material that is lightweight, waterproof, and available in a wide range of colors and styles.
- Vinyl: A flexible material that is resistant to water, stains, and scratches.
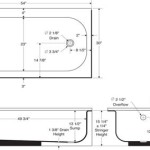
The height of the bathtub trim should be carefully considered. A standard height of 4-6 inches provides adequate coverage and prevents water from splashing onto the floor. However, if your bathtub has a higher wall, a taller trim may be necessary.
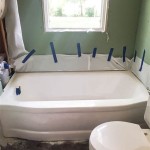
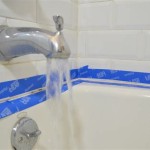
When installing bathtub trim, it is essential to use waterproof caulk or silicone sealant to create a watertight seal. This prevents water from penetrating between the trim and the bathtub or wall, reducing the risk of leaks and damage.
In addition to its functional benefits, bathtub trim contributes to the overall appearance of your bathroom. By choosing a trim that complements the style and color of your bathroom decor, you can create a cohesive and visually appealing space.
Regular maintenance of bathtub trim is essential to ensure its longevity and functionality. Clean the trim regularly with a mild detergent and warm water. Inspect the caulk or silicone sealant for any cracks or gaps and reseal as necessary to maintain a watertight seal.

10 Bathroom Makeover Quick And Easy Bathtub Trim Tub Skirt

Non Wood Quarter Round For Around The Tub And Shower Vinyl Plank Flooring Bathroom Installing Floor Trim

10 Bathroom Makeover Quick And Easy Bathtub Trim Hometalk

How To Finish Vinyl Plank A Bathtub

Quarter Round In Front Of Tub Bathroom Makeover Floor Molding Vinyl Flooring

Diy Tub Skirt Decorative Panel For A Standard Soaking

10 Bathroom Makeover Quick And Easy Bathtub Trim Hometalk

Closed The Gap Between Old Floor And New Tub With A Bit Of Plastic Door Sill Trim Should Stop Cold Basement Draft Molding Flooring Bathtub

Diy Tub Skirt Decorative Panel For A Standard Soaking

How To Add Decorative Moulding A Bathtub The Home Depot