Essential Aspects of Old Style Bathtub Faucet Repair
Old style bathtub faucets add a touch of elegance and charm to any bathroom. However, like any plumbing fixture, they can experience wear and tear over time, leading to leaks, drips, and other issues. Repairing an old style bathtub faucet can be a daunting task, but with the right knowledge and tools, it's a job that can be tackled by most DIYers.
In this article, we'll cover the essential aspects of old style bathtub faucet repair, including identifying common problems, gathering the necessary tools and materials, and step-by-step instructions for fixing various issues. Whether you're a seasoned plumber or a first-time DIYer, this guide will provide you with the information you need to restore your old style bathtub faucet to its former glory.
Troubleshooting Common Problems
Before delving into the repair process, it's important to identify the root cause of the problem. Here are some common issues with old style bathtub faucets and their potential causes:
- Faucet leaks: Worn out washers, O-rings, or gaskets can cause leaks.
- Handle stiffness: Mineral buildup or corrosion can make the handles difficult to turn.
- Dripping spout: A worn out cartridge or a faulty seat washer can lead to a dripping spout.
- Low water pressure: Clogged aerators or sediment buildup in the pipes can restrict water flow.
Gathering Tools and Materials
Once you've identified the problem, gather the necessary tools and materials for the repair:
- Adjustable wrench
- Phillips and flathead screwdrivers
- Hex key (Allen wrench)
- Plumber's tape
- Replacement washers, O-rings, or gaskets (as needed)
- Faucet handle repair kit (if needed)
- Cartridge puller (if needed)
Step-by-Step Repair Instructions
Now that you have the tools and materials ready, let's dive into the repair process:
- Turn off the water supply: Locate the shut-off valves under the sink or behind the tub and turn them off to prevent water from flowing into the faucet.
- Remove the faucet handles: Use a screwdriver to remove the screws holding the handles in place. Pull off the handles carefully.
- Replace washers or O-rings: If the leak is coming from the base of the handle, replace the washer or O-ring. Use an adjustable wrench to loosen the packing nut and remove the old washer. Install the new washer and tighten the packing nut.
- Repair handle stiffness: If the handles are stiff to turn, disassemble them and clean the components. Apply a small amount of plumber's grease to the moving parts.
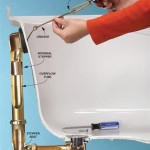
- Replace a dripping cartridge: Turn on the water supply and pull the spout straight up to remove the cartridge. Use a cartridge puller to remove the old cartridge and insert the new one.
- Clean clogged aerators: Remove the aerator from the spout using a wrench or pliers. Clean the aerator under running water and reinstall it.
Conclusion
Repairing an old style bathtub faucet is a manageable task with the right knowledge and tools. By following the steps outlined in this guide, you can restore your faucet to its original functionality and enjoy a leak-free, dripping-free bathing experience. Remember to always turn off the water supply before starting any repairs and use proper safety precautions to avoid injury.

How To Repair A Delta Tub Shower Valve

Antique Faucet Repair

Antique Faucet Repair

Bathroom Repair How To A Push Pull Faucet

How To Repair A Leaky Tub Faucet Today S Homeowner

11 Easy Steps To Fix A Leaking Bathtub Faucet

Repair Leaky Shower Faucet

Old Delta Shower Faucet Repair Made Easy

Dripping Bathtub Faucet In 1920s Home

How To Fix A Leaking Bathtub Faucet Diy Family Handyman
Related Posts