Bathtub Grout Repair: A Comprehensive Guide to Restoring Your Bathroom
Grout, the thin cementitious material that lines the gaps between bathtub tiles, plays a crucial role in waterproofing and preventing moisture damage. However, over time, grout can become stained, cracked, or discolored, compromising its integrity and potentially leading to costly repairs. If you're facing bathtub grout issues, here's a comprehensive guide to help you restore your bathroom to its pristine condition:
1. Assessing the Damage
The first step is to thoroughly inspect the grout to determine the extent of the damage. Check for cracks, stains, or missing pieces. If the grout is slightly discolored but structurally sound, cleaning may suffice. However, if the damage is significant or involves crumbling or mold growth, it's best to replace the grout.
2. Choosing the Right Grout
When selecting a replacement grout, consider the type of tiles and the traffic in your bathroom. For areas with heavy use, such as showers, an epoxy grout is recommended for its superior durability and water resistance. For ceramic or porcelain tiles, cementitious grout is an affordable and versatile option.
3. Preparing the Surface
Before applying new grout, the existing grout and tiles must be thoroughly cleaned. Use a grout saw or utility knife to remove any loose or damaged grout. Scrub the tiles with a bleach solution to remove stains and kill mold. Allow the surface to dry completely.
4. Applying the Grout
Mix the grout according to the manufacturer's instructions and apply it using a grout float or trowel. Hold the float at a 45-degree angle to the tile surface and press the grout into the gaps. Avoid overfilling the joints.
5. Smoothing and Finishing
Once the grout is applied, use a damp sponge to smooth the surface and remove any excess. Use a grout sponge or a small brush to create a concave joint, which will prevent water from accumulating on the surface.
6. Allowing Curing Time
Grout typically takes 24 to 72 hours to cure. During this time, keep the area dry and avoid walking on the grout. A fan or dehumidifier can help accelerate the curing process.
7. Sealing the Grout
Once the grout has cured, apply a grout sealer to protect it from moisture and stains. Choose a sealer specifically designed for your type of grout. Allow the sealer to dry completely before using the bathtub.
Conclusion
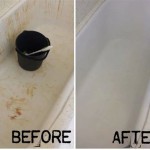
Bathtub grout repair is a straightforward project that can significantly enhance the aesthetics and functionality of your bathroom. By following these steps and using the right materials, you can restore your grout to its original condition and prevent future damage. Remember, regular cleaning and maintenance are key to keeping your grout looking its best for years to come.

Multiple Options For Fixing Ed Grout Around A Tub The Seattle Times

Help There S Ed Tile Grout In My Shower Memphis Bathtub Refinishing And Reglazing

How To Repair Tile Grout In Bathtub Bunnings Work Community

Best Ways To Keep Your Bathtub Looking Clean Tile Grout Cleaning Sealing Caulking Services For Denver

Installing Caulk Strip Over Ed Grout

Can You Use Grout Instead Of Caulk Around Where The Tile Meets A Tub Quora

How To Repair Tile Grout In Bathtub Bunnings Work Community

Grout Cleaning And Repair In Austin Tx Miracle Method Of

Proactive Tile Water Damage Repair The Grout Medic

Recaulking Services Caulking Contractors Grout Medic
Related Posts